Showing posts with label A Gift a Day. Show all posts

Wednesday, December 20, 2023

Christmas 2023, Gift 4: Sourdough Bread

Today's gift is the bulk of the gifts I am giving this year.  Immediate family is getting a loaf of sourdough bread per household this year as I want to spread the sourdough love :).  Sourdough starter, to me, has become as precious as any precious metal people can name.  Sourdough really is the best bread.  I've tried so many recipes over the years, but once I started baking with sourdough I'm not going back to other methods of baking bread if I can help it.  

I use King Arthur Flour's Rustic Sourdough Bread Recipe, but a while ago I made a change to the method because the original recipe has you bake it in the oven on sheet pans, which works, don't get me wrong, but I prefer the dutch oven method of baking sourdough as it gives a superior product.  After the bread has gone through it's first initial rise, I get two bowls and place parchment paper in them and then form the dough into two circular loaves and place in the bowls (I use my kitchen scale, I will readily admit, to make sure the loaves are pretty much the same size) and then set a timer for 1/2 an hour for the bread to rise in the bowls (cover bowls with plastic wrap or a damp towel).  

While the bread is rising, I place two 3 quart cast iron dutch ovens in the oven to heat up while the oven preheats to 425 F.  After the 1/2 an hour is up and the bread has risen, I score the top of the loaves with a knife (I like to just do a good old "x" on the top).  Remove the dutch ovens from the oven and place on the stovetop, carefully removing the lids (be careful to remember that those suckers are now 425 degrees so you don't get burned...I've heard horror stories).  Then I lift the bread, parchment paper and all (lift by the parchment paper) and CAREFULLY place the loaves of bread into the dutch ovens.  Place the lids back on the dutch ovens and put back into the oven.  Bake for 30 minutes and then remove the lids.  Bake for an additional 10 minutes.  Remove dutch ovens from oven and then remove the bread carefully from the dutch ovens (I lift them by the parchment paper) and place on cooling racks to cool (remove the parchment paper after you get them onto the cooling rack).  Wait for the bread to cool for at least an hour before you cut into it for the best results (confession:  A lot of times we make it about 20 minutes and then start slicing into it).  

I don't do large scale sourdough starter, so baking sourdough loaves for everyone has actually taken a decent amount of time this year.  I'd use a cup of sourdough starter, feed my starter, wait for it to get happy and then put back into the fridge until the next day, put the starter out on the counter to get warm and happy and start the whole process over again.  After the loaves cooled I placed them in heavy duty bread bags, I use these (affiliate link!) as they are the best bags I have found that help to keep the bread safe and fresh and used the ties that came with the bags to seal them.  I then just stuck all of the loaves, as I made them, into the freezer for Christmas Day (so they don't have time to mold before than or get stale).  I hope the family likes them as sourdough really is a labor of love :).

So, yeah, pics are of a couple of rounds of sourdough I'd done right before I went to put them into the freezer.  I only have one more round of sourdough products to make and I'm done with Christmas gifts (woohoo!).

Enjoy all!

Tuesday, December 19, 2023

Christmas 2023, Gift 3: Crocheted Christmas Tree Ornament

I can't take credit for this gift idea.  I saw an ornament like this on Pinterest and thought it looked cute, easy and quick.  And I was right on all accounts!

If you can knit a long row of stitches and bind off or you can crochet a single chain of stitches with any type of yarn you like, you can make these.

I just took a chunky yarn I had, crocheted a straight line and as I went I kept folding the chain I'd done over itself in a wavy type of line to make the Christmas tree.  When I had it the length I wanted (and the tree was big enough for my tastes), I finished the chain, tied off, and then went to work with the line I made.  I took another type of yarn I had in my stores in brown and then I made the Christmas tree on a flat surface so it was all lined up right.  I then took my crochet hook and went down through the tree in the middle so the hook came out of the middle of the bottom "branch" of the tree.  I then cut a length of my brown yarn so it was a decently long amount (better safe than sorry, I say) and knotted one end well so it wouldn't slip through the crocheted stitches that made up the tree.  I then just started slowly pulling the crochet hook back through the tree with the brown yarn in tow.  I'd stop between every layer and carefully put my crochet hook down (with the rest of the tree still on it) while I knotted the brown yarn in between the layers to create a "trunk" for the tree.  From what I saw on Pinterest you could also use beads for this, but I couldn't find my beads, so I just went with good old knots instead.  Once all the layers were done, the tree was essentially knotted together and done, but the ends of the tree looked weird just kind of hanging out in space, so I took a bit more green yarn and tied the hanging ends onto the branch above or below to make it look better.  I then crocheted a little trunk for the tree (not necessary if you aren't experienced enough to do that) and then tied a hanging piece of yarn to it and voila!  Tree ornament!

The time this took was nothing, honestly, as I'm decently fast at crochet now a days.  The biggest thing I had problems with was the green yarn LOVED to fray and separate on me, so I was having to be slow and careful to pull the yarn through the center of the tree.  Overall, though, I think it turned out cute and didn't take up a lot of time.  This went into a gift box with some of the cinnamon applesauce ornaments and another gift done!  Yay!

I am sure there are more in depth patterns for these online if you do a quick search.  I just eyeballed mine.

Enjoy!

Friday, December 15, 2023

Christmas 2023, Gift Two: Roasted Candied Nuts

This is a recipe that I made up years ago when I ran a recipe blog to help me cope with my kids various food intolerances and allergies at the time (I am truly thankful that today we only have to deal with the peanut allergy when it comes to food instead of the garlic, corn, oat and other things I had to deal with back then).  I made this around the holidays after thinking back on my time working in the college program at Walt Disney World (short version of that story:  I did not have an enjoyable experience) and the roasted candied nut cart they used to have at Epcot Center where I fell in love with roasted candied nuts.

I have made these a few times throughout the years and decided to make some to give away in small baggies as kind of a snacky type of gift for a few people with a few other gifts.  This was also a way to use up some nuts that had gotten buried in my freezer and I wanted to use up without me eating them all *ahem*.  

A few things I learned this year with this recipe.  One:  This recipe had always turned out well for me in the past with the previous ovens I had, but I think I over browned the sugar mixture on the stovetop the first time I made it and so when I went to roast them in the oven the outer edge nuts ended up burning on me (which will make a nut lover like me want to cry) and I hadn't even roasted them the full time yet.  So, do watch these when they are in the oven as nuts love to burn (which sometimes we just have to remember those lessons).  I made a second batch and was way more careful watching them and they turned out well, (however I still had to pull them after the first initial roasting) so, once again be sure to watch them as oven temperatures vary.  The last bit of roasting with the 300 degrees is basically to help candy the mixture, but if the mixture when you stir it after the first initial roasting, is sticking to a spoon and getting hard quickly like candy, feel free to pull the nuts as the candy mixture is set up and ready to go at that point.

So, here you go folks.  This recipe does not call for sugar, instead it calls for maple syrup and honey (when this was written was the start of people avoiding refined sugar), which lends it a wonderful flavor.  I also have started, when making this, to coat the final nuts in powdered sugar for added "snow like" effect.


Roasted Candied Nuts
  • 2 Cups pecans or other nuts
  •  1/4 cup maple syrup
  • 2 TBS honey
  • 2 tsp. vanilla extract
  • 1/2 tsp. kosher salt
  • 3/4 tsp. ground cinnamon
  • pinch to 1/4 tsp (depending on heat preference) Cheyenne pepper
Procedure: 
1.  Preheat oven to 400 degrees F

2.  Combine maple syrup, honey, vanilla and salt in a large saucepan and cook over medium heat until mixture reaches a near boil.  Add cinnamon and Cheyenne pepper, stir well and then add nuts to mixture.  Stir well till all nuts are coated with the mixture. 

3.  Bring mixture back to a simmer.  Pour nuts onto a well greased parchment lined baking sheet that has a rimmed edge (grease pan, place parchment on pan and then grease parchment...trust me this stuff is sticky).  Be sure to spread nuts into an even layer on baking sheet.  Place in 400 degree oven for about 7 minutes or until nuts start to smell nutty.  Stir nuts.

4.  Lower heat to 300 degrees. 
5.  Keep roasting and stirring nuts every few minutes until sugar mixture turns deep brown and clings to the nuts.  Remove pan from oven and let nuts cool on pan.  Mix nuts a couple of times as they cool (it'll stop them from sticking together as they cool).  You can also sprinkle a little more salt on the nuts before they cool (if you like a bit of a salty flavor), but be gentle with it as you don't want the salty taste overpowering your sweet.  Once cool, break nuts into individual nuts (or cluster sizes you like) and toss with powdered sugar (optional).
6.  Place in a bowl and store at room temperature and serve or place in an airtight container for up to a week or place in decorative containers of choice (small cellophane bags are really cute with this) and give away as gifts at the holidays.

Enjoy!!! 

Wednesday, December 13, 2023

Christmas 2023 Gift One: Applesauce Cinnamon Ornaments

This is one of those recipes that is so easy that it will blow your mind, but also comes together in a really pretty and rustic type of decoration.  I first made these ornaments years ago when my kids were small.  We'd just invested in a bigger tree than our little apartment tree we'd used for years and I had next to no ornaments to put onto it.  I wanted the tree to be pretty for the kids, but didn't have any money to spend for expensive boxes of ornaments.  I found this recipe and gave it a try.  And I loved it!  The ornaments will make your entire house smell like cinnamon, they look pretty on the tree and you can pack them away and use them year after year.  My old ornaments died years ago, due to the fact that Alvah decided he liked to eat them (PICA). Finally this year I thought back on these and decided to make them again to give some as gifts for his speech therapists and others.  So, let me show you how to make them!


Applesauce Ornaments

Ingredients:

  • 1 Part Applesauce
  • 1 Part Cinnamon
  • Optional add ins:  A few dashes of nutmeg, cloves, other spices.  


Procedure:

1.  Preheat oven to 200 degrees F.

2.  In the bowl of a mixer, with a spoon (which is what I did this time) or other implement, mix the applesauce and cinnamon together to form a dough.  Go slow if you use an electric mixer of any type or you will be inhaling way too much cinnamon for comfort and you will have a cinnamon coating over your entire kitchen.  Once dough forms, mash it into a ball with your hands and, if you have a decent amount of dough, divide it into a few pieces so you don't have to roll out too much at once.  Put dough ball you are working with between two pieces of parchment paper (you can also use plastic wrap, but I have better luck with parchment paper).  

3.  Roll out dough to 1/8 to 1/4 inch thickness (thicker will just take a bit more time to dry out/bake if you prefer thicker ornaments).  Cut out with simple shaped cookie cutters (trust me, keep it simple.  This dough loves to break and is crumbly, so if you try to get too elaborate you'll be reaching for the eggnog wayyyyy too much to battle frustration).  Use a straw to cut a hole in each ornament so you ave a hole for string later on (after about three ornaments blow out the dough that will get caught in the straw to keep the straw open...it will help your holes cut cleaner).  Use a spatula to transfer ornaments to parchment lined baking sheets (less likely to break that way).

4.  Bake in 200 F oven for two hours or until the ornaments are well dried.  Remove to cooling racks to cool completely.

I used 1/2 cup of applesauce and 1/2 cup of cinnamon for my batch this time around and I ended up with about two dozen ornaments.  Not bad at all.  

Alternate method (non bake method):  Place ornaments on baking sheets and place somewhere out of the way that is dry for 3 to 4 days or until ornaments are well dried.

Tuesday, December 20, 2022

Christmas Gifts 2022, Gift 5: Hot Buttered Rum Mix

This is a gift that I made for my husband, mainly as a means to make him something special that he wouldn't be expecting.  When he gets sick, under the weather or just is looking for something comforting hot to drink on a cold winter's night, he has liked making himself a hot buttered rum in the past.  I tried, a while ago, to make a mix for him, but it was made with ice cream and came out too rich and just kind of not great.  So, this time around, I searched for a more traditional version of the mix for him.

I found this recipe that worked perfect for me as it called for butter, brown sugar, maple syrup, some spices and vanilla extract.  All of which were things I had on hand.  It was a stupid simple process to put together and it came together really fast, which was a double bonus for me as I need fast things to make right now if I can find them.

This has to be stored in the fridge or freezer, just to warn you.  I put mine in wide mouth mason jars and stuck them in the wayyyyyy back of the fridge, unmarked, so that I can hopefully pull them out and surprise my husband with them on Christmas.  I'll them mark them and move them to the freezer for long term storage (although they'll last indefinitely in the fridge, I still prefer to go the route of the freezer for the sake of security).  

So, if you have all the ingredients on hand and are looking for something fun, with a lot less fake ingredients than the stuff you buy at the store, go and make this for someone.  I doubt they'll expect it :).  

Monday, December 19, 2022

Christmas Gifts 2022, Gift 4: Lavender Sachets

This is a gift to a friend of my daughter's...well really her friend's mom.  Her friend's mom loves heavily scented things, so I thought I'd use the lavender that I had gotten in my CSA box this summer (which I was honestly trying to figure out what to use it for) to make a couple of lavender sachets for her for Christmas and I'd put it in the gift along with some cookies for her friend.  

These things can't be easier to make.  If you have any nice scented things like herbs, rose petals or the like, all you really have to do is make some squares, sew them up until you have just a large enough opening to fit the things in that you want to add that smell nice (like I just left a big enough opening for a funnel so I could pour the lavender buds into the sachets), sew up your opening and bam!  Done!  I didn't fill the sachets super full so that they could be fit into a drawer with some clothes or something without getting in the way of things, but made the sachets big enough and out of bright enough material that they could (hopefully) be easily seen in a drawer if someone needed to move them or something. 

I used the same Christmas fabric I used to make the cup cozies out of and used some other left over bias tape I had around the house to make a bow for them.  Not a super hard gift to make, but hopefully one that they will like none-the-less.

Sunday, December 18, 2022

Christmas Gifts 2022, Gift 3: Handkerchiefs

This is one of the those gifts that is totally unexciting, but really practical and useful and, most importantly, desperately needed.  I haven't made handkerchiefs for my husband in a few years and it was definitely showing with how torn, worn and grody looking his handkerchiefs were getting.  So, I decided to make him some more handkerchiefs this year. 

I just used one of his old handkerchiefs to make a pattern from and just made sure to give myself a 1/2 inch seam allowance per side (I just eyeballed it, honestly).  I did find this tutorial that breaks down different dimensions, how to cut the fabric, how to sew the handkerchiefs by hand or by machine if you are interested in making them for someone for Christmas.  Old sheets or pillowcases are great to make handkerchiefs with if you can find fabric on them that looks nice.

I ended up digging out what I had left of my white muslin fabric in my stores to just make as many handkerchiefs as I could.  It ended up making fourteen handkerchiefs in all, which will hopefully last my husband a while before I have to buy more fabric.  

I used some bias tape I had leftover from another project to wrap the handkerchiefs with a pretty bow (still can't find any ribbon).  

So, yay, two family gifts down.  At least I'm making progress!

Saturday, December 17, 2022

Christmas Gifts 2022, Gift 2: A Quilted Throw

When it came on what to make for my son this year, it was kind of rough figuring it out.  He's grown TONS this year and is now over six feet.  He LOVES blankets and always has, so I thought that would be a good idea.  I did have to think hard about what I could make a blanket out of as my fabric stores have slowly gotten smaller and smaller over the years (or have gotten buried in my bedroom closet somewhere *sigh*).  I had some fleece, but nothing long enough to make a throw work.  I had some fake lamb's wool fabric that I thought would make a good backing for a blanket, but once again, not enough to make a throw out of.  

I finally looked at the flannel shirt fabric you see above.  If you are someone who has been reading this blog a looonnnnggg time you'll notice that this is the same fabric I bought back in 2015 that I've been slowly using tiny bits of over the years for this or that, but this was the first really big project I used the fabric on.  I pulled out some batting I had bought with Christmas gift cards from family last year to make a quilt out of and sacrificed it to make him a quilted, extra long, quilted throw to wrap up in when he feels the need.  I used some nice thick cotton batting for the throw as well, so it weighs a bit, which he will like as well.  The material on the bolt was decently wide on it's own, so I decided to be lazy and just went with the width of the bolt for the width of the throw and then just made sure the thing was a bit longer than a twin sized quilt.  Cutting it out in small spaces was the hardest part of the entire project.  With the built in lines on the fabric, quilting it wasn't that bad as I could just follow a straight line on the fabric to sew it (yay for easy).  It was kind of challenging to quilt something so big.  My sewing machine has been moved all over the house over the years due to lack of room and now with the wood stove being put in, it is currently stuck in a space against my living room railing with barely enough room for it to fold down and get plugged in.  So, shuffling the throw around to quilt it was kind of a pain, but it got done!

I just folded it up after washing and drying it and used what little bit of ribbon I could find to wrap a bow around it (I have NO idea where I put my ribbon...I've torn the house apart, but no luck.  I know I'll run across it after the holidays when I don't need it anymore, as is the way of things in the universe).  He's been lying on the folded up throw, so I'm thinking he might like it.  Here's hoping :).

So, family member one off of my list and I was somehow able to get it done in a day.  And now onto the husband and daughter and others on the list!

Friday, December 16, 2022

Christmas Gifts 2022, Gift One: Cup Cozies

So, for our first gifts of this year, I wanted to make something kind of special for my daughter's boyfriend's family.  The daughter and her boyfriend have been friends since they were really little, so we've gotten to know his family rather well and they are super sweet people who give us some fun things every year.  Last year they even gave us some honey from their bees!  So, I wanted to return the favor and wanted to do a bit more than just making them cookies like we did last year.

When I was going through my material I found the beautiful snowflake material you see above and knew this was the year I wanted to make something with it.  I then looked over at a pair of jeans that had torn out at the zipper but the denim was still in really good shape in the legs that I could use for fabric as well and thought, "Bingo"!  I went online and found this free pattern for cup cozies and it had a really easy tutorial to follow.  So, I printed off the pattern and decided to use the pattern for the hair elastic and button version, but instead of hair elastics I had some really thin elastic you'd lose in clothing that I got from my step-mom a while back as I didn't really have the money to go out and buy hair elastics special to use for the project (yup, broke we be :).  I used buttons that I had in my button jar and I used some scrap fabric to use for the batting.  The results were some actually really nice cup cozies that are decently thick and will protect your hands well from heat.  You can even make the cozies wrap around a mug if you fish the elastic through the hole for the handle...it's a stretch but I tried it out to make sure.  

Some quick ways to make these cheap.  One, if you use some thick denim from some old jeans (my torn pair weren't the thickest denim) you could skip the batting piece, which would cut down on time too.  For the top material you could use an old pillow case, old sheet or other materials you have around your house, so long as it looked nice.  So, use your imagination on that one!

So, hopefully they will find the cozies useful.  I made four more than seen above to give to others as well (and have a few more to go).  It is a decently quick project that you can complete in between this and that.  Cutting the pieces of fabric was actually the most time consuming part of the process, but they came together decently quick.  So, I have to say it was nice getting at least one gift down already.  Now onto others!

Thursday, December 15, 2022

December Happenings and Christmas Gifts 2022

This is one of those years where I am counting down the days until it is over.

What a year.

The latest that happened this month was a doozy.  My daughter woke up one morning with her eye swelled up.  This has happened randomly in the past.  We never could really pin down what would cause it to happen, but you would give her a Zyrtec and it would be fine.  

Not this time.

The allergic reaction went out of control.  Despite me pumping as many antihistamines as I could safely give her, it just got worse.  She went to bed that night with me a bit worried because she still had a swollen spot under her eye, but it wasn't getting worse, so I prayed that with the medications in her and some sleep she'd feel better.   It didn't work that way.  She woke up with her eyes nearly swollen shut, her face one big raised welt and hives and welts breaking out over her whole body.  We ended up in Urgent care and then the ER that day.  An IV of Benadryl and some steroids and then a prescription for Zyrtec and steroids was the result that day.  Fast forward a week later, after the first round of steroids was done and the reaction came back, although it never went away to begin with.  Finally we ended up at the Urgent Care last Sunday to try and avoid the wait at the ER (if the Urgent Care saw her first and would send her onto the ER the wait was a LOT less we found) and they ended up giving her a shot of steroids and an albuterol treatment because she had a rasp to her breathing they did not like.  

I, during the entire thing, worked on getting ahold of an allergist to get testing and things done so we can figure out what caused this and get it out of my daughter's environment, but no one was returning my calls.  Our pediatrician, true rock star that she is, got us a script for an epi-pen for Armina and sent in referrals with a request to bump her up the wait list due to the way things have gone the last few weeks.  Hopefully I hear from the allergist soon.  The Urgent Care put Armina on a really strong dose of prednisone this last go round, which finally got her face to go down and got rid of the majority of the welting on her body, but the script made her sick to her stomach so she's been working to keep things down this week.  The poor thing has been so miserable.  I'm praying we are over the worst of it for now and that it'll be okay until we can get into an allergist.  Please, pray for her on this.  We need all the help we can get!

Combine that with a record breaking snowfall and then the wind picking up while it snowed again and drifted snow in HUGE amounts.  It's been rough around here.  This was the view outside of my deck door when we got up in the morning...


It was bad.  My husband ended up spending the entire day shoveling 5 to 7 foot drifts of snow off of the deck and roof, after he tunneled across the yard, up the deck stairs one at a time and things first, of course.  He had a really crappy day of snow removal and he still has to shovel off a few more vehicles and things. 

Oh and my washing machine died.  Luckily, we had our old one that my husband was able to figure out the going off balance issue and we reinstalled it in the laundry room for the time being until he can find a bigger machine for me that works (the other one blew it's motor from what my husband was able to diagnose).   

I'm just praying that Christmas vacation for my husband goes well this next week.  We could all use just a relaxing, no stress, break from everything around here right now.  Here's praying.

On the practical side of things, I just out and out told my family that I couldn't afford to send them gifts this year, which was the honest 100% truth.  My mom actually appreciated it as she lost her job a few months ago and her budget on Social Security is pretty tight now a days.  I feel guilty not sending gifts as my brother and younger sister are actually really nice and generous at the holidays, but I knew that if I sent them gifts that I'd have a hard time affording it and now with medical bills coming down the pike (plus hopefully the allergists bills on top of it), it is going to be really tight around here.  I just hope my daughter feels better as this whole situation is just terrifying for her and the rest of us.

I decided to make the husband and kids gifts this year for the sake of the budget, because I actually do enjoy doing it and the family seems to like it too.  It was so crazy around here it is a miracle that I've actually figured some stuff out in that area as we haven't even hung up all of the Christmas decorations yet.  While looking through material and things, I did find some Christmas material that I hadn't used for anything yet and some other remnants and decided to make some gifts for some friends and family that are in the immediate area.  I've found things like making gifts right now is actually kind of calming me down and distracting me, which I'm grateful for at this point.  I'm also hoping to bake a few things for gifts this year as well (aiming for simple there too).  Hopefully things will be calm enough for me to do that.  I'm aiming for things that are easy to sew and bake and projects that are quick as well as that is what I can do in this stage in my life.  I'll share what I do and link to patterns and things as well in case you want to try them yourself (trust me, I'm aiming for free patterns this year, so it'll be affordable for you to do as well) and share some money saving tips on how to make things special, but cheap if I can.

So, yeah, that is the update for today.  I'm hoping to start the Christmas Gifts for this year tomorrow if I can so you have time make some of them if you want.  Barring anything else happening *knock on wood* I'll see you then.  And Happy Holidays.  I hope, even though most people are keeping it simple this year (us as well) that you can find the holiday spirit and wrestle some fun from this season.

Monday, December 20, 2021

Christmas 2021, Gift 2: Some Pretty Throw Pillows


Man, getting gifts done this year has been a constant battle!  I spent all of Saturday, a day I really wanted to make a bunch of gifts for the family, working on getting printers set up so that the daughter and husband could make some gifts.  After rebooting networks, finding and replacing ink cartridges, getting print heads aligned and cleaned and everything else, the day was pretty much shot.  Sunday, my son hadn't slept Saturday night, so I was not functioning so well, but I managed to get basics done, like housework.  So, being super productive and getting a bunch of gifts made hasn't really happened.

Bright side, I did find time to quickly get a gift finished for the daughter in the middle of all of the chaos, although it wasn't really a hard gift to do, so let's catalog that anyway!

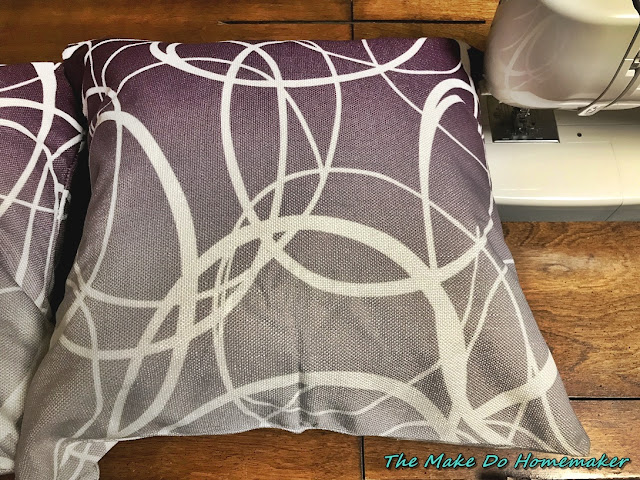
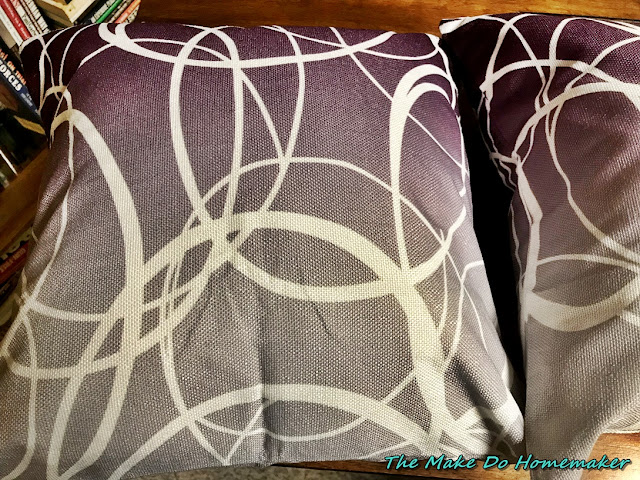
A while back, I found a good deal on a couple of pretty slip covers for cheap and they have sat in my closet for months.  One of the main things my daughter asked for Christmas early this year was some new throw pillows as the ones I made her in the past are really on their last legs (like one of the pillows I made for her the actual material is starting to develop holes...usually a good indication that the pillow is at the end of its life cycle).  I did my best to mend her current throw pillows and told her I'd aim to get her new ones for Christmas.  So, when I saw these pillow covers, I had to get them for her and make her some replacement throw pillows.  


The pictures really don't do them justice.  The pillows have a pretty graduated pattern of purple to them that fade out into a really light purple grey.  It would have been better as pink (since that is the daughter's favorite color), but I was willing to settle on the color since it was so pretty.

So, I took some leftover unbleached muslin that I had from another project and some stuffing/filling I had and was able to make two pillow forms to fit the pillow covers in no time flat.  The pillow forms aren't perfect, but they are going to spend their lives stuffed into a pillow cover, so I was perfectly content with that *laugh*.  I couldn't really make the pictures pretty before taking the photos of the finished pillows, sorry to say, as I was in a tremendous hurry to stuff said pillows into a big box and get it wrapped before the daughter saw what I was doing, which was harder than I thought it was going to be.

So, two gifts down for the year.  I really don't know if I'll be able to do much more, honestly, as my husband came down with a cold last night and went down hard.  He's pretty miserable.  So, I'm not sure how much I'm going to get done in the gift department when I'm just trying to keep the son from going into my bedroom and waking my husband up.

So, two gifts down for this year.  Here's hoping I can get a few more done before the big day. 

Wednesday, December 15, 2021

Christmas 2021, Gift One: Home Made Lip Balm


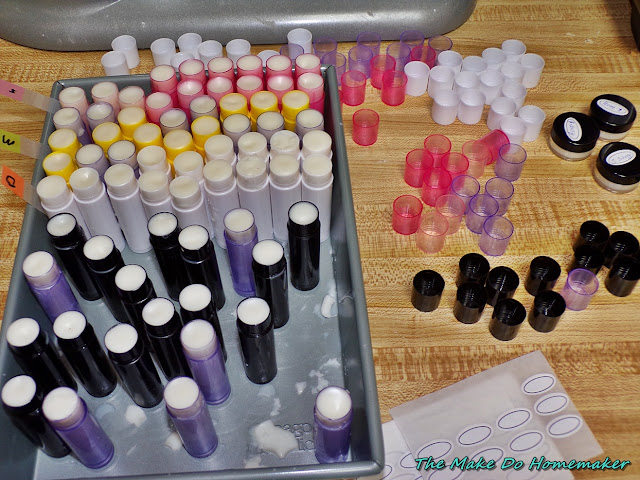
When it came to making gifts this year, I decided I would go in a different direction with a few gifts for the family.  So, this year I made lip balms/chap sticks in bulk for my husband and kids.  The main reason there are so many in the photo above is that my son has taken a liking to eating chap sticks over the last year.  I suspect it is because he won't eat...you know...food...so he craves the fat in the chap sticks as he keeps growing every time I look at him.  I've been sourcing all natural options that contain coconut oil and things basically as a sneaky way to sneak "good" fats into his diet versus goodness knows WHAT that is in the good old chemical laden ones, but MAN that gets expensive fast.  So, I decided to dust off of my "I need to make everything because my child is allergic to everything" gloves and ordered the materials to make my own lip balms in bulk for this year's Christmas gift to my family.  And, bonus, this way I'll definitely know what the son is consuming whenever he eats one as there are three ingredients, basically.

I will link to the recipe that I used and to the materials I bought.  Mind you, I went as cheap as I could to source the materials and I wanted a good volume for my buck, so this would give you enough beeswax and coconut oil to probably make lip balms for an army, so just be aware of that when you purchase.  

Note:  The following posts contains NO Associate fee links.  I'm just sharing.  If you wish to support the blog via Amazon purchases, please feel free to hit up the link on the right side of the blog and order whatever you want through the link.  Amazon will give me a small commission for pointing the sale their way if you order through that link and it will cost you nothing extra to do.  If you support the blog in this way, thank you :).

For this Christmas gift I went and purchased the following materials (over like four or five months so as not to break the bank):

  • 105 Pack of Lip Balm Tubes (Assorted Colors)
  • I also got these:  Lip Balm Containers, but man they are TINY.  I won't be buying those again, I doubt.
  • BetterBody Foods Organic Naturally Refined Coconut Oil, 56 oz (I went with refined to avoid the coconut flavor as the son gets funky about these things and my husband prefers neutral flavors in chap stick). 
  • Howemon White Beeswax Pellets, 2 lb bag (Note on this:  Some people were complaining about a chemical smell with the pellets and said they weren't true beeswax.  I didn't have any of those problems.  Mine smelled like nothing offensive and melted just like the refined beeswax pellets I've used in the past, but with shortages your mileage may vary on quality with different sellers on Amazon and things.  I wanted white because I knew my son wouldn't even let me near him with a yellow lip balm.  Anyway, use your own judgement on this product).

I used flavoring oils I already had in the house to flavor different lip balms.  I have to say, if you have a choice, go with the essential oils as they are more powerful and I think work better.  I ended up using at least 20 drops of flavoring oil per batch and the lip balms STILL barely taste like anything.  

The recipe I used to make the lip balms is Coconut Mama's Recipe and I just made a recipe with each flavor.   I found I got 16 lip balms out of each batch versus the yields she shared on her blog, but it might have been variances in materials that caused that to happen (or I'll find huge air bubbles in my lip balms when we go to use them, which would make me feel awful, but I doubt it).   I used olive oil I already had in the house for the third oil :).

Overall, I made four flavors and got a ton of lip balms to put under the tree for the family this year and also have enough materials to make a ton more, so I'd say it was worth it :).

How about you?  Making any gifts so far this holiday season?  My family is going crazy with the home made gifts this year, which I'm loving.  My daughter is making gifts for everyone in the family and some extended family too and even my husband has gotten into making gifts this year.  It is cool :).

Sunday, December 23, 2018

Chrismas 2018: Gifts to the Family


Welcome to the second, and final, post on the gifts I'm giving for Christmas to the kids and husband this year.  I am going to do some things late or finish up a few gifts later on, but for now I'm just going to call what I have done good and feel grateful that I was able to get done what I did.  I am happy with what I did get done, anyway :).

So, let's get to the gifts I'm giving and/or made for the family this year!

First up let's start with the gifts I'm giving to my daughter.  I aimed for two gifts per person this Christmas.  I was going to aim for four, but just ran out of time, so embroidered pillow cases for the kids, some handkerchiefs for the husband and such are on the agenda for hopefully this coming week, but here's the two gifts that are currently under the tree.

First up we have a brush/art roll I made for my daughter.  I used materials I had on hand for everything I made this year, so I used some canvas material I had, a remnant of quilt binding that I had for the ties and binding and for the smaller pockets, I was originally going to make some out of canvas and then embroider them myself, but due to the time constraints I changed my mind.  Instead, I used an old pair of embroidered jeans that my daughter loved from when she was younger and cut out the embroidered parts, zig zagged around the edges and then sewed those on as pockets for smaller brushes or other art supplies.

I thought, overall, that it turned out pretty well and I think my daughter will like it.  She's getting some brushes and other painting supplies for Christmas, so I wanted to make sure she had a really nice place to put them all.

Next up isn't a gift I made, but one that I put together anyway.  Originally I wanted to make jewelry to put into this myself, but I didn't have time, so instead I found another way.

My daughter loves necklaces now and has been asking for a jewelry box for Christmas.  I couldn't find a nice one that I liked, though, so I figured I was out of luck.  And then my eyes lit upon my old jewelry box.  I bought the jewelry box when I worked at Walt Disney World when I was in college.  It was one of the items I had found, fell in love with, and was determined to pick up before I left Disney to go home.  And so I did.  And I kept that jewelry box for years.  A while back, though, my husband got me a bigger jewelry box that I loved, so I emptied out my smaller box and had just put it up and took care of it all of this time, not knowing what I wanted to do with it, but I just didn't want to get rid of it.  So, when my eyes fell upon the box, I realized that it was a perfect opportunity to give my daughter the box that I had fallen in love with all of those years ago.

To go in it, I included a necklace I had made for my sister a lot of years ago that she had sent me a few years ago with a bunch of jewelry that she didn't want anymore that I knew Armina would like (since it's purple and all).  Then I took a few other necklaces that I was able to find at the used stores and things over the last year and voila!  Now she'll have a nice beginning jewelry box and some necklaces to start her jewelry collection.  I know she'll love that one :).

All totaled I spent 2.00 on the gift to get a few of the necklaces.

Next up are the gifts I made for the son.

First up is a panel project I found at the used store.  The panel was 1.00.  I used fusible interfacing I had around the house to use as batting for the pages and used thread I already had, so the gift cost a total of 1.00 to make.  I know that the book is a bit young for the son, but he loves to flick things, so I am hoping he'll like to flick and flip the pages on the book and hey, if he can read I'm hoping that he'll get a kick out of reading "The Night Before Christmas" and enjoy the pictures too :).

I also made the son his yearly sensory cube as he absolutely LOVES these things!  Every year he plays with the cubes until he darn near destroys them, so I couldn't let him down this year.  For the materials this year I used materials I had around the house.  Leather, cross stitch fabric, striped upholstery type of fabric, fleece,  fake fur and a shiny velvety fabric.    I think he'll really like this one.  I made this one smaller than last year  so he'll enjoy it more as he really likes the smaller cubes versus the larger ones :).


And finally is the gifts I made for my husband.  He really liked the neck pillow I made him for Christmas last year (actually we both end up stealing it from each other we both like it so well *laugh*) and so I wanted to make some more this year, but with more stuffing in them so that they'd be more supportive on the neck.  Originally I had plans to embroider them like last year, but I didn't have time, so I'll just embroider them a bit later.  I was also going to make him some tool rolls, but he couldn't remember what he wanted me to make them for, so that got put onto the back burner until he can figure out if he wants some made or not :).

So, there you are folks.  What I've been basically doing yesterday afternoon and a good portion of today.  But, yay for getting the gifts done and under the tree!  That makes me feel good anyway :).

Merry Christmas everyone!

Sunday, December 16, 2018

Christmas 2018: Gifts from Daughter


Well, I was going to start posting up one gift a day on here, but with how busy I am and how far behind on gift MAKING I am, I'm going to have to do things different this year and just kind of do a "gift dump" post as I go along to show you what we've been working on around here for gifts.  I'm in panic mode on getting gifts done on time at this point and we still have cookies to make, gingerbread houses to make and decorate, Christmas cards to fill out, Santa letters to mail off and just all the general things you should gradually be getting done in December that did NOT happen gradually this year.

So, welcome to the amended "Gift a Day" series here on "The Make Do Homemaker".  May you, hopefully, find some inspiration on what you can make for your family and friends this year in the process :).

Today, I decided we'd start off with the gifts my daughter has decided to give out, so far, for Christmas.  So, let's get to those!

 First off, up top we have some of the gifts my daughter is giving to Alvah for Christmas. 

We were at the used store right after Thanksgiving and I hear my daughter let out an excited shout.  I turn around to her trying to remove a small Snoopy from the stuffed animal rack (it had a clip on it to clip onto a backpack or something that was kind of hard to remove from the stand).  She smiled as she asked for my help and said, "Look!  It's brand new!  I want to get that for Alvah for Christmas!".  Alvah loves Snoopy and has since he was little and I was impressed with her eye for finding that one.  I helped her remove the Snoopy, which was missing a price tag, and we went up to see how much it was.  When we found out it was .50, Armina was doubly proud as she knew she was getting a gift Alvah would love super cheap.  I am so proud that I'm passing down the bargain hunting thought process to the next generation *sentimental tear*.

We were than sitting at home later that same day and Armina was brainstorming on what else to give to Alvah for Christmas (he's kind of hard to shop for, go figure) and her eyes fell upon a small bottle of water that Alvah had gotten from his teacher as part of a Halloween gift bag.  I'd drank the water and had put the bottle down on the table and Armina snatched the bottle up and asked if we could make a small sensory bottle out of it for Alvah as she knew he liked the ones I've made him in previous years. 

Armina had to sacrifice a small bottle of glitter she'd gotten with a nail polish kit from one of her Aunts as I couldn't find any glitter in the house to save my life and then I helped her with the corn syrup and distilled water solution to make the glitter float.  She chose the color of the water as she wanted the glitter to really show up well (which it does) and then I super glued the lid onto the bottle.  It came out nice looking and cost us nothing to do as we had all the materials around the house to make it.

When we were at the store the next day I pulled out a coupon for a free box of Jolly Time popcorn we'd gotten in the mail for taking a survey about popcorn consumption.  Armina had helped me take the survey (I know, weird thing to do together, but I take the time with the kids when I can get it) and her eyes lit up when she saw the coupon and asked if she could have it to buy Alvah a box of his favorite microwave popcorn for Christmas. 

At this point the child was on a roll *laugh*.

I was digging around in my closet looking for a certain bunch of Christmas decorations and stumbled across a snow globe you could personalize that I had bought at 90% off at Target years ago.  I had been using a bunch of those types of gifts for years to help pad out Christmas gifts and this was pretty much the last one in the stash.  Armina asked if we could make a snow globe for Alvah to go under the tree too as Alvah really likes snow globes.  Since it was plastic, I said sure and Armina chose a Christmasy scene from the front of some old Christmas cards we had and we put the scene into the snow globe.  So, another gift down for near free (I mean I think the snow globe ended up being about .50 after the clearance discount years ago).

We then checked the mail that same day and one of my product missions came in from "The Upside" a new product testing outfit I signed up for through Smiley360.  "The Upside" just does health and beauty products and my first mission was for "Udderly Smooth" lotion.  I tried out a small amount on Alvah's eczema (a really tiny amount since you never know how his skin is going to react) and then Armina asked if we could wrap the tubes up so she could give them to dad for Christmas for his cracked heels.  She was super excited about the idea because shopping for dad is even harder than shopping for Alvah (and she does have a good point there *laugh*).

So, yeah, so far when it comes to Christmas gifts my daughter is totally whomping me on getting those done.  I'm proud of her, though.  She put thought into each gift and still managed to do it on a shoe string budget.

So, stay tuned as (hopefully) I get to share some of the gifts I'm working on around here for Christmas as well.

Thursday, December 21, 2017

Christmas 2017: Teacher Gifts and a Girly Throw Pillow


 Yay!!!  We are at the end of the gifts I made for the family this holiday season!  And I managed to do it by Christmas (I was worried this last week if I was going to make it in time).

First, I let my daughter's pleading get to me about wanting another throw pillow for Christmas this year *laugh*.  Where she will stick this on her bed I have NO idea, but I'm sure she'll figure it out (kids are great that way).

She desperately wanted a pillow with a rose on it, so instead of embroidering one onto a throw pillow (running out of time to do more embroidery and all), I went through my fabric stash and found a pink fabric with roses on it instead.  It came out pretty, I think.
While making cookies a few nights ago (thus the sprinkles in the background...the cookies are taking up the other 80% of the table) my daughter asked if we could make some gifts for her teachers at the same time.  So, I pulled out some wood clothespins and we made some reindeer ornaments out of them. I learned how to make these ornaments years ago in Girl Scouts when I was a kid and I always thought they were so cute.   I actually bought the clothespins we used on these when the daughter was in preschool to make these very ornaments and we have some hanging on our tree, so I figured it would be fun to make some for her teachers (and in my case I decided to make one for the speech therapist, the OT and the adaptive PE teacher for Alvah as well).  A red and black Sharpie for the fine detail work, some red embroidery floss for the hanger, some Elmer's glue and  voila we had some Rudolph's ready to go!

For my son's teacher I gave a couple of bags of Hershey kisses this year (bought with a coupon on top of a sale to get them for cheap) for her and the aides to split how they saw fit as I figure candy is always appreciated by most people.

Everyone loved the ornaments, so I'd say we did okay :).

Total time to Make Gifts:  The pillow took about 1/2 an hour between cutting it out, sewing it and stuffing it.  The ornaments took about an hour between gluing them all together and waiting for them to dry enough to put the faces on.  Past that it was just letting them sit overnight to dry and giving them out. 

Total Cost to Make Gifts:  Nothing.  The stuffing for the pillow was the last of the stuffing from the one pillow I stuffed pretty much everything with this year.  The fabric I had already and it was given to me originally.  The clothespins cost me something years ago, but nothing out of pocket currently and the Sharpies we already had (as well as the glue and embroidery floss).

I am super happy with what I made for the kids and husband this year, I have to admit.  It was nice having time to actually put into the projects and make them nice looking.  Now onto the rest of the week and enjoying the Christmas holiday =D.

Wednesday, December 20, 2017

Christmas 2017: Spouse/Husband Gifts

 Right, hold on, I need to do a thing.  Ready?  *Puts on Santa hat*

*Clears throat and starts to sing*

On the 12th day of Christmas, my true love gave to me...
12 handkerchiefs
*Mumbles through a bunch of lyrics*
 Three containers of whipped foot cream.
 
Two embroidered pillow cases
*Strikes dramatic pose*

 And a pillow marked with a "B" *imagine "B" is more like "Beeeeeeeeeeeee!"*
Thank you *bows*.  To quote Alf, "Ha! I kill me!"

Obviously, this post is covering what I made for my husband for Christmas, so I figured I would share via a song.

So, let's break it down by the numbers...

First I made my husband and dozen handkerchiefs, because...well he needs them.  I just used an existing handkerchief to make a pattern (I just drew a 1/2 frame around the entire handkerchief to allow for same allowances) and then I just did french seams so that the handkerchiefs would hold up to constant use without fraying or anything.

The foot cream I kind of punted on. I used to make a foot cream my husband really liked, but I didn't have about 70% of the ingredients in the house anymore, so I made do with what I had and made him a new one.   I made it with some calendula oil that I had already and then I added a tablespoon each of borage oil, evening primrose oil and black currant seed oil (since I bought those to use on the son and he didn't like the smell at all and won't let me put them on him much), added three tablespoons of beeswax pellets and then heated it all up in the double boiler until the beeswax was melted and completely incorporated.  I then added about 10 drops of lavender essential oil and another 20 drops of peppermint essential oil.  After it had all cooled to room temperature, I took some solid state coconut oil I had and mixed in a bunch of it with a hand mixer until the mixture was light and fluffy.  And voila!  Foot cream.  This will be stored in the fridge after Christmas just to be sure it'll have some staying power, but hopefully it'll help my husband's cracked heels.

The pillow cases actually got made after the neck pillow I made for him.  My husband has problems with his back from time to time, so I wanted to give him a pillow to tuck under his neck when it was bothering him and made it big enough that he could watch TV or something while using it comfortably.  I thought about it and since the pillow was going to be on the bed all the time I wanted it to look nice, so I embroidered a "B" on it as an afterthought.

I then decided to embroider a couple of pillow cases to go with the pillow and thus the two pillowcases were done.

I am quite proud of myself as these were done on the sly so I am hoping my husband isn't aware of any of these gifts.

Total Time to Make Gifts:  The handkerchiefs took me 3 hours between cutting them, sewing them and juggling kids while doing it all.  The foot cream took me, oh I'll go with about two hours between preparation, waiting for it to cool and whipping it and such.  The pillow cases took me two hours per pillowcase (believe it or not the design is really simple and it didn't take long to get done embroidery-wise) and the pillow itself took me about two hours.  For the ends of the pillow I used a decorative plate as the template for the circle and then added a half inch circumference around the circle so I had a seam allowance taken into account.  I then just cut the fabric straight at what I thought the pillow should have for length and then I just sewed one circle onto the end, sewed the other end on and then sewed up the middle seam.  I embroidered the "B" on after the pillow was all together (which was a pain, but didn't take too terribly long).

Total Cost to Make Gifts:  Nothing out of pocket currently to do any of them.  The handkerchiefs I made with bleached muslin that I have in the house pretty much all the time (although if I had to guess on cost overall, I would say about 2.00 for the handkerchiefs since I got the material on sale a while ago).  The pillow was actually made with the unbleached muslin that Jo-Ann Fabrics messed up and didn't send me when I ordered it so they gave me the material for free to make up for it, so the pillow literally cost me nothing on the material front.  I used an old pillow for the stuffing for the pillow itself.

The foot cream is what probably would cost the most in materials.  The calendula oil I made from calendula petals I had dried myself a while ago and I had the calendula oil in the cabinet to put on my son's eczema as needed.  The borage oil, the evening primrose oil and the black currant seed oil cost me probably about 3.00 for all three oils once I had emptied enough oil caplets to get the oils I needed.  The coconut oil I had buried in the pantry.  The little mason jars I had on hand as they are part of my canning supplies.

The pillow cases were ones I already had around (one of them was actually part of a craft kit my step-mom sent me with no instructions with it, so I didn't use the pattern printed on it and just washed it off.  It worked well), so they didn't cost me anything to embroider.  The embroidery floss and thread were gifted to me, so that didn't cost me anything either.

Not too shabby of gifts to give to a spouse I'd say.

So, how about you guys?  Making anything for your spouses this year?

Tuesday, December 19, 2017

Christmas 2017 Gift Seven and Eight: A Sensory Cube and an Apron

Since I wasn't feeling good last night and didn't get to posting up yesterday's gift post, you get a double post today.  Hopefully I feel better today as I have gifts to finish, cookies to decorate with the kids and other stuff to do and make.

So, first up on the gift list today is a "girly apron" for the daughter. 

This was made from a kit my step-mom sent me.  I have no idea how old the kit was but the colored floss it came with was VERY seventies for the colors.  Avocado green for the leaves, fuchsia so bright it would blind you and goldenrod yellow finished up the color choices.  Since the entire project called for those colors only, I immediately threw the floss into my embroidery floss stash and then pulled out other colors from my stores to replace them.  I used a variegated pink embroidery floss for the roses, a nice light yellow for the centers and a prettier green for the leaves.
When it came to constructing the apron, the apron came with the tie already finished and you just had to sew it on and the original instructions called for you to gather the lace they had provided and then sew it into the apron.  Unfortunately they didn't give you enough cloth on the apron to do French seams and the apron was already fraying around the edges, so I knew putting it together on the cheap was just going to lead to tears.  So, I put the lace to better use than super frilly gathers.  I took one length and sewed it around the outside edge of the apron, folding it over the edge and sewing it in place with a zig zag stitch, basically making bias tape out of it to secure the edge.  I then took another length of the lace and sewed it around the edge like the directions called for, but I just didn't super gather it or anything (and the lace "bias tape" I'd made, if it shows through the lace you can't tell as it blends in with the lace). 

I then sewed on the tie piece, which, once again, the directions just called for you to sew it on, but didn't bother to do anything for potential fraying of the material.  So, I sewed the tie onto the front of the apron with a double stacked layer of zig zag stitch, making sure to trap the edge of the material under one of the zig zag stitch layers to prevent it from fraying later. I then covered up the zig zag stitches on the front with the last piece of lace.  It didn't QUITE reach, but it was really close so I think it'll work fine.

I made the daughter a nice pink camo apron years ago, but she doesn't like it because she's against all things hunting related (she keeps telling us that those are "boy" activities...where she gets this stuff I have no idea because it sure isn't from her family), so I'm thinking this one might blow over better (although the other one was more practical since it was a full sized apron *laugh*).
Next up is the ever present sensory cube for the son.  I started making him these a few years ago and he LOVES them, so I'm making sure to make him one every year now.

I did a five inch cube (cut out six inch cubes for each side and use a 1/2 inch seam allowance).  For the fabrics I did a fake fur, a fake lambswool, fleece, fake leather, aida cloth (for a "rough" texture), and a green satiny fabric.  I then, when stuffing it, put two small plastic bags inside.  One bag was stiffer and then the other one was one of those plastics that crinkle if you so much as look at it wrong and made a higher pitch crinkly sound.  This one was an easy gift to put together, and I know my son will love it, so I was happy with the finished product :).

Total Time to Make Gifts:  The apron took about eight hours between the cross stitch and the construction.  Not a hard project by any means, but still time consuming.  The sensory cube took me about an hour and a half between going through fabric remnants to find the fabric, making a template for the cube pieces out of felt (it sticks to fabric so it's a great choice for things like this that are smaller projects to make your pattern pieces out of), sewing it and stuffing it (which actually stuffing it took the longest).

Total Cost to Make Gifts:  Nothing.  The apron kit was given to me by my step mom and the thread was gifted to me as well.  The cube was made out of fabric remnants that I had around the house from previous projects or from fabric that was gifted to me by others.  The stuffing for the cube was taken from an old pillow (same one I used for the ornaments actually) and the plastic bags I had around as well.

Thursday, December 14, 2017

Christmas 2017 Gift Six: A Change Purse


There is actually a mate to this next gift (not a twin as the second one is a bit smaller than the first), but I had to do a bit more tweaking to get the purse looking like I wanted and forgot to take a picture of it before putting it under the tree for myself, so oops there *laugh*.

This is a double gift.  One change purse is going to my daughter.  And one change purse I kept for me.

You see, I made the change purses out of an old tie of my dad's.  My step-mom had mailed the tie in with a bunch of other things in one of her pinata boxes and asked me to keep it and do something with it as the tie was hand made, had belonged to dad and she just couldn't part with it herself by giving it to random strangers, so she sent it to me.  Of course, once she told me all of that, I couldn't part with it either and I kept thinking of something to do with it.  My husband wouldn't wear as loud of a tie as this one was (my dad loved wearing loud ties to work at times...he wore a tie to work every single day for 30+ years so he loved the "shake up" in the monotony of ties), but I didn't want to give it away, so I put it aside and tried to think of something to do with it.

While working on Christmas gifts, I glanced at the tie and realized that it would be really easy to just fold the tie over and use the point on the wide end as a flap and just make a quick change purse out of the widest part of the tie.  So, I did :).  I then took another bit off and made another change purse, but with a rectangular flap instead of a pointed one (as I was getting low on wider fabric pieces at that point) and voila!  Two change purses for my daughter and I to put in our purses, and all the while carrying a little piece of my dad around with us.  I know she will appreciate the sentiment and I sure do as I, even though it's been nearly seven years since he passed away, still miss him every day.

For the "closure" part, I secured some red buttons my step mom gifted me to the change purse itself and then took some old hair elastics that broke apart on me.  I cut a small slit into the upper cloth of the tie and just kind of threaded the elastic down into the inner parts of the tie and then used a zig-zag stitch, going over the hole a few times to make sure that the fabric wasn't going to fray later.  It worked well!

Total Time to Make Gift:  About ten minutes per change purse.  This was a project that went together super quick.

Total Cost to Make Gift:  Nothing as I had all the materials on hand.  I ended up using white thread for the project, even though I would have liked to have the thread match the material better, but it was the strongest thread I had (the tie was thick for one, and for two I wanted to make sure it would stay together well as it could potentially carry a decent amount of weight with change in it).  But, still materials-wise this cost me nothing.  And carrying around a change purse made from an old tie of my dad's and giving a little bit of my dad to my daughter for Christmas?  Priceless :).