Wednesday, November 16, 2022

An Emotional Hobbit Hole: Where I've Been

Please enjoy the shot of last winter as I totally didn't have a good image to put at the top of this post.  Sorry.

The road of a special needs parent is not an easy one.   It is kind of hard to explain what happens over time.  You get into this weird headspace over time as you watch your child not hit benchmarks that other children are hitting.  You kind of go through the grieving process over and over and over again as the years progress.  When something really not great happens, you just deal with it.  You really want to lean on someone, to share what is going on in your life, but at the same time you have this extreme sense of subconscious guilt.  There is always someone who is worse off than you are.   There is always a parent you see in the store or in passing where you realize just by looking at their situation that you have 100% nothing to complain about because your situation could be so much worse.  Then you feel worse for feeling bad that this or that happened and you just kind of clam up and just try to keep stoic and strong inside.  You watch people with kids who can do more than your child can and you want to cry some days, but there is always that voice saying, "It could be worse" and you just keep taking one day at a time, working with the limitations your child has been given and you do the best damn job you can by that child and loving them.  You celebrate THEIR successes, ignore what others do, work repeatedly to help them get past as many limitations as you can and you pray every night that maybe, by trying something new that God will help you find that you can get your child to a point they can live a somewhat independent life.  

It is the parent's way.  

Sometimes, though, things happen that just pull the rug out from under you and you feel like you are trying to keep your feet in quick sand and it just takes all of your emotional and physical energy to cope.  That's where I had to go this last month.

The new medication changes with Alvah were a mistake.  A bad one.  Alvah seemed like he was doing pretty well on lower doses of the new meds, so the doc and I talked about it and we decided to up his meds just a little bit to get him into a good spot and hopefully get his sleep patterns normalized.  What ended up happening was my son going completely off the rails when we upped his med, and I mean completely.  It is the worst he's EVER been and that was a bar I hoped to never have to surpass.  He punched holes in the walls of his room when you had to do something like drink a few sips of water or go to the bathroom and he started to eat the drywall after he had punched the hole.  His self harm went through the roof as well as him hitting other people.  I, in all honesty, was scared to death that I was losing him to his autism and I didn't know what I could do to help him.  I, as quickly as I could safely do, got his medication back down to really low levels, but it did not help.  I finally didn't give him any medication for 12 hours and then started him back on the Risperidone and Clonodine like he's been on for years.  That stopped the severe violence.  Thank God.  My husband, myself and my daughter felt worn torn after that long weekend...I can imagine how poor Alvah felt.  I still can't believe it was just a few days.  It was more than enough, though.  Since then, it has been a long month of getting his Risperidone where it needs to be, trying to get him sleeping okay (for him) and trying to come off of one heck of a adrenaline high from his erratic behaviors.  

He's getting better.  Thank God.  It is slow, though, as we need to get his bio chemistry leveled off and back on an even keel.  I started giving him a topical melatonin supplement that I just rub into his skin the morning and that has seemed to be helping, along with his roll on magnesium supplement I found.  I've been working with his swim teacher, a family friend, who has taken a bunch of different nutrition courses and things and has worked with special needs kids and adults for years and she's really been helping me to figure out more creative ways to try and get him some nutritional needs to help him as much as we can through non-medication means and help to level his mood off that way.

My husband spent a good week running around town trying to find enough wood paneling to hang in Alvah's room so we don't have to worry about him going through a bad pica phase and eating more of his walls, which was fun with the supply chain issues going on.  We finally have enough to get it done, so my husband is hoping to work on that starting this coming weekend.  

But, yeah, it hasn't been a good time.  

I'll report more on day to day things around here in the next post.  Honestly, just writing all of this out kind of exhausted me.  I'll get back to blogging here soon.  I just need to start getting caught up on everything around here so I have something to report.  So, stay tuned.  Hopefully the next post I'll have better news to report. 

Wednesday, October 12, 2022

What's For Dinner: What We've Been Eating of Late


So, instead of posting up Menu Plans like I used to do, I thought it might be more fun for me to post up some interesting thing we’ve eaten/tried out lately instead.  So, let’s kick off the first “What’s For Dinner?” segment!

1. So, first up, I had extra cabbage to use up even after canning sauerkraut up the ying yang (I know, hard to believe, but true).  So, I was watching “Tasting History with MaxMiller” and he made this dish called Bierocks, and I was more than a little intrigued, so I decided to make them for dinner one night, seeing as how I had ground beef, cabbage and sauerkraut in the house.  Instead of his bread recipe, though, I used my Easy Sandwich Bread recipe instead and just added a few things to make the recipe closer to the Bierock recipe.  And I have to say that it turned out REALLY well, with the exception of my inability to wrap the bread around the filling well for the first couple of buns.  I ended up having to freeze about ½ of them as the recipe made a lot and I packed them into my husband’s lunch a few times as I took them out and defrosted them in the fridge, but yeah…I am definitely bookmarking the recipe to make again in the future as it was really good!

2.  I processed the two pumpkins I had to process and put the puree in the freezer in 1 cup increments, but I had 2/3 of a cup of pumpkin left over, so I decided to make Celebrating Appalachia’spumpkin roll recipe.  It was (written recipe can be found here on her blog) super easy, didn’t take a ton of ingredients and was really, REALLY tasty!  I was really happy that it was so light and fluffy compared to the pumpkin rolls I grew up with in PA as those were so rich I had a hard time getting through an entire piece without my stomach telling me “no” *laugh*.

3. I found one lowly jar of raspberries in syrup that I had stored in the freezer last year.  I had already finished canning, so I tried to think of what I could use the raspberries for.  I decided, on a spur of the moment type of thing, to make them into sweet rolls.  I took the raspberries, thawed them, drained them (saved the juice and the daughter and I drank it with lemonade…so good!), mashed them, cooked them down with some brown sugar, cinnamon and a few spices and then rolled them up into giant sweet rolls.  I ended up putting cream cheese frosting on 2/3 and put buttercream on 1/3 (the daughter isn’t a huge fan of cream cheese anything, although surprisingly she did like the pumpkin roll).  They turned out well, but are filling, so I ended up freezing some of them to defrost for breakfasts in the coming months. 

4.  I tweak my quick sandwich bread recipe to make into rolls or sweet rolls (depending on how much sugar and things I add) and I really wanted cinnamon rolls one day.  So, I made 1/2 of the recipe into cinnamon rolls and 1/2 into dinner rolls to eat with chicken one night.  I will not say how many of the cinnamon rolls I ate, but I may have eaten roughly my body’s weight in them *laugh*.  I put cream cheese frosting on the cinnamon rolls, so that helps ;).  The regular rolls were good and we not only ate them with dinner one night, but the husband took them in his lunch a few times and the daughter carefully broke a few into very small pieces to chew for breakfast the last week.  Nothing had to be frozen or went to waste on that little venture :).

5.  We had left over beef roast that I had to do something with in the fridge, so I took it and ran it through our meat slicer (it was not the most tender cut of beef straight from the oven, unfortunately) to thin slice it.  I then made a batch of sandwich rolls (the son ended up eating half of them since one recipe makes 8 *laugh*) and we had French Dips later in the week to use up the roast beef (no pic of the sandwiches, as I forgot to take them, but enjoy the picture of the rolls instead :).

Those are probably the most creative things I’ve done the last little bit.  I know most of them were sweets this time, but I will share these posts when I have enough things to share *laugh*.  How about you?  Eaten anything interesting lately?

Monday, October 3, 2022

Summer and Fall Canning List, Part 2 (With Links When Available)


This year, I really do think I’ve canned (jarred/bottled) more food than I ever have before.  I’ve definitely put up more food volumes in the past (like putting up tons of pints of applesauce or something), but this year I did a lot of small batch canning, which might run out quicker, but will allow us to have more of a variety in our diets.  I have to say I was impressed.  I went through every single jar I had in the house and still had to go and purchase some more this year.  It’s been a long time since I did that.  So, anyway, let’s get to round two of the things I canned this year.  I’m going to start out with the repeat from the last list and the simple stuff and then get onto the more out of the ordinary canning I did.

Disclaimer:  This post contains affiliate links.  Amazon will shoot me a small commission if you order through these links.  It will not cost you anything extra to order through these links.  If you do not wish to order through the affiliate links, I understand.  If you do order through these links, thank you for supporting the blog!

1.   Sauerkraut (Rounds Two and Three): 

It amazed me how much sauerkraut I put up this year.  I am happy too as I was able to space out my ferments so I didn’t have to can up like 30 pints of sauerkraut at one time or anything this year. 

With round 2, I ended up with two pints that failed to seal.  I tried different lids and reprocessing the jars, but it didn’t work.  I’ve had more than a few Ball lids fail this year, so it may have been that, but I think part of the blame has to rest with the “Yes I Can” jars I ended up having to purchase as my local stores were out of Ball jars.  I was not impressed with how rough the seam on the jars was and am convinced that helped the seals to fail.  So, those jars got put up to hold craft supplies or dried goods, but I don’t think I’m going to attempt to can with those particular batch of jars again.

I ended up using the two failed jars to make pork and sauerkraut for dinner the next night (when it became apparent to me that the jars weren’t going to seal I just threw them into the fridge and used them for dinner the next day). 

So, yeah, simplest recipe in the world here.  Just be aware it will stink up your house (and it does stink *laugh*).  Take pork chops or pork roast, throw it into a crock pot, cover with jars of sauerkraut (don’t drain, or if you do drain and rinse be sure to throw in more liquid) and cook on low for 8 to 10 hours.  The pork will be delicious, but your house will smell.  Your welcome *laugh*.


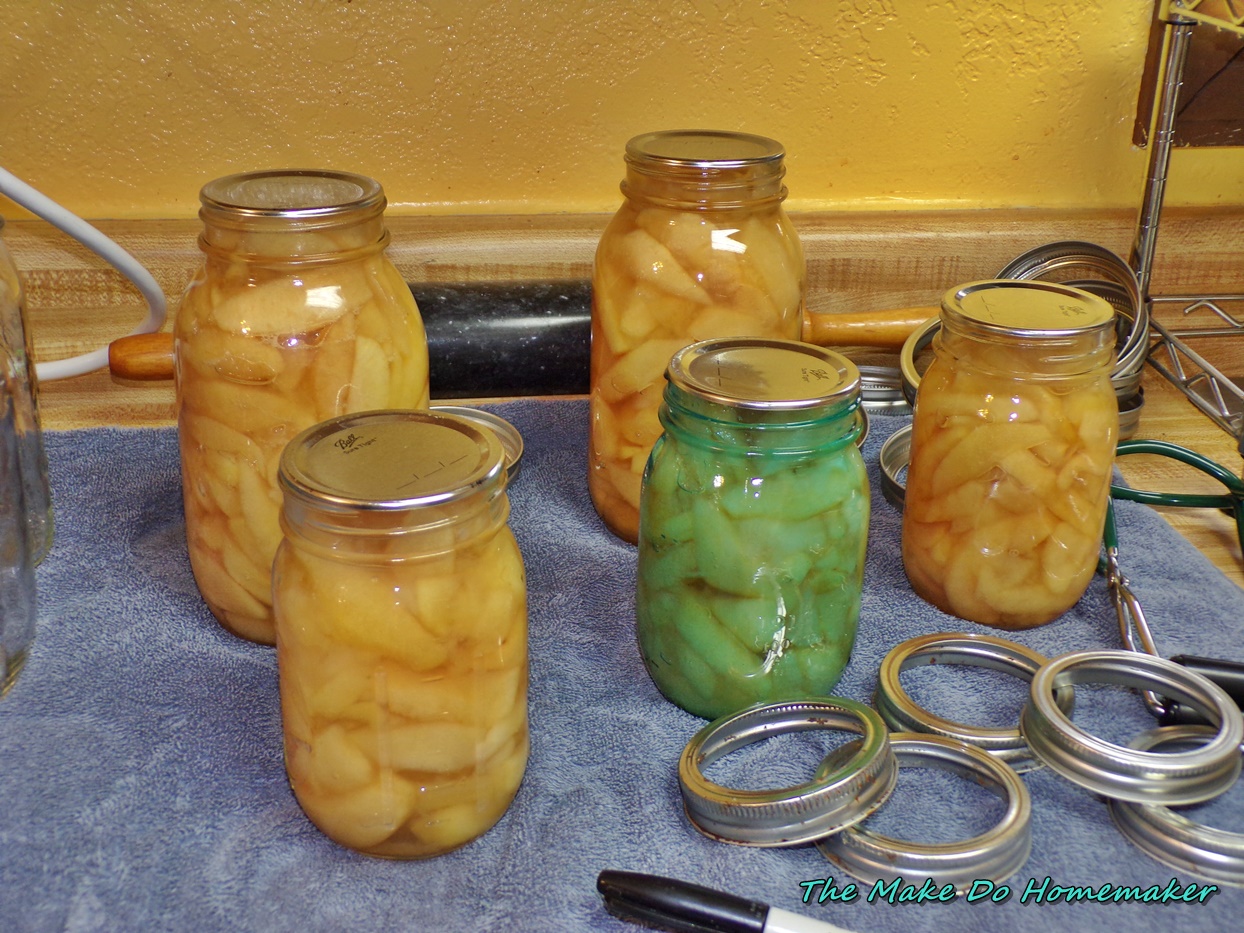
2.  Apple slices in syrup (Source:  National Center For Home Food Preservation)

Apples were on sale a bit ago.  Cheap.  .99 a pound cheap.  I was enthusiastic to say the least as I immediately thought of canning some apple pie filling.  But, once I got the bags of apples on the counter I thought on it for a minute and decided that I would just can some apple slices in syrup to use in various baking things later in the winter.  I followed the recipe in the Ball book word for word for canning apples in slices, used the proper headspace, did the hot pack canning method…the whole shebang.  All of the jars sealed, but it worries me that the apples seemed to swell up yet more in the jars as they were water bath canning and there isn’t much left in the way of headspace in a few of the jars.  They did seal, though, but yeah…that was weird.  I haven’t had that happen with anything but beans before and those were pressure canned.  Just some of the weird things that happen when canning sometimes.


3.  Potatoes (Source:  National Center For Home Food Preservation)

I got a bunch of potatoes from the CSA this year.  They came coated with mud, straight out of the ground, and hadn’t been cured at all (cured is just a fancy way of saying “dried out” as drying them with good ventilation toughens the skin and helps them store longer).  I tried to dry them out as well as I could in my tiny kitchen, but it just wasn’t working.  When I realized they were going to go bad on me, I said to heck with it and canned them all.  Some, I canned in French fry shapes to drain, dry and deep fry later on, mainly as an experiment to see if they come out better this way so my son might start eating homemade French fries versus stuff that comes in paper cartons or plastic bags.  I had a bit of siphoning with the French fry cut potatoes because I opened my pressure canner a bit too soon (before the jars were cooled down enough), but not too terrible. 

I then ended up canning up the rest just cut into chunks.  I ended up with a lot more than I thought when it was all said and done (10 pints), but they will come in handy, I’m sure.  Those came out perfect.  No siphoning, no cloudiness from excess starch…I was really impressed how well they came out.

4. Green Tomato Relish (1/2 recipe.  Source:  Bernardin online.  You can also find the recipe in The Ball Complete Book of Home Preserving).

I harvested my green tomatoes from my tomato plant earlier in the summer and decided to can them up into a green tomato relish.  I've made this in the past and it is a really tasty relish, so I decided to split the recipe in half and make it again this year.  I did end up with 4 jars instead of 3, but hey, I was happy with the results overall :).

5.  Heavenly Fig Jam (Also can be found in The Ball Complete Book of Home Preserving).  Source:  Bernardin online.

I buy dried figs when I can find them and then keep them in my food storage.  This is one of the main ways I use those dried figs as I've found that the jam is excellent.  I especially love it to make my Pantry Friendly Fig Sauce, which goes excellent with pork.  It also always looks so pretty in the jars with how the fig seeds disperse so well throughout the mixture :).  

Just a note:  In the canning book I have the orange liqueur is optional, so I always omit it.

5.  Victorian Barbeque Sauce (Rhubarb BBQ Sauce)  Source:  SB Canning.com, posting up recipe from The Ball Complete Book of Home Preserving.

I really love to pull this recipe out when I have enough rhubarb in the freezer that I need to use up before it goes freezer burned and dried out (which I've found to be a thing that happens with rhubarb).  So, this year was one of those years.  I had JUST enough rhubarb from my plant (it wasn't a good year for it with how the weather went hot so early) and from the CSA to make a batch of Victorian BBQ sauce.  

I do add about a tablespoon of liquid smoke to my BBQ sauce to give it a smoky flavor.  I've seen others add liquid aminos, or soy sauce or Worcestershire Sauce to the sauce instead, so I might try that next time I make it to see what kind of flavor it gives it.  I find that it just kind of cuts down the super fruity flavor the BBQ sauce has and gives it more depth to add the liquid smoke (which I asked my local extension service about adding it and they said it was find as that was considered a seasoning and would not effect the safety of the final product).

6.  Raspberry Juice (Source:  Bernardin Online)

My mother-in-law asked me to go over and pick raspberries one day as she was worried some of them were going to rot on the bushes if they weren't picked.  She has two different types of raspberries...a bigger domesticated variety and more of our wild raspberry variety at her place.  The wild variety are smaller and much, MUCH more powerful tasting than the domesticated ones and those were the ones this day that she wanted me to concentrate on picking, which I gratefully did.  We ended up with a big Ziploc bag of berries, but they were a mixed bag, literally, of both varieties of raspberries and I didn't think they would make very good jam.  So, instead of making jam, I decided to can raspberry juice for the first time this year.  I have found that it goes great in lemonade (I used some leftovers that didn't fit into a pint jar to try it) and if I find I'm not using it I figure I'll just use it to make jelly with later in the winter or something.

7.  Mixed Berry Jam  (Source:  ballmasonjars.com)

I had a mixed berry frozen fruit combo that I had a really good personalized price on at Carrs.  I decided to stock up on it (I had the personalized price on it all month back in like June) and I just picked up one bag a week.  When I had enough I decided to make jam from what I had gotten, which I did.  And I have to tell you folks, this jam is AWESOME!  It was this one if you have a Safeway affiliate anywhere near you (no affiliate link on that one, just sharing the product image).  The daughter really likes this stuff and has already eaten through one jar of it *laugh*.


8.  Pumpkin Butter (not canned, but in jars so I'm counting it anyway *laugh*)

I found a bag of pumpkin puree in the bottom of my block freezer that I had shoved into my beef freezer for...reasons I guess.  But, I needed to use it urgently as I was about to put more pumpkin puree back into my freezer from the pumpkin I got from the CSA and the pumpkin the daughter decorated at the fall festival as they were both showing signs that they were going to go bad on me.  So, I decided to cook down the puree from the freezer and make pumpkin butter out of it.  I threw it into the crock pot with some sugar and spices (I combined like four online recipes into one to make it with flavors we liked) and just let it cook and cook and cook down.  It came out really tasty.  I waited until it cooled and then I put it in 1/2 pint mason jars and put them in the freezer for storage.  I'm looking forward to eating it on biscuits this winter for sure.


9.  Mock Pineapple Chunks (Source:  The 1870's Homestead on YouTube) and Black Currants in Syrup (Source:  H is for Harbinger).

I got a ginormous zucchini one week from the CSA and I knew I wasn't going to be able to use it all for baking recipes and things.  I could have shredded it and frozen it, but I have a hard time using it when I do that (kind of out of sight, out of mind somehow), so I grated a few cups to make zucchini bread with later on and the rest I seeded, peeled and chunked up and decided to try a mock pineapple canning recipe from that 1870's Homestead on YouTube.  I felt very comfortable water bath canning this recipe as you are pickling the zucchini in pineapple juice and lemon juice (both nice, high-acid liquids).  I have to say I tried a piece of it before putting the rest in the jars to can and it really and seriously DOES taste like pineapple. I'm going to enjoy using it in sweet and sour pork and pineapple upside down cake (chunks, slices, I don't care so long as it tastes yummy *laugh*) this winter! 

I also got a container of black currants that week and looking at them I KNEW they weren't going to last more than like a day.  So, on top of the zucchini that was not going to fit in my fridge since it was too huge and those, I decided to can them both together.  I cleaned the black currants (not a fun task I have to say as you have to remove the little beard thing from the currant which is harder to do than you might think) and put them all into a 12 oz jar.  I only had like 2/3 of the jar full, but I just shrugged and added syrup to the jar till it was the right headspace and processed the currants like that.  I'm figuring this is going to make more like black currant juice than anything, but I'll dump the jar into a pan, let it boil down and thicken up and we'll have black currant syrup on our waffles at some point this winter.  It works for me.


10.  Caramelized Onion, Maple, Balsamic Jam (Source:  The 1870's Homestead on YouTube)

This was one of those recipes that I was nervous about, but intrigued about as I wasn't sure if caramelizing the onions and then making jam out of them was safe.  Well, not only does Pamona's Pectin have a recipe for caramelized onion jam (Google it if you are curious), but the newer Ball Book of Home Preserving does too, so I found that this jam existed.  I ended up with four and half jars, so we just used the 1/2 of a jar for bacon sandwiches (so, so good!!!).  

I made the recipe at the daughter's request as she LOVES onions, so I bit the bullet and made her some.  I'm not sure all of what I'm going to use the jam in, but stay tuned as I'll share what I make with it as I make it.  So far I know it's great on bacon sandwiches anyway *laugh*.  It is definitely a luxury canning item for sure, but hopefully the daughter likes what we make with it (so far she likes it, anyway).

And there you go folks.  The rest of what I've been up to this summer and fall till now on the home preservation front.  Hope projects are going well for you where you are!

Thursday, September 29, 2022

Thrifty Thursday: Thrift Store Finds

It's been a long time since I posted up a thrift store haul.  Honestly, it's because I just plain haven't found much at the used stores in a long time.  We don't go that often anymore is part of the reason.  We don't really NEED much is another reason and the last reason is because there just hasn't been much there the last few years.  I honestly think a lot more people have caught on to the idea of hanging on to their stuff in case they need it again or they have caught onto the idea that thrift store shopping is a great way to the save money.  Probably both if I want to be honest.  So, yeah, there just hasn't been much at the used stores the last few years, so there hasn't been much to post up.

I did however pop into the used store earlier this summer and found a few things I'd been looking for.  They've been on my list for quite a while, so I was thrilled to find them.  So, let's show off those finds :).


1.  A Tupperware potato keeper.

I have been looking for one of these suckers for a lonnnnnngggg time.  I even contemplated buying one new a few times, but I didn't want to go through all the trouble to find a Tupperware dealer person and all of that jazz.  And, of course, there was the cost to consider as well.  So, I just kept it on my list of things I was looking for and just kept my eyes open.  My husband actually came out of the used store (the son was cranky so we went in in shifts to look for things on our lists) and told me there was a bunch of Tupperware in there that day.  I went into the store excitedly as I was really looking for a Tupperware container to store my iced tea bags in (the box they came in was falling apart).  I went to where my husband said the Tupperware was and immediately saw the potato keeper sitting there.  I grabbed it without hesitation.  

Why do I want a potato keeper you might ask?  Well, my daughter has decided that she loves onions and while I was storing onions in the hanging baskets in my kitchen the baskets were starting to really deteriorate with age and I was scared of them breaking with any type of weight in them.  So, I thought a Tupperware potato keeper would hold the amount of onions I end up keeping around for my onion loving offspring now a days *laugh*.  

I then looked over and found a container for my iced tea bags too!  It was a good day!

2.  Blue lidded Tupperware container

This was JUST the perfect size to hold my iced tea bags and still fits into my lazy Susan cabinet in my kitchen well.  So, I'm super happy about it.

All totaled I spent less than 10.00 for both items and they are working out perfectly in my kitchen.  The onion/potato keeper sits on my counter now and gives me easy access to onions when I need them and my iced tea bags are well protected.  So, I think it was a really productive used store haul!

How about you?  Found anything good at the used stores/thrift stores/charity shops of late?  

Wednesday, September 28, 2022

Autumn in Alaska and What I've Been Up To


So, once again blogging got delayed (obviously).  A quick recap of events that have prevented me from doing much other than getting through life the last month:

1.  The daughter's teeth started to bug her.  Got her to the dentist, but he didn't find anything on X-ray (cavities or what not), so he thought it was because maybe that her wisdom teeth were showing up on the X-rays.  Made an appointment for a more in depth X-ray.  Wisdom teeth didn't wait and poked through the gums.  So, it was in to get the daughter's wisdom teeth removed earlier than most teenagers.  She's recovering well, but yeah that was an unexpected turn of events there.

2.  The son's medications stopped working again.  So, we are trying to come up with some other plan to help him regulate his moods and help him to sleep at night.  It's been hard, but hopefully we'll get there here soon where he's doing better.  Fingers crossed.

There was good things in the month too though.

1.  We finally, after working hard the past year, got our medical bills paid off, this time with some help from the PFD.  Between those bills (which unfortunately were on credit card), it ate the entire PFD we got this year, but at least it paid off the rest of the medical bills, so I'm not complaining at all.  Course, now I have a wisdom teeth bill to pay off, but it is a major load off of my mind to have some pretty substantial bills due to my back paid off and the wisdom teeth are on Care Credit so I have a year to pay them off before interest pops up to haunt me.

2.  We went to the local fall festival again this year.  And this year it wasn't snowing and horribly cold.  Instead we actually had sunlight that day and the temperatures were chilly, but not bad, which was great.  Unfortunately, the amount of things they had to do was severely reduced this year compared to previous years (partly due to, I'm sure, labor shortages and all), so the son went on a few tractor rides, walked around a while and was ready to go home.  The daughter did manage to decorate a pumpkin at one of the events there (seen above) and so we got a free pie pumpkin out of the day, which was cool.  It was kind of short, but the kids seemed to have a good time anyway, so that was good.

We did stop off at a local produce stand that we like (Bushes Bunches) and I was able to score a FEW turnips (it's been hard to find them this year), a nice big onion and some local potatoes.  I would have bought some veggies from the farm where the fall festival was, but their prices were crazy high (2.50 per onion as an example) compared to my budget, so I passed on buying vegetables there.

3.  We celebrated my son's birthday at home.  My mother-in-law came over to help us celebrate and it was a lot of fun.  We had home made pizza and breadsticks and it was a nice and enjoyable evening.

4.  I got my pantry and freezers organized, managed to get produce processed before it went bad (with the CSA, that wasn't as easy as you might think as the quality just was not there this year) and put up as well.  I feel pretty darned good about those accomplishments, honestly, as with the son's medications not working great, it's been hard to get things done some days.


5.  Fall has been hanging on this year, which has been wonderful for a person like me who loves autumn above all seasons :).

I was asked by a reader what fall was like in Alaska, so I thought I'd give a quick tour of what fall is like up here.

Well depending on the year we may or may not have fall at all, really.  Last year we went directly into winter pretty much from mid-September or so.  This year is much nicer.  Normally, though, we do have snow at any time after October rolls around and most years the kids are running around in snow gear when they go trick or treating and trying to not slip and slide on the ice as they go from door to door in the subdivisions.

The leaves are hanging on the trees instead of immediately dying and blowing off this year and if you look around you'll quickly see more shades of gold than you thought you'd see with the trees seeming to all change color to different shades of yellow and brown.  It is surprising the trees are holding on so well with all of the rain we've gotten, but they are and I'm super happy about it.  

The temperatures are cold at night and in the morning (shot above from a few days ago),  but by afternoon I've been able to open the windows pretty much every day to air out the house still and let in that crisp autumn air.  It's pretty warm for this time of year, another thing I'm grateful for.  

We do have the furnace on and it kicks on at night and in the mornings, but it isn't kicking on constantly yet, which is a wonderful turn of events when I think of what the heat and electric are going to cost us this winter.  

When I first moved up here I greatly missed the colors that the trees would erupt into during the fall, especially missing the foliage changes from my youth in New England, but as I've gotten older and spent a good portion of my life now in Alaska, I really do love the change to golden hues that happen up here.  If you find someplace with lots of cranberry bushes growing they will change a beautiful shade of red toward the ground as well (I couldn't find a good spot in my yard to take a picture of some to show you).  

So, Alaska has its own color palette to appreciate this time of year.

So, there you go, a quick shot of Alaska in the fall (well, my yard in the fall anyway *laugh*).  Hope you enjoyed a tour of the fall shades we are experiencing up here at the moment.  I love them and wish I had some chairs on my deck so I could sit out there and really enjoy it.

I do, in fact, have some blog posts in the wings for October, so hopefully I get to post them!  I hope you are all having a great fall (my prayers are with those impacted by the hurricane and other events, for sure) and I will hopefully see you soon!  

Thursday, September 8, 2022

A Day in My Life: Come Bake With Me


 To kick off September, I thought I'd do something a bit different and take you all along on what I did September 1st, which turned out was a baking day for me (I KNOW it's late, but hey, better late than never *laugh*).  So, let's get to it!

September 1st, 2022

After waking up (I know, stater of the obvious there *laugh*), getting dressed and heading upstairs, I take care of getting the kids breakfast and getting the daughter started on schoolwork.  The son woke up, ate a little bit and immediately went back to bed.  He hasn't been sleeping well with his allergies all flared up, so I just let him and get started on my list of things I needed to do.  I pull out the mixer and necessary materials and work on making bread to last for the next few days.  I get the first load of dishes on to wash after I get the bread into the pans to rise before baking them.  It is only then I go and get my first cup of coffee for the day.

Side note, but the above picture is how I make my coffee everyday.  Notice the cone above the mug?  That is called "the pour over coffee method" and it seriously makes the best cup of coffee I've ever had.  Been making coffee this way for years and I love it, although I have expanded to having two cones; The above one and another ceramic one...the ceramic one I actually prefer the taste of the coffee out of, but it was in the dishwasher this morning.  I love this system partially because it stops me from having to have a coffee maker on my countertop taking up room and I can just store the drip cone in the cupboard with my regular dishes and the other reason is because, of course, it makes an awesome cup of coffee :).

After I got a cup of coffee to sip on, I put the bread in the oven and I move onto my next project and that's getting dinner started in the slow cooker.  I use my electric pressure cooker for this (I bought a nice instant pot glass lid for my six quarter pressure cooker because it was WAY better quality than the one that came with my pot, in case you are wondering) because the chicken won't fit in my tiny crock pot.  I have to say that I'm not a huge fan of the slow cooker function on the electric pressure cookers.  I mean it gets the job done, but it cycles the heat on and off hard to get the items cooked and it just doesn't seem to work as well as a real crock pot.  My opinion anyway.  

Right, back to the matter at hand.  I take the half defrosted rotisserie chicken out the fridge (we bought one at Three Bears, so it's just a Costco rotisserie chicken with a substantial mark up on it) and put it on to slow cook so I could cook the meat off the bones for chicken noodle soup for dinner.  This will also give me a good opportunity to use up some carrots with bad spots and some celery that immediately went limp and sad from the CSA box the last few weeks as well as one of the sweet onions we got in our CSA a few days prior (the onions are delicious, but have no shelf life to them to speak of, so you have to freeze them or use them quickly).

After that, I pull out a block of cream cheese from the fridge and cut it in half.  I then put the cream cheese into a bowl to come to room temperature so I can make cheese Danishes for breakfast over the weekend.  I take a break to get the son a snack and work on schoolwork (the daughter has been working on hers the entire time I'm working on other things with me occasionally helping with a problem here and there).  

I take a intermission from schoolwork to get the bread out of the oven and unload the dish washer.  I reload it quickly so I can get the bread making tools ready to go again in a little bit.

Now that the bread is out of the oven, I reset the temperature for my next project, which is dessert.  My entire family loves the Krusteaz Lemon Pound Cake mix and I have a few left from the last bulk order I made that need to be used up.  So, I get that mixed up and put it in to bake.  I then pull the son back to school work and get the rest of his schoolwork done for the day right when the timer goes off.  

I take it from the oven and place it on it's serving dish to cool completely. 

I then put the temperature on the oven back to 375 degrees, put the dishes from the last load away and make sure my metal mixing bowl is cool enough and then start on making hard rolls for my son to snack on.  He now eats these instead of the store bought hotdog and hamburger buns and I could not be happier about that.  

Once the rolls are in the oven, I take the inner pot out of my pressure cooker and strain the chicken from the broth.  I put the broth back in the pressure cooker, add some seasonings, some bouillon (to up the chicken flavor a bit as the broth was a tiny bit bland) and cut up the vegetables I want in the soup and put the slow cooker back on to cook.  I'll add the chicken back in when it is cool enough to separate from the bones.

I pull the rolls from the oven and it is less than five minutes before the son grabs one and runs off with it, which makes me laugh.  I help the daughter on some math problems and we break for lunch.  I ended up pulling a salad we had made from our CSA vegetables from the fridge and eating that for lunch.  The son actually helped to cut up the vegetables as part of his home economics course I designed for the year, so I was more than a little proud to eat the salad he helped to make.  I boil a pound of pasta to have it ready to go for a quick and easy lunch.  The kids have spaghetti (the daughter) and pasta with olive oil and Parmesan cheese (one of the son's favorite meals in the universe).  After lunch I then check the chicken and find it to be cool enough to handle.  

As I pull the chicken from the bone and pull it apart into bite sized pieces, I find that the rotisserie chicken had a LOT more meat on it than I thought it would (Carrs chickens never have more than a meal's worth of meat on it, so it blew me away), so I took half the chicken and added it back to the soup and then took the other half and decided in an instant to try and make chicken salad out of it.  I find a few recipes online and then decide to just wing it.  I add some tarragon (goes well with chicken), some parsley, a bit of old bay seasoning (what?  I like Old Bay!), some salt and pepper and enough mayo to make it nice and moist, some almonds that I pull from the freezer and chop up a handful of, and then, since I don't have any fresh grapes or anything to add, I throw in some dried cherries and some raisins into the mix.  I finish up by adding some onion and some celery to the salad.  I have to say as a first real attempt to make chicken salad, this turned out really good!!!  We ended up eating the entire thing of salad, which is an accomplishment since it made way more than I was planning on!

By this point dinner is fast approaching and I'm very tired.  But, I am determined to stay the course and get the rest of my list done for the day.  

I get the easy cheese Danishes ready to go and put into the oven to bake and get the home made noodles rolled out, cut into noodles and added to the soup to cook for the last 1/2 to an hour before my husband is set to be home.  I put the glaze on the lemon pound cake, put the soup on "keep warm" after I make sure all of the noodles are done and that the seasoning on the soup is right.  Honestly, after all of that, I sat down with a glass of water and watched some of my favorite gardening and cooking YouTube channels and just appreciated the fact that I was sitting down *laugh*.

So, there you go folks.  Hope you enjoyed coming along on my baking adventures for the day and hope it wasn't too boring for you :).  

Saturday, September 3, 2022

Super Easy Fast Sandwich Bread


Okay, first before I share this recipe, quick disclaimer, this is heavily, and I mean HEAVILY, based on La Fuji Mama's Simple One Hour Bread Recipe.  I have just tweaked it a bit to make the crumb fluffier and softer and put instructions in to cook it in loaf pans so you can make standard loaves with it and my times are a bit different than hers so it'll take you a bit more time to make this.  Anyway, I definitely support the original recipe and suggest you try both ways of doing things and see which one works for you :).

I'm posting this mainly because I just keep getting e-mails once in a while asking me to share my bread recipe when I show pictures of home made bread, so I finally gave in and am sharing it.   Please let me know if I'm missing an essential element somewhere.  I have made this so many times I have it memorized and only when writing it out I realized how hard it is to type something when you aren't actively making it in front of you *laugh*.

So, here you go.  Sandwich Bread in an Hour.  Enjoy!


Super Easy Fast Sandwich Bread

Ingredients:

  • 5 1/4 Cups Bread Flour
  • 1 1/2 tsp. kosher salt
  • 3 TBS sugar
  • 3 TBS Dehydrated Milk Powder
  • 1 1/2 Rounded TBS of Instant Yeast (I only use SAF Instant Yeast)
  • 1 1/2 TBS Cooking Oil (I like to use canola in mine)
  • 2 Cups Warm Water (not too hot or you'll kill your yeast)

Procedure:

1.  Preheat Oven to 375 degrees F.

2.  Spray two loaf pans (I use cast iron loaf pans) with non-stick cooking spray.  Set aside.

3.  Combine all dry ingredients except the yeast in the bowl of your stand mixer.  Mix the dry ingredients in the bowl together quickly (I just use the tablespoon I used for the yeast to do this) and then add the yeast on top (I do this so that the salt doesn't come in contact with the yeast and kill it).

4.  Add the oil and warm water to the bowl and attach your dough hook to the mixer.  Mix on low speed for one minutes and then scrape the sides of the bowl.  Set a timer for 5 minutes and speed up mixer to medium speed.  Mix dough for the five minutes.  When the timer goes off, stop the mixer and spray a small section of your countertop down with non-stick cooking spray.  Dump the dough onto the greased countertop (the dough will most likely be pretty sticky, this is not a bad thing) and fold the dough over to get some of the nonstick cooking spray on top of the dough.  Knead the dough a few times until you can handle it easily (it doesn't take long).  Take a bench scraper or knife (I LOVE my bench scraper for this) and cut the dough in half.  

5.  Round the dough into balls in your hands and then take the balls and shape them into loaf shapes that will fit in your pans (this might take a few tries before you get good at it and you might end up jamming your dough into your loaf pans a few times...don't worry about it...you'll get better at it :).  Place dough into your loaf pans and put plastic wrap over loaf pans.  Set loaf pans in a warm place and set your timer for 15 minutes.  

6.  When timer goes off check your dough.  It should be pushing on the plastic wrap at this point.  Carefully remove the plastic wrap as the dough will want to stick to it a bit.  If your dough is just hitting the top of your loaf pans (which mine at this is), set your timer for about five more minutes.  Keep an eye on the dough and once the center of the dough goes over the top of the loaf pan by a bit (I'd say like an inch, but it is going to do depend on your loaf pan and I don't want you to over-proof your dough), place the pans in the preheated oven.  

7.  Bake at 375 degrees for 35 minutes.  Remove bread from pans, turn them over in your hands (use oven mitts is my suggestion) and then tap the bottom of the loaves.  The bread should sound hollow when tapped.  Place the loaves on a towel to cool (I like to place them on their sides for a bit so that the bottom cool a bit first and then flipped them so that the side can cool as well).  Once cool, enjoy as a wonderful sandwich and toasting bread.  

Honestly, since I discovered this recipe my family won't eat store bought bread anymore.  I've even found another variation that my son will eat as rolls so I don't have to buy hotdog and hamburger buns for him anymore (I'll share that recipe later).  After finding this recipe I gave away my bread maker as I didn't need it anymore.  Who needs one when you can make bread, from scratch in about an hour?  

Enjoy all!