Wednesday, September 30, 2015

What I'm Reading in 2015: August and September

And I will start out with a big old "Oops!" that I never got around to posting up what I was reading last month.  It's been busy around here and then on top of that I've been reading through so many books that it's been hard to keep track of them all.  I can safely say that I think my brain got a lot of wrinkles the last couple of months, though *laugh*.

The first book is the book I finally got to read from cover to cover this month...
 Ration Book Cookery: Recipes and History (Cooking Through the Ages)

This book is small (I mean literally, it's like five inches tall by five inches wide), but it's actually jammed with quite a bit of information and recipes.

 I've got a few rationing cookbooks in my collection (this one too is British in origin), but the thing that stands out with this one, to me, is PICTURES (in color no less in some cases)!  Sure, some of the dishes aren't that appetizing looking, but when you are looking at recipes for mock goose and things I was really intrigued with what they would come out looking like.

I bought this book on kind of a whim as I was pretty much getting any book on rationing I could get my hands on and this book doesn't disappoint.  It has a timeline of rationing in Britain, old vintage product pictures and advertisements and even propaganda posters from the Ministry of Food.  There's even cooking times for how long to cook food in a hay box (it's like a thermal cooker made with hay, a box and a pillowcase).

If you are interested in rationing, how it worked in Britain, how people coped and cooked with rationing in place, even how it effected the battlefront, this is a great book to start with as it jams a LOT of information into a small package.

And now, on the lighter side of things, is a book I've read a lot this month as it is the highlight of my daughter's bedtime since I got the book for her....
 Splendiferous Christmas (Fancy Nancy)

This is, by far my daughter's favorite book series, ever (mind you I haven't started reading her Harry Potter yet *laugh*).  This series follows Nancy Clancy, who likes to be fancy in everything she does.  This includes speaking as many French words as she can (because French, as we all know, makes things more fancy), dressing up in frills and baubles and doing everything she can to live fancy (including walking around in ballet slippers or running her own spa).

These books are great.  They not only have expanded my daughter's vocabulary (for instance in this book the word pleading is used and Nancy explains what pleading means in a cute way), but it also is giving her a limited French vocabulary.  The artwork in these books is really nice and VERY detailed for children's books (for instance the cover you are looking at is a good sum up of what the artwork is like in the rest of the book).  The writer really captures what it is like being a little girl in her writings, which makes it a really fun read as well.

This book follows Nancy and her family (she has a little sister and her mom and dad) as they find a Christmas tree, wait and wait for her grandpa to show up so they can decorate the tree, a small childhood tragedy occurs and how it is fixed and leads to a very merry Christmas indeed.

I'd definitely recommend this series of books.  I've never run into a bad one yet, and we so far have about five in our collection on top of the ones my daughter has pulled out of her school library (thank goodness for Swagbucks to help me buy all of those).

Monday, September 28, 2015

How I Menu Plan (and a Free Printable!)


I've had a couple of people ask me of late if I could share my system for menu planning every week as they feel overwhelmed and don't know where to start.

So, I decided that I'd do a post on it for you.  And hey, I even made my first EVER printable for you to print off if you want (it's down below!).  Cool huh?

Now, if you look up menu planning on Google or your favorite search engine you are going to find a lot of blogs that tell you to menu plan around the sales are available that week.  This is not one of those blogs.

Menu planning that way, honestly, worries me as it means that most people don't have a week's worth of food in their house and are dependent on the store to make their meals for the week.  As someone who strives to have six months to a year's worth of food around in the house for fear of cash flow problems or something else going on the idea of just doing a menu around the sales at the store every week goes against the grain.

Oh don't get me wrong, I tried it when I started liking the idea of a menu plan.  And I'd fail miserably at it as my family would decide in mid-stream that we wanted something else for dinner in the middle of the week.  Next thing I'd know, I'd have food that went bad in my fridge and feeling awful that I'd wasted food.

Nope, my system now a days goes like this.

I sit down on Saturday and start to figure out my menu plan for the next week.  This revolves around what I have in the freezer and pantry first and foremost.  If I have no creativity that week I'll go for a system based on what I KNOW I have and just allow myself some sitting and staring off into space drooling time as I try to figure out more than a vague baseline for the menu to build from.

For instance my menu plan for this week started this way, due to my son being sick on Saturday so I was distracted.
Monday:  Beef or Pork
Tuesday:  Chicken (in crock pot) because I knew that we have an appointment to make tomorrow and we're going to be busy during the day.
Wednesday:  Pork in crock pot (therapy day)
Thursday:  Pasta
Friday:  Pizza (Thursday during the day I'll put what I have of my ripe tomatoes and put them in the crock pot to make sauce so I have them for pizza on Friday).
Saturday:  Leftovers or casserole (leftovers if we have them and I know I have the makings of casserole in the pantry if there are few leftovers to choose from in the way of meat)
Sunday:  Lamb chops
And that's it.  Side dishes are left to my imagination until I start working out the details in my head and the specifics can be left up to me looking through my cookbooks, letting my culinary imagination run for a while until I come up with something or hitting some of the cooking sites like All Recipes or something to see if I can find something to spark my imagination.

You'll also notice if you look at my meal plans some days of the week seem to be pretty consistent in what we are having.  That's because I know I'm busy that day (like right now Wednesday and Thursday and Monday are more likely to be crockpot nights as I know that I'm busy those days and might not have time to cook).

I've also tried to do the "set day of the week for this certain meal" type of menu plan too and had decent success with it.  Like I had a set day for Taco day for a while when I could get good deals on hamburger (Fridays) and such.  There's a reason why "Meatloaf Monday" has been around forever.  Some people just like to keep the same schedule week after week.  My advice though is you do Meatloaf Mondays do one week beef meatloaf, one week spiced turkey meatloaf, one week a Thai themed meatloaf or something just to break up the monotony.   It not only gets boring for you to cook when you make the same thing week after week, but it also bores the people who have to eat it.

Sunday rolls around and I sit down and look at the Fred Meyer ad for the week.  The only thing I do with the store ads is to see if there is something I need to stock up on or if there is a fresh ingredient I'd like to add into a dish on the menu plan that I know I can't substitute out with a pantry item.  Otherwise I just look for sales on the foods my son normally eats as he won't eat home cooked anything yet.

Monday and I have a pretty good idea on what I want the rest of the week to shape up like, but sometimes Monday is still up in the air.  Like this morning I really didn't want to eat pork, but I don't have much beef in the freezer so I was trying to figure out the details, but was at the store buying milk and found beef ribs on sale 50% off (read cheap for beef) and I grabbed them to make them into our main dish for tonight.

Usually once I get Monday done and cooking the rest of the menu plan starts to fall into place.  Once I get one meal figured out it's like the other meals in the menu start to come into my head on what would "compliment" that day's menu.  Side dishes are either seasonal items (like during the summer we have a lot of salads during the week) or pantry items (like you'll notice green beans used a LOT as a side dish with meat around here as green beans are one veggie both my husband and daughter will eat without complaint, so we have them a lot).  I try to do meals based on one meat, one veggie/fruit and one starch.  Meat is self explanatory, but starches we'll either have rice, potatoes or bread and butter/some type of toast around here for the most part.  Every once in a while I'll mix it up with stuffing or something, but those are pretty much our staple items.   But, if your family likes baked beans use those as your starch with dinner.  It all depends on what you like, so go with it!

On Tuesday I look at the Carrs ad and do the same thing as I do with the Fred Meyer ad.  If I want to have salad during the winter, for instance, I tend to schedule it for Friday as salad can go on sale cheap at Carrs on 5.00 Friday or I can stop by Fred Meyer for their weekly sales at that time or look for reduced salad to use.  Well that and my weekly shopping is normally done on Friday (pay day), so I just revolve fresh produce usage around that day.

So, there you are folks.  My "system" as it were.  Now onto how I actually STICK to a menu plan every week.

I've tried so many different  systems it's pathetic.  The home keeping binder.  Didn't work for me.  The weekly print out to put your menu on and on the same page write down your grocery list.  Didn't work as I never remembered to look at the menu because I couldn't see it easily or I'd forget my grocery list as it'd be up on the fridge with my weekly menu.  It just frustrated me.

This is the system that finally worked for me.

This, as you've seen on every weekly menu post is my weekly menu board.

And this is also my menu board...

It's a DIY dry erase menu board and it's so easy!  I finally found the original tutorial I used for mine (if you can call it that as it is THAT simple) HERE.  I found the idea originally on Pinterest and loved it, but I lost track of the link (I should have...you know...pinned the pin!).  I made mine with scrapbooking paper from a kit I had and a thrift store 10x14 frame (thus why I have the blue on the bottom and top of the board) so it's nice and visible.

I LOVE this thing!  I hung it up on the wall in my kitchen, write my menu on it every week and it really does help me to stay organized.  If I'm not sure what I'm going to have for dinner that night, I just look over at the menu board first thing in the morning and I have my answer.  I'll even make little notes on the bottom for what my baking list is going to be if it is something out of the ordinary so that I remember it.  It was super cheap to make, keeps me organized, and if I get bored with the design I'll just switch out the paper and voila!  New menu board.  For a FRACTION of the cost that something like that would cost you if you bought one commercially.

In case you are one of those "write things down every week to stay organized" types on print outs, or if you want a nice template to stick in a frame to make your own dry erase menu I made this for you...

I even included some blue snowflake pattern that's found on vintage Corelleware (because, well it's me making it so I had to make it "me" ;).  I thought I did pretty well for my first attempt at a printable, if I do say so myself.

Just click on the image of the menu plan and it'll bring you to a new "page" where you'll view the image (since the above image is smaller than the original is, of course).  Right click with your mouse and save the file as whatever you'd like on your computer and print it off however you like.

Enjoy!  And good luck with the menu planning!  It really will help you to stay organized in the kitchen, keep better track of what is in your pantry inventory (more on that later) and make things a little less stressful on a day to day basis when it comes to the kitchen.

Sunday, September 27, 2015

Monthly Goals Update and This Week's Goals

Well, this weekend was one big curve ball thrown our way.  We went out yesterday to do some quick errands and get my son out of the house and we found out the hard way he had a stomach bug.  So, we ended up going home and taking care of him all day yesterday and detail cleaning the back seat of our car (which in all honesty needed it anyway).  As a result of yesterday my husband and I were just exhausted today to the point of nearly not being able to function.

To stay awake I decided the only thing to do, once I knew that my son was feeling better, was to get some work done.  So, I got some work done.

As goals for the week went, I got a decent amount done all things considered.  So, let's get to it!

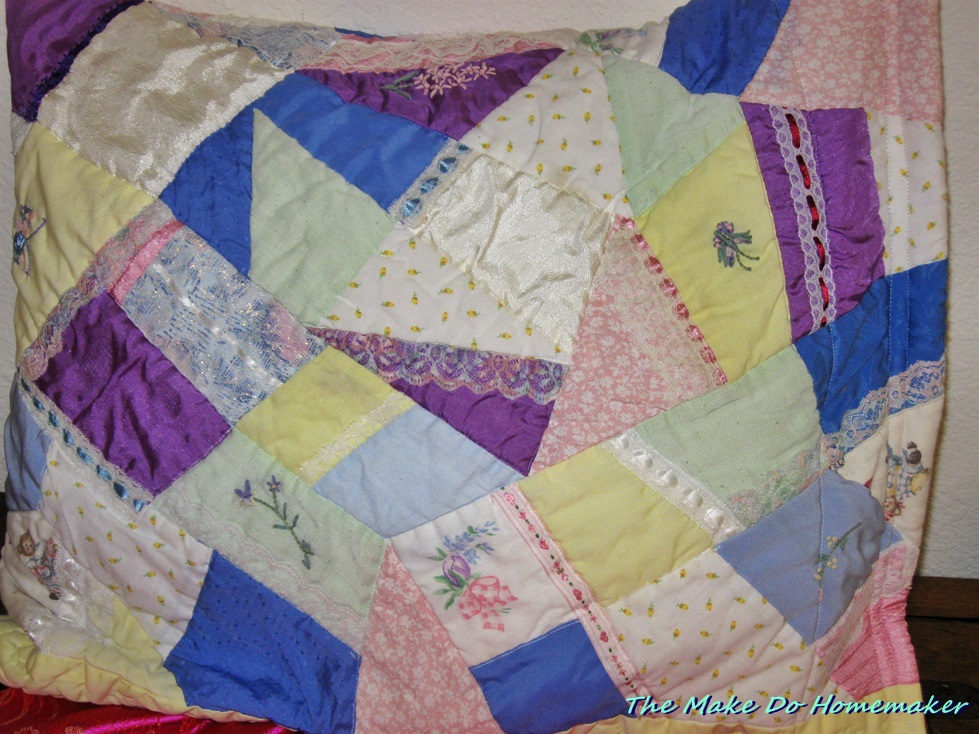
First up, I have a story to tell.  It involves the pillow above.

Ages ago, when my daughter was just a few months old, I went into a used store and looking through the various blankets and baby things (as I was still getting things for my daughter) I stumbled across a quilt.  A beautiful baby quilt.  It was embroidered, quilted, patched together with beautiful fabric.  Someone had put a lot of love into that quilt.

It was also very well worn.  To the point of making me sad.  It was stained in a lot of places.  There were holes where something had caught the fabric and ripped it and the batting underneath.  It was in somewhat sad shape.  But the thought of the stories that went into the making of that quilt.  The usage of that quilt.  I had to buy it.  And it was 1.00, so really who could pass it up?

I held onto that quilt for years with the intention of doing my best to rebuild what was broken in that quilt.  I ran it through load after load of laundry, trying every trick in the book to remove the stains.  I think it still smells of Woolite, honestly, from the sheer amount of time it spent soaking in it.

Once I realized the stains weren't going away, I tried to fix the holes.  Unfortunately, fixing a quilt with holes through the batting as well as the top was just outside of my ability to fix and make look good.  But, still, I held onto the quilt wanting to do something with it.  To make it live again.

And then it came to me recently when I stumbled across it in my fabric stores.  I was about to put it back in the pile of material, yet again, after all of these years and then stopped myself determined to make something out of it so it could see the light of day again.

So I started measuring and realized I could make what I like to call a "half pillow" out of it.  What I do is when a cheap pillow starts to get trod down (which how quickly does that happen right?), after I wash the pillow about five times, is I open one end and then fold the batting in half and stick it back into the original pillow case and then sew it up half way down.  And voila!  A 1/2 pillow.  It makes a nice throw pillow without a lot of effort and I happened to have a pillow to use so I made one and then used the quilt to make a pillow sham for the pillow.  I'll give the pillow to my daughter for Christmas.  She asked for "fancy things" for Christmas this year and by golly I think that fits the bill!

I mean just look at that embroidery.  Regular embroidery, ribbon embroidery (which I really need to work on mine), lots of lace accents.  It's just beautiful!  Here's the other side...


Yes, you can still make out a stain here or there, but I think that helps add to the character of the finished product.

I've decided to use the material that I can get together from the remnants of the quilt that are left to make a tea cozy for my tea pot.  I've always wanted a pretty tea cozy, so the quilt material definitely fits the bill and I'm pretty sure I'll have just enough material to make it (and if I have extra I'll make a pretty hotpad for the tea pot to sit on.  Squee of excitement here *laugh*).

 Next up, I wanted to start getting ready for Halloween this week as it's going to take me a while to get materials together for one and for two I had to do some creative things to make some stuff work, so I was curious as to how it would all turn out.

My daughter asked for a Harry Potter theme for Halloween and never one to shy away at an opportunity to get my geek on when it comes to Harry Potter, I started thinking on what to do for it.  I've done a Harry Potter themed Halloween for my daughter in the past, but I wanted to make it a bit fancier this time around as I'm hoping to have a small party so she can invite some of her friends from school.

And so I hit Pinterest for ideas and found some cool stuff.  I quickly decided that I wanted Honeydukes to make an appearance at the Halloween party because...well it's the candy shop for crying out loud!  So, I went looking for Honeydukes printables, but didn't find any.  I, not to be defeated went around and found some pics of the Honeydukes sign from the Wizarding World of Harry Potter, went into my photo shop program and made some of my own stickers to use.  A package of 1.00 treat bags from Target and I was in business.

I then used the clear plastic that covered the treat bags to make the windows in a Bertie Bots Every Flavored Beans box.  I found it on Deviant art through a Pinterest link for something else I was looking for and thought it was so cool I had to give it a shot. 

It was kind of a pain to put together as it didn't want to fold right, but it worked out alright in the end.  I'm going to put some allergy safe jelly beans in it and use it on the treat table at the party.  And hey, for 1.00 plus a piece of sticker paper and some ink I thought it came out pretty well.

I also found an acceptance letter to Hogwarts on Deviant Art and printed that off and then found a Platform 9 3/4 ticket through Brandy's Harry Potter post on the Prudent Homemaker.

Overall, I thought everything turned out pretty well!  I printed off some more things that I'll work on making later, but so far so good.

If you'd like to check out some of the things I found for yourself, feel free to check out my Halloween Board on Pinterest.

I made my daughter a ankle length skirt to go with her Christmas gifts made out of the prettiest pink Asian fabric I found at the used store.  I thought it was so pretty, but there wasn't enough to make a dress, so I made a skirt out of it instead.  Currently it's ankle length on her as I do worry about how much she could grow before Christmas, but it turned out well.  I'm proud of myself as it took me all of an hour to make it and that's with double folded seams too (to protect the material from fraying).

By the way if you want to make an easy skirt pattern for your daughter?  Take the waist measurement and double it (plus whatever you have for seam allowance...in this case I added 2 inches for the folded 1/2 inch seam).  Then take your length measurement, add two inches for the elastic waist to go in and whatever your bottom seam allowance is and start sewing!  The extra material around the waist will gather as you pull the elastic to size and the length can be hemmed.  Easy peazy!

I also got the home made Bisquick made, so it feels good for that to be done.

So, now onto this week's goals!

1.  Make table runner and tablecloth out of fall material (yup, I punted this down the field again).
2.  Work on reorganizing bedroom.
3.  Get more things bagged up and take to used store to free up corner of bedroom that I'm going to need.
4. Take inventory of material stores and figure out what needs to be replenished.
5. Take apart desk and move bottom half into bedroom to use as a dresser.
6.  Reorganize pantry better now that canning season is done (I need to rearrange to make sure I have things in the right place for usage).
7.  Reorganize counter space in kitchen to plan I sketched out.
8.  Make out goals list for next month and get shopping goals finalized.
9.  Clean and oil sewing machine.  Change needle (it's time).

And there you are folks.  My goals for this week. 

Friday, September 25, 2015

Frugal Friday: Money Saving Weekly Recap

This week has been busy.  And not all of it good.

I took my daughter to her scheduled dentist appointment this week and got her two baby teeth pulled.  The poor thing HURT for a day afterwards and when I looked at the teeth they pulled I saw why.  I had never seen baby teeth with roots that long.  No wonder the poor thing couldn't get them to come loose/out.  Half of the tooth was rooted in!

We stopped off afterwards and made an appointment with the orthodontist.  Found out that orthodontist work isn't covered by her insurance, so we're going to be paying a possible 7 to 8 thousand out for braces if she needs them.  I'll be sending up a lot of prayers till her appointment at the beginning of October that the braces aren't necessary.

When the gal told me that insurance didn't cover braces, I think waiting for the inevitable argument from another dissatisfied person, I sighed and just asked if they took payments.  She said yes they did and gave me some details on the other arrangements they could make and then complimented me on being so calm about it.

I just shrugged and gave a half grin saying that by this point I'm numb when it comes to dental bills.  What can you do if the work needs to be done?

And so we'll go in and see how that all works out in a few weeks.  Fingers crossed.

Anyway, I did get some money saving things done this week!

1.  I've remembered about 1/2 the time this week to turn off the heat in my kid's rooms when they are at school during the day.  I know that sounds like a really not great average, but this is the coldest September we've had in a few years, so I feel proud of myself for remembering at all as I get back into the swing of things around here.

2.  I fixed the other arm of our loveseat (seen up top).  The right arm, admittedly, didn't come out as well as the left arm did, but I had to kind of force the material to do what I needed it to on the right arm instead of following the contours of the arm like I did on the left.  Mainly because I REALLY needed any extra material I could scab off of my lowly 1 yard remnant so I could fix some really nasty flaking leather that was on the back couch cushion.  By doing the arm the way I did I managed to stretch the fabric as far as I needed it to go (barely...I think I had about 1/16 of an inch to spare.  I was proud of myself *laugh*) and everything is fixed.  That, to me is the important thing. The patch on the back couch cushion is obvious when you see it, but hey if you cover it with an afghan or quilt you'll never know it's there (see can't see it up there in that picture can you ;).

3.  I went to the store today and by combining sales and coupons (and actually going to multiple stores, which is a rarity for me anymore) I was able to stick to my weekly grocery budget but was able to get a flat of evaporated milk, various flavors of Jello, some canned pork, 10 more lbs of margarine (this will hopefully, if my calculations are good, between what I already bought and this 10 lbs, last us six to eight months), 10 cans of green beans and 6 cans of various condensed soups as well as steaks (steaks are kind of a luxury item anymore).  All within my normal grocery budget.  When I was at Carrs and the total started at 157.00, I got a bit petrified that I'd done my math wrong only to watch the amount go down when they hit total.  By the time my coupons were applied and discounts taken my total was 84.00.  Times like that I feel good and really feel like I earned my home keeping "pay" as it were.

I even looked up at our local bulk store to find that their gas was a lot cheaper than elsewhere (2.69 at Three Bears on the Palmer Wasilla folks!) and I realized when I saw the price in town that even with my gas rewards I wasn't going to get cheaper than that, so I stopped off there on the way home and got gas. 

4.  By limiting my trips and trying to combine errands I was able to make 1/2 tank of gas last two weeks.

5.  I watched "Wartime Farm" on You Tube over the last week and thoroughly enjoyed it!  It's kind of like "The 1940's House" only it's based on three people living in British wartime farm conditions for a year.  It was fascinating watching it and seeing what kind of resourcefulness the farmers had to employ to see them through the war years and beyond.  I added the companion book to the series to my Amazon cart to hopefully buy later.  Times like this I love having a laptop as I put it on the counters and watched the series (8 one hour episodes in length) while I baked or did the dishes.  I'm seriously thinking about watching some of the other series such as "Victorian Farm" in the coming weeks.

I was also able, by doing a little research, to find some Women's Institute booklets on Amazon (the woman in "The Wartime Farm" used WI booklets a lot and I was really intrigued by them) for free download.  I'm hoping to read through them soon.

6.  I made cookies this week.  Still have to make bread, but I'm planning on waking up early tomorrow to get that done and work on some housework (like ironing and sewing) while the kids are still asleep.  IF they actually sleep normal hours and wake up normally, which with my kids...it ain't likely, but I can hope.

7.  I dropped off three more loads of things to the used store.  Still have a bunch more to go, but I'm making progress.  I don't know if it's really a "money saving" thing to do, but I still feel good that those clothes will go to people who will need them and the people who run the thrift store are really nice and I'm happy to help support their church and charities.

8.  I made a big pot of mulled apple cider oatmeal and ate it for my breakfasts all this week.  A cheap breakfast, yes, but I've really been enjoying it.

9.  I made a batch of home made Bisquick/Master Mix as I was running low.  I love that stuff for pancakes mostly, but it's worth keeping around for sure!

10.  I edited my October shopping list some more to add a few things and remove some things I've been able to buy beforehand with my weekly grocery money.  I feel really good watching the list get smaller as I pinch pennies to get some of the things beforehand with what I normally spend for the week.

And there you are folks.  Some ways I saved money this week.  How did you do?

Thursday, September 24, 2015

Thrifty Thursday: Thrift Store Finds


So, I was so excited last weekend when we went to one of our local thrift stores that was having a fall celebration/party.  We thought we'd get the daughter a cookie and me some free hot apple cider, but when we went in and looked around we walked out with some stuff instead *laugh*.

One of the things we walked out with is a rocking recliner for our living room for my son.  He loved it so much when we were there that we just couldn't walk out without it.  It needs to have it's bottom brace thingy repaired (my husband's camp, not mine), but overall it was in great shape.  For 12.00 it was worth it, definitely.  My son is impatiently waiting for my husband to fix it (unfortunately for him he had to work last weekend and had a birthday party to go to for my daughter so he didn't get to it) and then I can replace the really cheaply made 10.00 olive green recliner we have in our living room with the nice neutral colored one (yay!).

My find of the day, however, was the above book.  I FINALLY found a jello cookbook!

I know, I'm insane.  Live my life for a little bit and you'll figure out why.

Seriously, I had been told by various older people (70 years young) I knew that Jello was one of the staples in their cupboards because it could be used for pretty much everything.  One woman called it the super glue of the kitchen.

Now, I wouldn't go as far as that, but I WAS impressed with all of the different things you can actually do with Jello.  In the book there are recipes for sherbet, fruity glazes, various molded salads (of course), cakes and more.  And hey, if I ever want to incur the wrath of my family, and not to mention my taste buds, there are TONS of savory salads with floating olives and things molded into them.


This book makes me want to go out and buy every flavor of Jello imaginable and experiment, but instead I'll leave you with a hearty "Fish mold!!!!" and be done with it (I really need to work on my un-molding skills).

Mulled Apple Cider Oatmeal

I am, by nature, a fall person.  I grew up in New England, so fall is, I think, intrinsically in the blood when you come from that area.  Pumpkins on everyone's doorsteps, apples falling from the trees and all the wonderful dishes (such as hot apple cider) that came with those apples, the beautiful foliage changes that ranged from yellow to brown to red to purples.  I loved it all.

Once I moved to Alaska it took me a while to get used to the Alaskan autumn.  We don't have all of the beautiful colors of fall up here.  We have a FEW trees and bushes that will turn red, but for the most part Alaska is shades of yellow in the fall.  You can't really grow pumpkins in your garden here without a lot of extra effort.  And apples up here...well we have a few varieties of apple tree that will grow and they do make nice tasting apples, but it's nothing close to the variety of apples you can find down South.

However, I've come to appreciate our short lived fall season in Alaska.  I am constantly amazed how many shades of yellow you can actually find in the trees up here as the trees change color.  I like the colder mornings combined with the beautiful afternoons.  Instead of pumpkin season we have potato season (which I do celebrate the cheap prices on those).  And even though we might not have many apples up here, we still get some wonderful varieties coming in from down South.

In the days when money wasn't so tight I would buy a few jugs of fresh apple cider from the store this time of year as I always do miss the fresh apple cider you could buy everywhere back East this time of year.  I'd buy a jug (or three) come home and can it to help see me through the long winters.  But, that was before money got tight.  I've got some jars of apple cider from a jug a friend gave me that she didn't want last year that I hoard and tend to pull out when I'm sick or want a treat.

So, I came up with this recipe to help stretch that wonderful apple cider bounty out a bit.  It's perfect to eat on a cold fall morning with a sprinkle of cinnamon on top.

You can use this method with both rolled oats or steel cut oats.  Personally, I prefer steel cut oats when I can get my hands on them as I love the creamy and yet chewy texture they lend, but make what you have.  It'll still taste great!

I will also add some extra milk, if we have it, when I reheat the oatmeal to make a creamy porridge instead of a chewy dense oatmeal.  Yummy!

 Mulled Apple Cider Oatmeal

Ingredients:
  • 1 Cup Steel Cut Oats (or rolled oats)
  • 2 Cups mulled apple cider (you can use regular apple cider or apple juice + 1/8 to 1/4 tsp. pumpkin pie spice instead).  Reduce to 1 cup if making rolled oats.
  • 2 Cups milk (you can use water if you don't have milk, but the texture won't be as creamy)  Reduce to 1 cup if using rolled oats
  • Pinch of salt
  • Cinnamon, diced apple, apple sauce or brown sugar for topping (optional)
Procedure:
1.  Combine apple cider and milk in a pan and bring to boil. 

2.  Add oats and bring back to boil (will only take a moment). 

3.  Reduce heat to bare simmer and simmer for 25 to 30 minutes or until oats are tender and are desired consistency (if using rolled oats cook for 5 to 7 minutes or until desired consistency is reached).  Add salt and mix into oats.
Serve with a sprinkle of cinnamon or brown sugar (if desired).  Diced apple or apple sauce on top of the oatmeal will only improve the appley goodness (if you have some at your disposal.  The one lowly apple in the picture is currently the only one I have fresh and it was reserved for daughter's snack time, so that was out for me *laugh*).

This can be spooned into a container the night before, covered with plastic wrap and reheated in the mornings.  I tend to do so at the beginning of the week and eat it for breakfast all week long.  Just microwave for a minute to a minute and a half or until hot, stir in some milk to make it creamy again (if desired) and voila!  A hearty and fall flavored breakfast that will keep you full till lunch!

Tuesday, September 22, 2015

Slow Cooker Beef Stroganoff


This is a recipe that developed out of a need to STRETCH (and I mean stretch!) some thin cut beef steaks as far as they would go (two very tiny ones).  It worked well, so I've employed it a couple of times since then, because I can find those tiny steaks sometimes for 5.00 or less.  Basically, it's one of the few ways we're getting beef in our diet anymore.

So, here you go folks.  Just to warn you if you are a gourmet type of person when it comes to Beef Stroganoff, just move on.  I don't want to be responsible for your heart attack when you see dehydrated mushrooms and beef bouillon in this recipe.  Cheers!

Slow Cooker Beef Stroganoff

Ingredients:
  • 2 thin cut beef steaks (mine are usually about 1/4 to 1/3 pound of meat total), cut into small bite sized pieces.
  • 1 can cream of mushroom soup (10 1/2 oz), undiluted
  • 1 cup beef broth or stock or beef bouillon reconstituted to 1 cup beef broth (my bouillon works out to 1/2 tsp. to 1 cup water).
  • 1 to 2 TBS dehydrated onion (depending on how strong an onion flavor you like)
  • 1/8 tsp. garlic powder
  • 1/3 cup dehydrated mushrooms (I use button mushrooms), 1/2 cup sliced mushrooms or 1 can sliced mushrooms (well drained)
  • pinch of pepper
  • 1 cup sour cream (I always get the small containers/1 cup containers on reduced at the store for .79 or so.  Light sour cream is fine here)
  • 1 package egg noodles
Procedure:
Combine everything but the sour cream and egg noodles in your crock pot/slow cooker.  Cook on high heat 4 hours or low heat 6 to 8 hours, stirring occasionally.

When ready to eat, prepare egg noodles to package directions and drain.  Turn off heat on crock pot.  Stir in the sour cream with the Stroganoff mixture in crock pot.

Combine pasta with Stroganoff ingredients.  Stir carefully to combine (to avoid breaking up the egg noodles).  Serve.

Monday, September 21, 2015

Menu Plan Monday: Menu for Week of 9/21/15

I have decided for the sake of my sanity this week to try and use the crock pot to make my life easier as much as possible on the busier days.  I have a dental appointment for my daughter tomorrow on top of the regular therapy days, so I definitely need some meals to make my life a bit easier.

Menu Plan for Week of 9/21/15
Monday:  Tacos

Tuesday:  Pot Roast (crock pot), potatoes au gratin (mix from pantry), green beans (pantry)

Wednesday:  Roast chicken (crock pot...trying a new method I researched online to make a rotisserie-like chicken), dressing/stuffing, mashed potatoes and gravy, leftover green beans, biscuits (Bisquick mix from pantry)

Thursday:  Leftover Roast Chicken Dinner Croquettes, pears (pantry), leftover mashed potatoes.

Friday:  Noodle bowl night for kids, fancy dinner night for husband and I (otherwise known as 2.00 discount brie, reduced prosciutto and some olives from the pantry on home made bread).

Saturday:  Breaded fish, rice, peaches

Sunday:  Turkey Burgers with honey mustard dressing (found a bunch of frozen turkey in the freezer), french fries, green beans.
Desserts:  Jello with Dream Whip, apple crumble.

Baking/To Make List:  Bread, mulled apple cider porridge (a recipe I'm messing with this week), biscuits, orange rolls (still need to make these).  Baking Day:  Tuesday.

Sunday, September 20, 2015

Monthly Goals Update and This Week's Goals

Well, overall it's been a pretty productive week for me around here.

When it came to last week's goals, I got the majority of them done.  I got some mending done, including mending the loveseat arm, but I still have a ton more to do.  I also didn't get my other table runner made, but I've got time so it's not a big deal.

I got the sideboard all cleaned up and managed to empty the drawer and actually use it for...you know...sideboard stuff!  I would have taken a "before" picture, but I think everyone pretty much knows what their junk drawer looks like and can just superimpose that image over the drawer in their minds.

I managed to get a bag of garbage from the sideboard alone.  The majority of it was old papers (from the drawer) and lots of old gladware type of containers that the lids went MIA a long time ago or lids where the containers went MIA a long time ago...you get the idea.

In the drawer I put cloth napkins, table runners and napkin rings and then there was the space below...

Where I did what I could with it.  I'm hoping that once I can get the hutch cabinet in a lot of this stuff will have another spot to go and I can reorganize (the brown sugar and tapioca I have in here until I can find some more Tupperware containers to put them in the pantry).  I'm hoping eventually this space can house good dishes (for special occasions) and tablecloths.

I dropped off three loads of stuff to the used store this week.  I still have a lot more clothing to go, but I'm making progress!

I got all of the laundry folded and too small clothing is now in a bag ready to go to the used store.

I got the freezer cleaned off, coils cleaned, and the entire contents of the freezer removed and reorganized.  I can now see what I have, have it all organized on the shelves better and found that I had to throw away very little (mostly I unboxed things and threw the boxes away to make things stack better with less wasted space0.

Bright side.  I found some things I forgot I had (like some lamb chops!), so that was a really welcome find.  I find my list of fresh things I want to get next month getting smaller, which makes me even happier as it will save me from having to spend unnecessary money next month.

I finally got the chocolate chip cookies made for my daughter's lunches.  I used an old Betty Crocker recipe that not only made more cookies than the previous recipe I'd been using, but it also used a combination of butter and shortening, so it was cheaper to make in that respect AND it only calls for 6 oz of chocolate chips, so a bag of semi-sweets will make 2 batches of cookies (yay for kitchen scales for accurate weight measurement with that!).

I started to clean up the master bedroom in preparation of reorganizing it and I got some more Halloween and fall decorations (read: kid's artwork) put up.  I also got a little bit of Christmas gift work done this week as well, so woot!

I figured out how to tear apart and deep clean my dishwasher (which BOY did it need it!).  My husband and I had looked up our dishwasher, or at least what the manufacturer said was our dishwasher online and the instructions they gave for cleaning it didn't make any sense compared to what we were dealing with.  I finally figured it out by studying it and figuring out where tabs and stuff were and we got it done.  I think that really does rank up there with one of the most disgusting home maintenance jobs I've had to do thus far.  But, bright side my dishwasher is running much better now!  Not on my list but it needed to be done.

I went out today and composted the garden in preparation for winter.  Nope, not on my list for last week either, but it needed to be done anyway!

So, onto this week's goals!

Sewing Goals:
1.  Continue to work on Christmas gifts.  Be sure to finish pillow form and pillow case for daughter this week (the cat keeps trying to nest in the material and I don't want her getting too comfortable).
2.  Continue to work on mending.
3.  Finish table runner.
4.  Make pumpkin table cloth or runner with leftover pumpkin material.
5.  Mend other arm of loveseat.
General Goals:
1.  Continue to work on cleaning out and reorganizing bedroom.
2.  Take inventory of material stores.  Make sure I have everything I need and if not, make list.
3.   Print a couple preliminary Halloween items online (I'm doing a Harry Potter theme for Halloween this year for my daughter) and make sure they come out okay.
4.  Make a batch of home made Bisquick/master mix.
5.  Take apart fold down desk and move bottom half down into bedroom to use as a dresser.
And there you go folks.  Some basic goals for this week.  I am sure there's more I'm not thinking about right now, but I'm tired, soooo I'll figure out the rest later!

Friday, September 18, 2015

Frugal Friday: Money Saving Weekly Recap

Today has been busy on top of a busy week.  So, let's get to money savings things I did this week.

1.  I redid the arm on our loveseat.  As some may recall, I had issues with our loveseat not doing great earlier in the year so I made a sling for the loveseat.  Like this...

What I found though was that I was putting a band aid on a much bigger problem.  See, the leather on the loveseat has been used hard the last four years and it just starting shredding and falling apart.  And unfortunately the left side of the couch in the picture above got it the worst.  The sling, while a good idea in theory quickly started to show its disadvantages.  My son treated it like a ready made blanket to wrap himself up in, the thing was hard to tuck back into where it needed to be (which was often that it managed to come loose) and as the cloth slid over the loveseat arms all the time it actually made the shredding leather problem worse instead of helping it.  I finally pulled the sling off the loveseat and tried to deal with it just being ugly.  Unfortunately then my son started plucking the leather again and it just ended up being more and more of a mess.

I'd been looking at the used stores obsessively the last couple of weeks hoping to find a loveseat cheap to replace the thing as it was really looking ratty, but wasn't having any luck.

And then today I went to Jo-Ann Fabrics as part of my errands looking for yarn.  While I didn't buy any yarn (4.00 + per skein not on sale?  No thank you), I did find a yard of remnant leather for 6.00, originally the material sold for nearly 30.00 per yard, that was the same shade as the loveseat, so I went home and got to work.

Here's the final result...


If you look closely you can see the lack of seams, but overall I thought it turned out rather well.  The left arm is now one big patch and not a shred to be seen.  I've got enough material left to do the right arm as well (which I'm hoping to do tomorrow) as it's in pretty rough shape too, although not falling apart yet.  I took a cushion that was in better shape from my couch downstairs in the den (we don't sit on it as much so it's in much better shape) and exchanged it for now (so the ratty cushion you see in the top picture is now gone from the final picture here).  Now that I know that Jo-Ann sells the material I'm hoping to get a yard at a time and redo the cushions and other parts that need to be done.  We'll see how that goes.

Just a couple of notes to those who might think about doing upholstery work from someone who has repaired a few things in their day.
1.  Get an upholstery needle.  YES, it is worth it! 

2.  Even if you have thick calluses on your fingers, they will hurt by the end of the project.  Guaranteed.  And no, in my experience, a thimble does not help this problem.

3.  If you feel like it really needs to be done?  Give it a shot.  Odds are whatever happens you will improve the issue.
But yeah, for a 6.00 (well 3.00 since I still have the other arm and half of the material to go) repair I think it looks pretty good.  My husband was impressed anyway :).

2.  I went to Carrs today and got cooking oil for 1.67 per container, brown sugar and powdered sugar for 1.67 per 2 lb bag and got corn muffin mix (3.99 for a six pack).  These went straight into the pantry to help pad it out.  I'm happy that I'm being able to check things off of my shopping list for next month and doing it while hitting sales and working it into my normal grocery budget.  This will definitely help me not spend as much money on a bulk shopping trip next month.

3.  I darned two comforters this week and am working on another that needs an entire side redone (it's got piping that is going to need work to get it all to align right).  I also mended a pair of jeans and darned two pairs of socks.

4. 
I went out today armed with giftcards and an errand list and one of the errands I had was to go to our local Sportsman's store and use up the rest of my husband's giftcards he had to get the above.  They are emergency rations for our 72 hour kits.  I researched online and found that these have enough calories to keep an adult alive for two days and everyone said they taste like coconut cookies.  Both win types of scenarios in my book ;).

With how much my husband had left on his giftcards I was able to get two packs and paid .20 out of pocket after giftcards.  I bought these primarily because they are relatively cheap and won't take up much space in a bag.

5.  I ran to Home Depot while I was out (I combined all of my errands that I had in town down to one big trip) and found they had solar salt and they even had one that had gotten torn and was 50% off.  I compared it weight-wise with a full bag and it seemed pretty full to me, so I grabbed the bag and used what was left on our Home Depot giftcard to get it.  I was able to get a nearly full bag of solar salt for .27 after giftcard was applied.  Worked for me!

6.  I picked up butter and cheese at our local Fred Meyer this week as butter was on sale for 1.99 a pound with in-ad coupon and the cheese was cheaper with the in-ad coupon then the price I pay for a log at the bulk store (and we do use cheese a lot around here). 

7.  I started on a potholder for my daughter's teacher for Christmas using yarn I'd found in the bags and boxes that had been in storage.  I'm thinking I should be able to make pot holders for all teachers and aids this year and not spend any money out of pocket for gifts for them.

8.  I made all of our meals at home which saved us money and used coupons and sales (obviously) to get the most from my dollars this week.

And a quick garden update (as they go I guess).

I pulled the last turnip this week as it has been so wet that something, probably root maggots, were starting to eat on the little turnip and I wasn't going to lose it to bugs.  After that I pulled the rest of the plants for the year, worked the soil a little bit (still have some of that to go) and am starting to work in compost to help it to rest well over the winter.  I'm going to try an experiment and really bury the rosemary in my garden in the hopes I can MAYBE get it to overwinter and come up next year.  I'd love it if it would as I'm notoriously bad at growing rosemary from seed and would love to save the money from buying a rosemary plant next year.  Fingers crossed there.

I did invest in some seeds last week.  Brandy at The Prudent Homemaker made some suggestions for a fall and winter garden last week and while I knew in zone 4 that a fall and winter garden was kind of out, I did find some links to some cool seeds.  Alpine strawberries/wild strawberries are strawberries I grew up with when I was a kid in Maine and I loved them as they are super sweet. They sound like they'll be good summer plants here and since they don't send out runners they are great for planters and such, so I'm going to try my hand at planting them next year.

And so now that the garden is done for the year, the planning for next year's garden begins *laugh*.

Hope you all had a fruitful and frugal week as well!

Thursday, September 17, 2015

Thrifty Thursday: Thrift Store Finds

This was a good week on the Thrift Store front.  Well, kinda *laugh*.

Some of what is seen above is actually from a local antique shop that is going out of business.  They were proclaiming 50% off everything and intrigued, since we'd never been there before, my husband took us on an adventure to find the place.  We found it and went inside and were amazed by all the stuff.

I was able to get a box of canning lids (with the lids still inside), an old frozen food box and a vintage baking powder tin (I collect old spice tins) for like 3.50.  It was fun and I was able to pay with cash I had in my pocket, which kept me careful on how much I spent.

We also went to a local used store and I found a soap dish, which I'd been needing for the kid's bathroom.  And then I made the mistake of turning said soap dish over and saw "ironware" and other markings, went and looked up the soap dish online and found that it is an ironware dish made in the 1800's, specifically transferware.  The 1.00 I paid for it was definitely worth it as it is in perfect condition (honestly I got it because it was solid, clean and I thought it was pretty).  I knew ironware was pretty tough, so I was all for just using said soap dish, but my husband put his foot down and after arguing with me the abuse that soap dishes take on a day to day basis, the soap dish finally ended up in my china cabinet.  So, I still need a soap dish for my kid's bathroom *laugh*.

I was also able to find cloth napkins for .25 a piece, so I got some patriotic themed napkins (blue with white stars) and some grey blue ones, four of each.  So now I have a couple of new cloth napkins in the rotation.  Always welcome.

At another used store I was able to find a new Oxo grips can opener for 3.00.  I love the one I have but the handles keep popping off, so I was happy to find another one.  We also found an old style can opener/key for 1.00 (those come in handy!).  The vintage biscuit/cookie cutter was .50 (I love the old style cookie cutters and biscuit cutters, they just work so well!)  and the potato masher (bakelite handle and everything!) was 2.00.  I have been looking for an old style potato masher as my "new fangled" Oxo potato masher just doesn't work great in my opinion and I KNOW the old style ones work because that's what I grew up with.  And the rubber spatula was another kitchen item I've been needing as mine are just getting really worn and it was .50.

Really, it was a week to run into things I needed and some I didn't, but it was still a lot of fun exploring and finding cool things.

Find any cool things on your travels lately?

Tuesday, September 15, 2015

Menu Plan Monday: Menu for Week of 9/14/15


This has been a busy couple of days and I found myself kind of sitting at the kitchen table staring off into space as I tried to figure out what to put down for a menu this week.  So, it ended up being a day late as I waited for divine guidance on what we should eat this week.  Well, I didn't get any shining light from the heavens, but I think I figured out some things to eat this week, anyway *laugh*.

Menu Plan for Week of 9/14/15

Monday:  Baked chicken, mashed potatoes, green beans

Tuesday:  Baked fish, rice a roni, fruit cocktail
Ingredient Notes:  Home made rice a roni mix from pantry, fruit cocktail from pantry.
Wednesday:  Pork roast, roast potatoes, tomato slices
Ingredient Notes:  Potatoes, garden produce from pantry.  Tomatoes from garden produce from pantry.
Thursday:  Shrimp scampi, mixed vegetables, garlic toast
Ingredient Notes:  Canned shrimp from pantry, mixed vegetables from pantry, garlic from garden produce in pantry.  Olive oil for toast from pantry.
Friday:  Pizza

Saturday:   Chicken Alfredo
Ingredient Notes:  Canned chicken from pantry, alfredo sauce from pantry, pasta from pantry.  Add some peas from freezer.
Sunday:  Pancakes, bacon, eggs.
Desserts:  Apple pie, orange jello, chocolate pudding.

Baking List:  Pizza crust, orange rolls, bread.  Baking day, Friday.

Monday, September 14, 2015

Monthly Goals Update and This Week's Goals

Well, I didn't get to doing this post yesterday, as you could probably tell *laugh*.  It was one of those weeks which was a just one curve ball after another.  Not in a bad way, mind you, but it did keep us busy around here.

For one, I found a hutch like cabinet at the used store last week that I REALLY wanted for my kitchen.  It is missing a drawer, but I knew looking at it that it was made of very solid wood.  When I dragged...err...went with my husband to the used store, he agreed with me that it was definitely worth the 20.00 they were asking for it as just the material it was made of ALONE would be worth 20.00.  So, we bought it and got it home and I've spent a good couple of days last week cleaning that cabinet up.  About 15 layers of grime were on it and underneath I found oak!  Yup, definitely worth 20.00.  I'll try to show pictures of it once we can get it out of a cramped corner of our garage, but I'm just so excited to get that cabinet put in!  It's got a microwave space built into it a large upper cabinet which I'm dying for as it will make a nice mini-pantry in the kitchen.  I'm just thrilled, let's put it that way.  My husband will have to cut the cabinet down a few inches to get it to fit into the actual kitchen (I have a galley style small kitchen), but in the meantime I will wish for it to be done *laugh*.

I reorganized furniture to get to my main heating vent to clean it and also to allocate some space for the kitchen hutch cabinet if my husband didn't want to mess with cutting it apart.  I'm glad I did as I found out that we have an open into the floor heating vent because of an unfinished heating duct, so I know that we've been losing at least SOME heat into the floor because of that.  So, my husband has to build a duct to complete the heating vent.  Poor man.  I just keep adding to his "to do" list.

I was settling in late last week to get some sewing done and found out my daughter was invited to a birthday party for a friend of hers who has been her friend for about 1/2 of her life now.  They don't get to see each other often, so I knew she would want to give her something and it was VERY short notice so I dug through what I had to make her something.  My daughter ended up helping me to make a cat out of a panel project I'd found at the used store a while back.  She poked herself with about four pins helping me to pin it together and she helped me to stuff it.  I was proud of her for helping me with it and am glad she's finally showing an interest in making things.  I'm now down one thing I could make for a potential Christmas present, but it was worth it as it didn't cost me anything to make because I had all the materials and her friend loved the gift, so it all worked out.

I did get a fall themed table runner done (seen up top there) and have another one in the works.  The pumpkin table runner was going to be my Halloween table runner, honestly, as I looked at the cost of Halloween material at Jo-Ann's and then saw that fall themes were 70% off that week, so I got generic pumpkins instead of some cool Halloween thing.  My daughter picked out the pumpkins and we were happy with that choice (I have another material I picked out for just a fall theme that I need to make).

Then I was at the used store when we bought the hutch cabinet and I found someone had dropped off a bunch of Halloween themed panels of fabric.  I'm not sure what they were going to do with them originally as there were a bunch of different series of panels with 3 Halloween fabrics per panel, but I looked at the panels and realized if I could pick a couple where I could make a joining "panel" in the middle with fabric I already had I could make a pretty cool table runner out of them.
So, I picked some orange and black themes (I tried to take a couple of close ups above here), took some black fabric I had at home to make the bottom of the table runner and the "joining panel" in the middle and voila!  A really cool Halloween table runner that took no time at all to make!  For 2.00 total cost.  Can't beat that :).

I didn't get to cleaning the top of my freezer off, so that's going to get transferred onto this week's goals.  I did manage to download and fax the form I needed to the allergist (cost me 3.00 to fax, but I got it done).

Waking up a half an hour early wasn't necessary as my son has been getting up at 4:00 am.  I tried to explain to him I wanted to wake up a half an hour early, not three hours early, but he didn't seem to care *laugh*.

Besides being exhausted I was able to get the shake and bake mix dialed in the way I wanted so that's done for future dinners.

I still need to get more Christmas gifts worked on, at least the preliminary things (cutting, making patterns, etc) and I still need to get the massive pile of mending a bit more caught up, so those will, once again, get transferred onto this week's goals as well.

So here's this week's goals!

Sewing Goals:
1.  Get final fall themed table runner done.
2.  Use leftover pumpkin material to make table runner for coffee table or sideboard (depending how long it ends up being and how it looks on both).
3.  Work on mending.
4.  Work on Christmas gifts.
General Goals:
1.  Clean out sideboard drawer.  Toss what isn't needed.
2.  Move unnecessary things in pantry to 40' van or donate to used store to prepare for getting groceries next month.
3.  Continue to bag up old clothing from storage and take a couple more loads to the used store (I finally got all the clothes out of the den and now it's onto the bedroom!).
4.  Make more pizza pockets for freezer.
5.  Make cookies for daughter's lunch.
6.  Start to reorganize master bedroom.
7.  Clean off top of freezer, clean freezer coils.  Organize top of freezer.
8.  Take inventory of what is in freezer so I know what to add to the "fresh" grocery goals list.
9.  Fold all laundry and weed out clothes that don't fit kids well (they're both growing again).
10. Organize own wardrobe better for the coming winter months.  Start boxing up summer items.
11.  Put up more Halloween decorations (I am putting them out slowly until October so we don't get too tired of seeing them :).

And there you are folks. My goals for this week.  You have anything you are doing this week?

Saturday, September 12, 2015

Lessons I've Learned Being Broke: Don't Be Afraid To Glamorize

When I was younger I realize now that I was kind of arrogant.

See, I, like many other kids I know who grew up in the 80's remember our families being broke.  Then when my parents got divorced and my mom became a single mom raising four kids, I thought I knew what it was to be broke.  And then I got married and my husband got really sick our first year of marriage, which blew through our savings and I thought I knew what it was to be REALLY broke there for a long while.

And then this last couple of years happened and I started to realize something.  Back then I knew what it was to be broke, but I didn't know what it was to be broke well.  I was arrogant and assumed I knew how to be broke and do it well.  I know that is about as clear as mud, but allow me to elaborate.

See, back throughout my life I've had to live without much to live on, sure, but I just kind of hit survival mode and went with it, waiting for the monetary light at the end of the tunnel.  A new job to see us through a rough patch of not having money (which until I had kids I always managed to find), shopping with coupons to their fullest extent (heck I even ran a coupon BLOG for a few years!) and getting groceries for free or near free, getting a tax refund...something was always on the horizon that I just lived to get to, to get us through our monetary troubles.

The last couple of years though things changed.  I can't get a job right now with two kids in two schools, my son in therapy multiple times per week and with health issues such as allergies that I have to worry about.  Coupons kind of dried up years ago, sadly, when manufacturers saw the show "Extreme Couponing" and went ballistic (that and the economy taking a nose dive).  Tax refunds...well you only get a good tax refund if you make a decent amount of money in a year and well...two out of three years we didn't.

So, I had to start tapping reserves I didn't know I had.  I started coming into my own as a serious prudent homemaker and started realizing that when you are seriously broke/poor the more you are expected to do to save money the more you find you CAN do.  And I started to realize that while we might not be able to afford some of the luxuries others could, trying to keep up with what the neighbors were doing wasn't going to make us any happier with our lives.  So, I started to live well within the means we have and I find myself much happier for it.  Sure I still sweat about bills and have a panic attack at the price of beef, but I can still make chicken for the fourth time in a week and not dread eating it!

So, I thought I'd share with you a few of the lessons I've learned from being broke to hopefully, maybe, give you some inspiration to make your lives a bit brighter no matter your monetary lot in life.

And today's lesson is this:  Don't Be Afraid to Glamorize

I, like many others get into a culinary rut from time to time.  Ironically, my husband has found that I was in the worst ruts with cooking when we were making decent money.  I mean, heck, it really doesn't take a lot of creativity to dress up a steak and baked potato for dinner, so I never tried.

Now when you are looking into your pantry and seeing cans of chicken and other canned goods and trying to figure out how to stretch that into various meals because your monthly food budget went down like the Hindenburg due to some curve ball, you start to come into some creativity on the culinary front.

So, the next time you are staring at a plate of meatloaf for the third time in a week that isn't so much meat loaf as cracker/bread loaf with a bit of meat added for color and flavor, here's some suggestions to try and put a happy spark into your life by "glamorizing" the meal.

I got turned onto this by reading vintage cookbooks and blogs about mid-century lifestyles.  Glamorizing was a huge deal in the 1950's.  Looking back at vintage cookbooks you'll see loads of recipes from the 40's and 50's with maraschino cherries on top of desserts, parsley garnishes on things that sometimes don't even make sense, radish blossoms on top of salads and other little touches to the meal.  Some of this was to just dress up meals that were still pretty monotonous and basic as after WWII there was a global shortage of different food items, so families tried to dress up what they could afford to put on the table.  But there was also a feeling of celebration to the meals as things like rationing came to an end, WWII was over and the future was looking bright again.

Just so you know, these tips are going to be more of a "modern" touch on this as while I love maraschino cherries from time to time what the food dye does to tablecloths?  With my kids?  Yeah, that doesn't happen at all often *laugh*.

These tips won't only spiff up your dinner table, but also will save you money, really in the long run.

1.  Go for cloth tablecloths as much as possible.
I ditched cheap vinyl tablecloths a long time ago just because I got tired of my kitchen table looking like a picnic table (I do, though, keep a layer of clear vinyl on my wooden table at ALL TIMES underneath my cloth tablecloths to protect my table.  I like my table and my kids trash it on a regular basis, so I found this to be the best way to protect the poor thing).  I've found, though that cloth tablecloths also have a lot of advantages.

For one, you can get them CHEAP at the used stores if you are willing to keep an eye out and look.  I don't pay more than 3.00 for a tablecloth.  Period.  If you can't find them cheap at a local used store, buy a sheet cheap at a yard sale or at the used store and make a tablecloth out of that.  If you aren't talented at sewing, you can get some heat bond tape to seal the edge instead of sewing it or something (just look up "no sew tablecloths" on your favorite search engine.  I'm sure they are out there).  I love being able to trade out tablecloths when I want a new look on the table and if I really want to switch it up now a days I just make a table runner and voila!  Fancy!

On average I change my tablecloth about three times a week.  And I've had my current store of tablecloths (with the exception of the white ones I made recently) an average of three years (some longer).  For 2.00 per tablecloth I'd say that's pretty cost effective!
2.  If you want to glamorize an average table, get cloth napkins.
Nothing speaks glamour for kids like putting a cloth napkin by their plate like in a fancy restaurant.  My daughter still gets a huge kick out of it.  If you want to go really fancy, put the napkin in a napkin ring (and remember, you can make napkin rings out of plastic screening or other materials...check out Pinterest for ideas).

The nice part about cloth napkins, too, is that you can reuse them over and over again.  Since starting to use cloth napkins my paper towel consumption has gone WAY down compared to what we used to use.  I either make my own cloth napkins out of fabric scraps I get from the used store, or I buy them at the used stores when I can find them cheap (like I just got some for .25 a piece yesterday at one local used store).  Check local Facebook yard sale pages or Craigslist for fabric as well as sometimes you can get fabric for even free when someone is just trying to clear some old store out.
3.  Don't be afraid to invest in some "fancy" dishes.
I am ashamed to admit that it took me until just recently to realize the power of a "fancy" dish could make when getting my daughter to eat her dinner.

I stared at the dessert dishes/sundae cups seen in the picture above at the used store for WEEKS (I kid you not) until I finally decided to take the plunge and bought the four of them they had for .50 a piece.  I've been serving the same desserts I always do of different flavors of jello or pudding or some other simple fare in those cups instead of just a regular opaque dish and suddenly with her own special portion in front of her in a special dish, my daughter will do things like eat all of her dinner, including vegetables, so she can have her "treat" at the end of a meal.

Honestly, I smile every time I use them too.  It's kind of fun to make dessert just a bit more special with those little dishes.  I'm very glad I bought them.
4.  Put your food on serving dishes instead of just putting the pot down on the table.
This I started to avoid ending up in a burn ward with my son, who doesn't get the whole "hot" concept consistently yet, or my daughter who can get into trouble when she doesn't pay attention to what she's doing.  So, I starting placing food in other dishes to serve at the table and it really does up the meal from, "Here's your food" to something a bit more personal somehow.

Now, don't think you have to get super fancy with your serving dishes.  The vegetables I serve at the table are most times served in a standard cereal bowl.  I do have two platters I have bought at the used store throughout the years I try to serve meat on, but if I don't feel like putting a big plate on the table (we have kind of a small table without the leaves in it) I'll just use a dinner plate and put the meat on that.  It works just as well and allows everyone to see what they are going to eat.

Some things like enchiladas or casserole, of course I serve directly out of the baking pan at the table, but when it comes to other more "piece mail" types of dinners, I do try to serve out of dishes instead.
5.  If you have garnish, use it!
If you have a parsley plant that grows in your kitchen or some herbs in your fridge that aren't being used how about making your meal a bit more fancy by using some garnish?  There's a reason restaurants do it.  It just kind of makes the meal feel special.

Even if you don't have herbs, you could dress up the meal with some little food types of touches.  For instance, if I add a dollop of Dream Whip to the top of jello?  I think my daughter might try liver and onions to get to that treat (my husband and I both hate liver and onions, so luckily she dodged that bullet).  She loves "cream" on top of pretty much any dessert, as do most kids, so it's something to think about.  Even just taking some stale bread to make croutons one night might just elevate your dinner to the next level.
If there is one lesson I've learned in the kitchen, though is this...

6.  HAVE FUN!
I really have found that I can seriously have fun trying to think of different ways I can dress up a can of chicken, some leftover pork or some droopy carrots.  Try to make it into the "no waste" game instead of staring at the measly choices you have and getting depressed.  It'll at least improve your mood and when you cook happy, I honestly believe your family will eat happier for it.

When you get depressed at all aspects of cooking and it becomes just another chore to dread, it really takes a good hunk of potential joy you could find in homemaking.  So, I do encourage you to try and have fun.  Go and get a few new plates to dress up the table at a used store.  Make a new pretty hotplate to put under your beat up old loaf pan with your meatloaf at dinner.  Crush up the remains of the cereal in the bottom of the bag and happily toss them onto the top of a casserole for a new layer of texture to the tuna casserole you've been staring at too much.  Make some cloth napkins out of an old sheet and pinking shear the edge if you don't have time to sew them.  Just do SOMETHING new to break out of the "we're broke" mindset.  If nothing else it might just help you find some joy in being broke instead of wishing for things you can't have.
Enjoy life all!  No one else can do it for you!

Friday, September 11, 2015

Frugal Friday: Money Saving Weekly Recap

This week saw some things on the money saving front.

1.  I researched when to harvest turnips online and found that the best time to harvest is actually when the turnips are about two to three inches in diameter.  My turnips were in the two to three inch category for the larger ones, so I harvested those (and a few smaller ones to use for greens).  I'm not sure if the other turnips are going to grow very big, but I left them in the ground just to see how far they'll get.  I plan to use the ones I harvested along with what is left of my potato crop to make corned beef and vegetables this weekend.

2.  I needed needles and realized that Jo-Ann Fabrics was having a Labor Day sales event, so I went in and used my 25% off total purchase coupon to make the needles a bit cheaper.

3.  I got a personalized price on pasta at Carrs for .98 for Barilla pasta.  I bought 20 boxes.   Between this and the pasta I already have this should be enough pasta to last my family a year.  I used the money out of my regular weekly grocery budget to buy the pasta.

3.  I used supplies I already had in the house to make creamed soup mix and a shake and bake style mix.

4.  I finished my shopping goals for October. They may need tweaking as I come up with other things I need and/or I find I have enough and don't need that certain item.  I'm being really careful with the list as I want to make sure it's dialed in as well as possible.

5.  I baked bread this week and we've been eating it with meals instead of pasta or rice.

6.  I shopped with coupons and with the sales (obviously by the pasta) to make my dollar go as far as it would go.

7.  I mended a comforter this week so far.  I'm hoping to get more mending done tomorrow.

8.  I've been drying tomatoes as they ripen.  I decided dehydrating the tomatoes made the most sense as they are only ripening one to two at a time.  I've got about one half pint of dried tomatoes so far out of my crate of tomatoes, on top of the green ones I've turned into fried green tomatoes and other "green tomato" dishes.

And there you have it.  Some of my frugal endeavors this week.  How did you do?