Showing posts with label Christmas. Show all posts

Wednesday, December 20, 2023

Christmas 2023, Gift 4: Sourdough Bread

Today's gift is the bulk of the gifts I am giving this year.  Immediate family is getting a loaf of sourdough bread per household this year as I want to spread the sourdough love :).  Sourdough starter, to me, has become as precious as any precious metal people can name.  Sourdough really is the best bread.  I've tried so many recipes over the years, but once I started baking with sourdough I'm not going back to other methods of baking bread if I can help it.  

I use King Arthur Flour's Rustic Sourdough Bread Recipe, but a while ago I made a change to the method because the original recipe has you bake it in the oven on sheet pans, which works, don't get me wrong, but I prefer the dutch oven method of baking sourdough as it gives a superior product.  After the bread has gone through it's first initial rise, I get two bowls and place parchment paper in them and then form the dough into two circular loaves and place in the bowls (I use my kitchen scale, I will readily admit, to make sure the loaves are pretty much the same size) and then set a timer for 1/2 an hour for the bread to rise in the bowls (cover bowls with plastic wrap or a damp towel).  

While the bread is rising, I place two 3 quart cast iron dutch ovens in the oven to heat up while the oven preheats to 425 F.  After the 1/2 an hour is up and the bread has risen, I score the top of the loaves with a knife (I like to just do a good old "x" on the top).  Remove the dutch ovens from the oven and place on the stovetop, carefully removing the lids (be careful to remember that those suckers are now 425 degrees so you don't get burned...I've heard horror stories).  Then I lift the bread, parchment paper and all (lift by the parchment paper) and CAREFULLY place the loaves of bread into the dutch ovens.  Place the lids back on the dutch ovens and put back into the oven.  Bake for 30 minutes and then remove the lids.  Bake for an additional 10 minutes.  Remove dutch ovens from oven and then remove the bread carefully from the dutch ovens (I lift them by the parchment paper) and place on cooling racks to cool (remove the parchment paper after you get them onto the cooling rack).  Wait for the bread to cool for at least an hour before you cut into it for the best results (confession:  A lot of times we make it about 20 minutes and then start slicing into it).  

I don't do large scale sourdough starter, so baking sourdough loaves for everyone has actually taken a decent amount of time this year.  I'd use a cup of sourdough starter, feed my starter, wait for it to get happy and then put back into the fridge until the next day, put the starter out on the counter to get warm and happy and start the whole process over again.  After the loaves cooled I placed them in heavy duty bread bags, I use these (affiliate link!) as they are the best bags I have found that help to keep the bread safe and fresh and used the ties that came with the bags to seal them.  I then just stuck all of the loaves, as I made them, into the freezer for Christmas Day (so they don't have time to mold before than or get stale).  I hope the family likes them as sourdough really is a labor of love :).

So, yeah, pics are of a couple of rounds of sourdough I'd done right before I went to put them into the freezer.  I only have one more round of sourdough products to make and I'm done with Christmas gifts (woohoo!).

Enjoy all!

Tuesday, December 19, 2023

Christmas 2023, Gift 3: Crocheted Christmas Tree Ornament

I can't take credit for this gift idea.  I saw an ornament like this on Pinterest and thought it looked cute, easy and quick.  And I was right on all accounts!

If you can knit a long row of stitches and bind off or you can crochet a single chain of stitches with any type of yarn you like, you can make these.

I just took a chunky yarn I had, crocheted a straight line and as I went I kept folding the chain I'd done over itself in a wavy type of line to make the Christmas tree.  When I had it the length I wanted (and the tree was big enough for my tastes), I finished the chain, tied off, and then went to work with the line I made.  I took another type of yarn I had in my stores in brown and then I made the Christmas tree on a flat surface so it was all lined up right.  I then took my crochet hook and went down through the tree in the middle so the hook came out of the middle of the bottom "branch" of the tree.  I then cut a length of my brown yarn so it was a decently long amount (better safe than sorry, I say) and knotted one end well so it wouldn't slip through the crocheted stitches that made up the tree.  I then just started slowly pulling the crochet hook back through the tree with the brown yarn in tow.  I'd stop between every layer and carefully put my crochet hook down (with the rest of the tree still on it) while I knotted the brown yarn in between the layers to create a "trunk" for the tree.  From what I saw on Pinterest you could also use beads for this, but I couldn't find my beads, so I just went with good old knots instead.  Once all the layers were done, the tree was essentially knotted together and done, but the ends of the tree looked weird just kind of hanging out in space, so I took a bit more green yarn and tied the hanging ends onto the branch above or below to make it look better.  I then crocheted a little trunk for the tree (not necessary if you aren't experienced enough to do that) and then tied a hanging piece of yarn to it and voila!  Tree ornament!

The time this took was nothing, honestly, as I'm decently fast at crochet now a days.  The biggest thing I had problems with was the green yarn LOVED to fray and separate on me, so I was having to be slow and careful to pull the yarn through the center of the tree.  Overall, though, I think it turned out cute and didn't take up a lot of time.  This went into a gift box with some of the cinnamon applesauce ornaments and another gift done!  Yay!

I am sure there are more in depth patterns for these online if you do a quick search.  I just eyeballed mine.

Enjoy!

Friday, December 15, 2023

Christmas 2023, Gift Two: Roasted Candied Nuts

This is a recipe that I made up years ago when I ran a recipe blog to help me cope with my kids various food intolerances and allergies at the time (I am truly thankful that today we only have to deal with the peanut allergy when it comes to food instead of the garlic, corn, oat and other things I had to deal with back then).  I made this around the holidays after thinking back on my time working in the college program at Walt Disney World (short version of that story:  I did not have an enjoyable experience) and the roasted candied nut cart they used to have at Epcot Center where I fell in love with roasted candied nuts.

I have made these a few times throughout the years and decided to make some to give away in small baggies as kind of a snacky type of gift for a few people with a few other gifts.  This was also a way to use up some nuts that had gotten buried in my freezer and I wanted to use up without me eating them all *ahem*.  

A few things I learned this year with this recipe.  One:  This recipe had always turned out well for me in the past with the previous ovens I had, but I think I over browned the sugar mixture on the stovetop the first time I made it and so when I went to roast them in the oven the outer edge nuts ended up burning on me (which will make a nut lover like me want to cry) and I hadn't even roasted them the full time yet.  So, do watch these when they are in the oven as nuts love to burn (which sometimes we just have to remember those lessons).  I made a second batch and was way more careful watching them and they turned out well, (however I still had to pull them after the first initial roasting) so, once again be sure to watch them as oven temperatures vary.  The last bit of roasting with the 300 degrees is basically to help candy the mixture, but if the mixture when you stir it after the first initial roasting, is sticking to a spoon and getting hard quickly like candy, feel free to pull the nuts as the candy mixture is set up and ready to go at that point.

So, here you go folks.  This recipe does not call for sugar, instead it calls for maple syrup and honey (when this was written was the start of people avoiding refined sugar), which lends it a wonderful flavor.  I also have started, when making this, to coat the final nuts in powdered sugar for added "snow like" effect.


Roasted Candied Nuts
  • 2 Cups pecans or other nuts
  •  1/4 cup maple syrup
  • 2 TBS honey
  • 2 tsp. vanilla extract
  • 1/2 tsp. kosher salt
  • 3/4 tsp. ground cinnamon
  • pinch to 1/4 tsp (depending on heat preference) Cheyenne pepper
Procedure: 
1.  Preheat oven to 400 degrees F

2.  Combine maple syrup, honey, vanilla and salt in a large saucepan and cook over medium heat until mixture reaches a near boil.  Add cinnamon and Cheyenne pepper, stir well and then add nuts to mixture.  Stir well till all nuts are coated with the mixture. 

3.  Bring mixture back to a simmer.  Pour nuts onto a well greased parchment lined baking sheet that has a rimmed edge (grease pan, place parchment on pan and then grease parchment...trust me this stuff is sticky).  Be sure to spread nuts into an even layer on baking sheet.  Place in 400 degree oven for about 7 minutes or until nuts start to smell nutty.  Stir nuts.

4.  Lower heat to 300 degrees. 
5.  Keep roasting and stirring nuts every few minutes until sugar mixture turns deep brown and clings to the nuts.  Remove pan from oven and let nuts cool on pan.  Mix nuts a couple of times as they cool (it'll stop them from sticking together as they cool).  You can also sprinkle a little more salt on the nuts before they cool (if you like a bit of a salty flavor), but be gentle with it as you don't want the salty taste overpowering your sweet.  Once cool, break nuts into individual nuts (or cluster sizes you like) and toss with powdered sugar (optional).
6.  Place in a bowl and store at room temperature and serve or place in an airtight container for up to a week or place in decorative containers of choice (small cellophane bags are really cute with this) and give away as gifts at the holidays.

Enjoy!!! 

Wednesday, December 13, 2023

Christmas 2023 Gift One: Applesauce Cinnamon Ornaments

This is one of those recipes that is so easy that it will blow your mind, but also comes together in a really pretty and rustic type of decoration.  I first made these ornaments years ago when my kids were small.  We'd just invested in a bigger tree than our little apartment tree we'd used for years and I had next to no ornaments to put onto it.  I wanted the tree to be pretty for the kids, but didn't have any money to spend for expensive boxes of ornaments.  I found this recipe and gave it a try.  And I loved it!  The ornaments will make your entire house smell like cinnamon, they look pretty on the tree and you can pack them away and use them year after year.  My old ornaments died years ago, due to the fact that Alvah decided he liked to eat them (PICA). Finally this year I thought back on these and decided to make them again to give some as gifts for his speech therapists and others.  So, let me show you how to make them!


Applesauce Ornaments

Ingredients:

  • 1 Part Applesauce
  • 1 Part Cinnamon
  • Optional add ins:  A few dashes of nutmeg, cloves, other spices.  


Procedure:

1.  Preheat oven to 200 degrees F.

2.  In the bowl of a mixer, with a spoon (which is what I did this time) or other implement, mix the applesauce and cinnamon together to form a dough.  Go slow if you use an electric mixer of any type or you will be inhaling way too much cinnamon for comfort and you will have a cinnamon coating over your entire kitchen.  Once dough forms, mash it into a ball with your hands and, if you have a decent amount of dough, divide it into a few pieces so you don't have to roll out too much at once.  Put dough ball you are working with between two pieces of parchment paper (you can also use plastic wrap, but I have better luck with parchment paper).  

3.  Roll out dough to 1/8 to 1/4 inch thickness (thicker will just take a bit more time to dry out/bake if you prefer thicker ornaments).  Cut out with simple shaped cookie cutters (trust me, keep it simple.  This dough loves to break and is crumbly, so if you try to get too elaborate you'll be reaching for the eggnog wayyyyy too much to battle frustration).  Use a straw to cut a hole in each ornament so you ave a hole for string later on (after about three ornaments blow out the dough that will get caught in the straw to keep the straw open...it will help your holes cut cleaner).  Use a spatula to transfer ornaments to parchment lined baking sheets (less likely to break that way).

4.  Bake in 200 F oven for two hours or until the ornaments are well dried.  Remove to cooling racks to cool completely.

I used 1/2 cup of applesauce and 1/2 cup of cinnamon for my batch this time around and I ended up with about two dozen ornaments.  Not bad at all.  

Alternate method (non bake method):  Place ornaments on baking sheets and place somewhere out of the way that is dry for 3 to 4 days or until ornaments are well dried.

Tuesday, December 12, 2023

Christmas Cookie Recipes

Hello again, all!

Blogging delayed, again.  We've just been super duper mega busy around here.  I've been turning and burning getting things decluttered around the house (I am determined to start out next year with a fresh and free type of feeling if I can), getting Christmas goodies made and all the things.  I have to say I'm tired, but I feel good that the season so far has been a lot of fun for the kids, which is important to me.  We have the tree up with the son's favorite candy canes on them (well...for about an hour until he eats them all...I have to do the flavored candy canes in stages or he'd make himself sick just gorging himself on those).  Gingerbread houses are made (I'll share pictures of those on another post), the advent calendar has candies in it that the kids are having fun opening the drawers every day to get their Andes mint.  Today I'm working on getting some Christmas gifts made as I am SO far behind on that.  I am, literally, just starting home made gifts today, which yikes...not a great start.  Hopefully I can get it done quickly this week as I really want to get some relaxation time in next week to just enjoy the holidays before they are here and over.

Now, onto what I did pretty much all of last week.  Christmas cookies!  I thought I'd share what I made in case you need some inspiration this year, so let's get to it!  Links are provided for the recipes in case you want to make them :).

1.  Basic Butter Cookies

Butter cookies are, by far, one of my favorite holiday treats.  When I saw what the price was for one thing of the blue tinned Dansk cookies, I decided to find a recipe to make my own.  

Opinions?  These are delicious.  Mine didn't turn out very flaky, but I did roll them out and cut them instead of putting them through a cookie gun (honestly, I just didn't want to clean the cookie gun...did I mention I am tired?  Lol!).  I'm mainly the one eating them right now, which I might be okay with *ahem*.  

2.  Chocolate Crinkle Cookies

This recipe made a ton.  Like 53 cookies, ton.  Since I made these the right way a few years ago (be sure to chill your dough overnight for the best results), these have become one of my daughter's favorite Christmas cookies.  

These turned out really well.  I used the espresso powder that was optional in the recipe, and it helped to probably boost up my cocoa powder, which was ancient.  My husband and daughter really like these.  I think they taste like a brownie cookie.  Both my husband and daughter say they are better than brownies.  You can make them and decide for yourself *laugh*.

3.  Cashew Butter Blossoms

I made these last year and they were a hit with the family, so I made them again this year.  I took the classic peanut butter blossom recipe and just subbed out cashew butter for the peanut butter.  This recipe made no where NEAR the 48 the recipe said they would.  I got 23.  But I think I made my cookies a lot bigger than called for (probably closer to a tablespoon as I couldn't find my melon baller, which is what I normally use to figure out a rounded teaspoon called for in recipes...I'm determined to organize my kitchen drawers next with a better system so I can find things).  I'm glad I got a pic of these when I did as my daughter blew through them and they are already gone.

4.  Gingerbread Cookies

Technically this recipe is for a gingerbread house, but the first time I made a gingerbread house with the recipe, my family, especially Alvah, fell in love with the gingerbread.  If you hate the ginger scented cardboard that a lot of gingerbread cookies end up being, you need to try this one.  It reminds me of Pepparkakor (Swedish spice cookies).  Let's just put it this way.  One recipe of this stuff calls for one TABLESPOON of ground ginger and one TABLESPOON of ground cinnamon.  Yeah, that heavily spiced.  I made a double batch this year and we used 1/2 for the gingerbread houses and one half for gingerbread cookies.  Alvah has already taken at least one bite out of each cookie, so I think he likes them *laugh*.


5.  Sugar Cookies

My husband's favorite Christmas cookie.  I use his Grandma Molly's recipe for sugar cookies every year and these are always a hit.  I did notice this year that Crisco has changed...it contains more water to pad out the weight, I think, and as a result I had to add more flour to get the right texture.  I also added a bit of tallow to the frosting for the cookies as it too called for Crisco, just to make sure everything would turn out right.  It did, but processed foods, yeesh.  I don't buy many outside of chips for Alvah, and boy do I notice a difference in quality, quantity and price with those things.  Irritating to say the least.

And yes, before some well intentioned individual pops in and says that Crisco is not good for you and such...I know.  But, I only buy a little 16 oz thing of Crisco every year for Christmas baking, so I'm not too worried about it.

And there you go folks.  The Christmas cookies I made this year.  I'm still considering making some thumbprint cookies closer to Christmas so I can hopefully have some for my birthday (it's the week after Christmas) as I love those things, but we'll see how much I want to bake after the holidays are progressed further *laugh*.

Enjoy all!

Monday, December 20, 2021

Christmas 2021, Gift 2: Some Pretty Throw Pillows


Man, getting gifts done this year has been a constant battle!  I spent all of Saturday, a day I really wanted to make a bunch of gifts for the family, working on getting printers set up so that the daughter and husband could make some gifts.  After rebooting networks, finding and replacing ink cartridges, getting print heads aligned and cleaned and everything else, the day was pretty much shot.  Sunday, my son hadn't slept Saturday night, so I was not functioning so well, but I managed to get basics done, like housework.  So, being super productive and getting a bunch of gifts made hasn't really happened.

Bright side, I did find time to quickly get a gift finished for the daughter in the middle of all of the chaos, although it wasn't really a hard gift to do, so let's catalog that anyway!

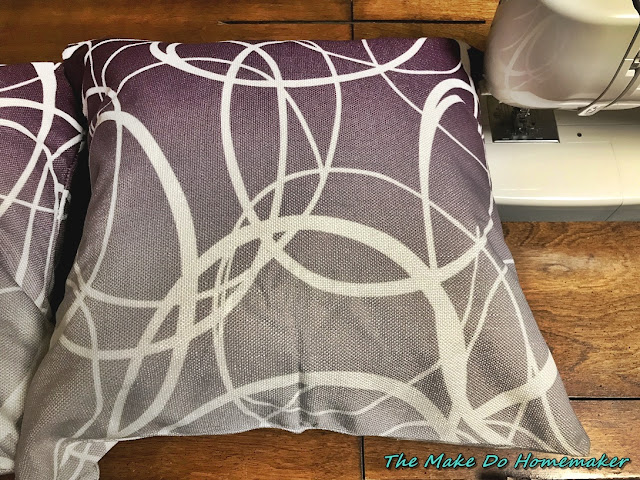
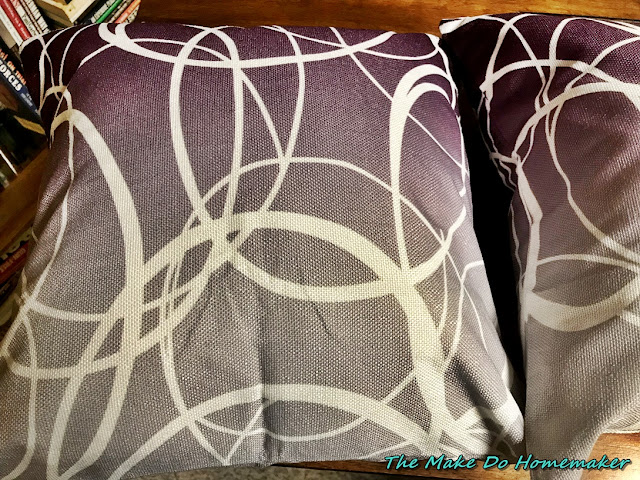
A while back, I found a good deal on a couple of pretty slip covers for cheap and they have sat in my closet for months.  One of the main things my daughter asked for Christmas early this year was some new throw pillows as the ones I made her in the past are really on their last legs (like one of the pillows I made for her the actual material is starting to develop holes...usually a good indication that the pillow is at the end of its life cycle).  I did my best to mend her current throw pillows and told her I'd aim to get her new ones for Christmas.  So, when I saw these pillow covers, I had to get them for her and make her some replacement throw pillows.  


The pictures really don't do them justice.  The pillows have a pretty graduated pattern of purple to them that fade out into a really light purple grey.  It would have been better as pink (since that is the daughter's favorite color), but I was willing to settle on the color since it was so pretty.

So, I took some leftover unbleached muslin that I had from another project and some stuffing/filling I had and was able to make two pillow forms to fit the pillow covers in no time flat.  The pillow forms aren't perfect, but they are going to spend their lives stuffed into a pillow cover, so I was perfectly content with that *laugh*.  I couldn't really make the pictures pretty before taking the photos of the finished pillows, sorry to say, as I was in a tremendous hurry to stuff said pillows into a big box and get it wrapped before the daughter saw what I was doing, which was harder than I thought it was going to be.

So, two gifts down for the year.  I really don't know if I'll be able to do much more, honestly, as my husband came down with a cold last night and went down hard.  He's pretty miserable.  So, I'm not sure how much I'm going to get done in the gift department when I'm just trying to keep the son from going into my bedroom and waking my husband up.

So, two gifts down for this year.  Here's hoping I can get a few more done before the big day. 

Wednesday, December 15, 2021

Christmas 2021, Gift One: Home Made Lip Balm


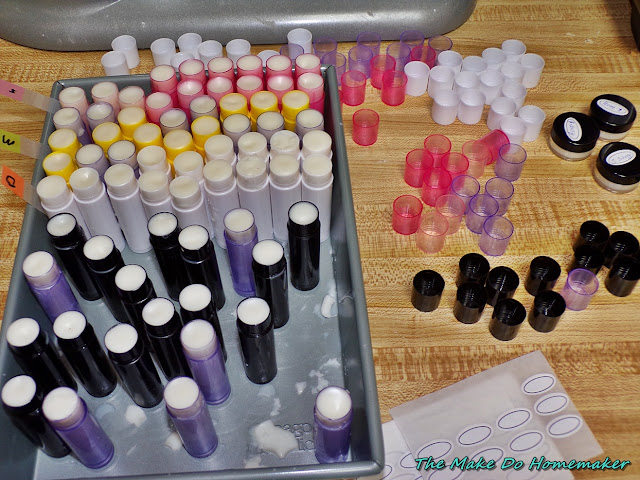
When it came to making gifts this year, I decided I would go in a different direction with a few gifts for the family.  So, this year I made lip balms/chap sticks in bulk for my husband and kids.  The main reason there are so many in the photo above is that my son has taken a liking to eating chap sticks over the last year.  I suspect it is because he won't eat...you know...food...so he craves the fat in the chap sticks as he keeps growing every time I look at him.  I've been sourcing all natural options that contain coconut oil and things basically as a sneaky way to sneak "good" fats into his diet versus goodness knows WHAT that is in the good old chemical laden ones, but MAN that gets expensive fast.  So, I decided to dust off of my "I need to make everything because my child is allergic to everything" gloves and ordered the materials to make my own lip balms in bulk for this year's Christmas gift to my family.  And, bonus, this way I'll definitely know what the son is consuming whenever he eats one as there are three ingredients, basically.

I will link to the recipe that I used and to the materials I bought.  Mind you, I went as cheap as I could to source the materials and I wanted a good volume for my buck, so this would give you enough beeswax and coconut oil to probably make lip balms for an army, so just be aware of that when you purchase.  

Note:  The following posts contains NO Associate fee links.  I'm just sharing.  If you wish to support the blog via Amazon purchases, please feel free to hit up the link on the right side of the blog and order whatever you want through the link.  Amazon will give me a small commission for pointing the sale their way if you order through that link and it will cost you nothing extra to do.  If you support the blog in this way, thank you :).

For this Christmas gift I went and purchased the following materials (over like four or five months so as not to break the bank):

  • 105 Pack of Lip Balm Tubes (Assorted Colors)
  • I also got these:  Lip Balm Containers, but man they are TINY.  I won't be buying those again, I doubt.
  • BetterBody Foods Organic Naturally Refined Coconut Oil, 56 oz (I went with refined to avoid the coconut flavor as the son gets funky about these things and my husband prefers neutral flavors in chap stick). 
  • Howemon White Beeswax Pellets, 2 lb bag (Note on this:  Some people were complaining about a chemical smell with the pellets and said they weren't true beeswax.  I didn't have any of those problems.  Mine smelled like nothing offensive and melted just like the refined beeswax pellets I've used in the past, but with shortages your mileage may vary on quality with different sellers on Amazon and things.  I wanted white because I knew my son wouldn't even let me near him with a yellow lip balm.  Anyway, use your own judgement on this product).

I used flavoring oils I already had in the house to flavor different lip balms.  I have to say, if you have a choice, go with the essential oils as they are more powerful and I think work better.  I ended up using at least 20 drops of flavoring oil per batch and the lip balms STILL barely taste like anything.  

The recipe I used to make the lip balms is Coconut Mama's Recipe and I just made a recipe with each flavor.   I found I got 16 lip balms out of each batch versus the yields she shared on her blog, but it might have been variances in materials that caused that to happen (or I'll find huge air bubbles in my lip balms when we go to use them, which would make me feel awful, but I doubt it).   I used olive oil I already had in the house for the third oil :).

Overall, I made four flavors and got a ton of lip balms to put under the tree for the family this year and also have enough materials to make a ton more, so I'd say it was worth it :).

How about you?  Making any gifts so far this holiday season?  My family is going crazy with the home made gifts this year, which I'm loving.  My daughter is making gifts for everyone in the family and some extended family too and even my husband has gotten into making gifts this year.  It is cool :).

Thursday, December 3, 2020

Frugal Friday (Times nearly 2, again): Money Saving Weekly Recap


I want to take this opportunity to apologize to anyone who follows my blog on Facebook.  Facebook changed their format about, what, a month ago or so (I'm not on Facebook much, so I don't really have a good time table here) and since they changed their format I've posted up links to my blog post from last time about, oh, fifteen times, and it has YET to show up on the blog feed on Facebook.  Facebook has been e-mailed and they are working on it, I guess.  I finally got Facebook working on my new cell phone, so I will try to link to this post and last time's post (I haven't been able to post as my blog either) together and we'll pray that something works here.  So, yeah, sorry we are experiencing technical difficulties on social media at the present time *sigh*.

We've been busy around here, so I haven't had a lot of opportunity to blog the last few weeks.  I was busy putting up Christmas decorations, wrapping gifts and putting them under the tree (more on that down a bit further), getting Thanksgiving out of the way and wrapping up our current concepts in homeschool.  We are now officially on Christmas break (I love homeschool for reasons like this :), so I will hopefully have more time to blog this month (as well as get some Christmas gifts made for my family).

Right, so lets get down to some nitty gritty on what has been going on around here.

1.  Our state is in basically voluntary lockdown at the moment, so I have been avoiding going anywhere, which is saving us money I suppose.  The downside of it, though, turned out to be wrapping paper.  Turns out after using the same rolls of wrapping paper for years, they all decided they wanted to run out at the same time.  I managed to make it work.  If you flip some of the boxes over under our tree at the moment you might find some creative patches of mismatched wrapping paper, but hey, if you look at them from above you can't tell, so I am calling it a win *laugh*.  We'll definitely have to purchase more wrapping paper next year, though.

2.  We had a nice, simple, Thanksgiving at home.  Besides the turkey the side dishes ended up being more simplified than in previous years for the sake of my diet (the family was insistent that I didn't need to make the dishes just for them :), so that saved us some money.  I have been busy and was just really tired before Thanksgiving so I got as much done the day before as possible to cut down on dishes on Thanksgiving and we didn't bother pulling out all of the "fancy" dishes that survived the earthquake like we did last year.  I did pull out our nice turkey platter and used our new roasting pan (which worked great by the way), but otherwise we went simple this year.  And it was a lot of fun and everyone had a good time, I think :).

3.  When the husband took his car in for a recall he found out that his fuel filter needs to be replaced.  Instead of having the dealership do it and pay them the labor costs (which wasn't cheap) he went online and ordered the fuel filter and will replace it himself.  Thank goodness he got the garage cleaned out so he'll be able to work on his car in the comfort of a heated building as it has gotten cold here.

4.  Speaking of heat, I got our electric bill and gas bill in for the month.  I'm not sure how much gas we are saving by putting the plastic panels up in the windows, but I definitely noticed a reduction in the electric bill from them.  I think the electric baseboard heaters aren't cycling as much with the plastic blocking the wind blowing in through the windows.  Normally this time of year our electric bill is up well over 300.00 and this month it was 279.00, which is definitely a savings.

5.  I did end up taking advantage of Black Friday sales this year.  The son needed a new winter coat as he's shooting up like a weed (I saw him next to his dad's nearly six foot frame and he's nearly as tall as his dad!), so I went on Land's End and took advantage of their 60% off sale for Black Friday to order him a new coat.  It's a small men's, so it should last him a while and it is rated at -7 degrees Fahrenheit for comfort, which is pretty good.  Hopefully it is will be as good of quality as I am used to with Land's End and will last him a while.

The other sale I took advantage of was Amazon had Puriya Mother of all Creams on sale for nearly half price on Black Friday.  I like to keep an extra tub of it in the fridge to put on the son's eczema cold (it seems to help kill the itch better), so I ordered a tub of the cream on sale as it saved me over 10.00 buying it on sale.  

6.  My brother sent us an Amazon gift card for Christmas.  I used it to buy clothes, mainly for myself I'm sorry to say.  It has been years, and I mean YEARS since I bought myself clothes brand new (with the exception of like sneakers), so it is kind of a weird feeling to be getting new clothing in the mail, not for the family, but for me.  I've lost enough weight that my old clothes are fitting odd and the used stores don't have much that I've been able to find that isn't all stretched out and such (I think a lot of people gained weight this last year), so new it is.  I'm praying everything fits alright so I don't have to return things.  I comfort myself that the fitting rooms everywhere are closed anyway, so even if I went to the stores I'd still be guessing and having to return things if they didn't fit *laugh*.

7.  Our bed frame fell apart.  And no, I'm not kidding.  The son sat on our bed and it just collapsed.  

The bed frame has been giving us problems since the earthquake.  It was an old frame given to us by my husband's grandfather years and years ago, and it had these lock nut things that went around the frame to hold the thing in place and then we just screwed it to the headboard my brother-in-law gave us later on.  Well with everything collapsing onto the bed in the earthquake the locknuts bent and wouldn't stay where you needed them so we were always fighting with this or that cross frame collapsing and having to be repaired.  I honestly think, after taking the bed apart, that the frame was over half of our problem with the bed giving us back aches and things as all the cross frames were shot and just would not stay put.  I threw the old frame away and put the mattress and box frame on onto the floor.  Since it was lower than it used to be, I went and grabbed our old mattress out of the den (yes, it is still sitting in the den *sigh*) and put it onto the pile of mattresses and box frames.  It ended up coming out the perfect height that way and so far it's a lot more comfortable than it has been the last month or so. 

The husband has decided he's going to build his own frame for the bed and make it with drawers under the bed.  If this gets done I'll be thrilled as any new storage, especially for sheets and things, is always appreciated around here :).

8.   I sat down and talked to the family about Christmas dinner.  I normally try to buy a really nice rib roast for Christmas, but we just plain don't really have the money for it this year and, I explained, we really don't need anymore beef in the house as we still have a bunch of beef in the freezer.  So, I asked, if we could just cook the few fillet steaks we have in with our beef and make a "fancy" dinner with the filet mignon steaks instead of worrying about getting a beef roast.  The husband and daughter didn't have a problem with that idea.  So, at least I don't have to worry about that added expense this month, which honestly is a relief as prices continue to climb and money gets tighter.

9.  I have been really enjoying Townsends on YouTube (been a fan for years, honestly).  Right now we are watching him read "A Christmas Carol" on his YouTube channel, which is really enjoyable as he's MUCH better at dramatic reading than I am and so the daughter is enjoying it a lot more and not getting caught up in what this or that word means *laugh*.

10.  We put our noses to the grind stone the last few weeks and managed to get our schoolwork buttoned up for this month as of yesterday.  So the kids are officially on Christmas vacation for the month and we are officially half way through the school year.  I am feeling a major sense of accomplishment in that :).  I have lots of fun activities planned for the kids this month, including (hopefully) making Christmas cookies tomorrow (the first batch.  I want to make sugar cookies and then make some gingerbread cookies for the son as well).  I'm determined that even with the just plain crazy this year has been that the kids will get to enjoy themselves this holiday season!


11.  I needed new cutting boards.  I had bought some cheap ones from Amazon a long while ago, which worked OKAY, but were wearing out and honestly I never used the smaller sizes of board as they were too small to be of much use.  Instead of ordering new ones, I remembered that my husband still had some heavy duty commercial grade cutting board material that he had bought to make a platform for my son's race car bed out of (it doesn't mold like the particle board that was in it originally did).  I asked him if he could cut me a few cutting boards out of the material and gave him the sizes I would like.  He was able to use the scrap pieces of cutting board material to cut me a few new cutting boards and I am GREATLY appreciating them as they work wonderfully!  And it didn't cost us a penny, which is right in my price range :).


12.  One of the things I was able to sign up for this school year was the Doodle Crate through the Kiwi Crate company (Kiwi Co) for my daughter.  This was taken directly out of our school allotment and counts are part of her art grade.  She had gotten aa soap making kit as one of her boxes and we saved it to make during the month of November (we made the candles and the soap as part of our "pioneer crafts" fun unit I put together for the kids).  My daughter gifted most of the soaps in with family Christmas gifts (along with most of the candles we made) as gifts from her and Alvah, which I thought was very cute and we had a lot of fun exploring different melt and pour techniques.  

And there you go folks.  Some of the things we've been up to the last few weeks.  I hope you are getting things done and that life isn't too hard for you right now.  I hope you are all having a good holiday season so far!

Thursday, November 19, 2020

Frugal Friday: Money Saving Weekly Recap (Times nearly 2)


Man, I'm tired.  Daylight savings really wholloped me this year, mainly because it threw off the son's schedule and I've been fighting him on going to bed even more than usual because of it.  Le sigh.

Sorry it took so long to compile this post together.  It's been kind of rough digging up things that have saved us money as it seems like money is just flying out the door as soon as my husband's paycheck comes in anymore.  Just the price on groceries alone gives me hives.  But, I'm determined to find the bright points though, so let's get to those.

1.  One of the things I decided to incorporate into our lesson plans this year is some fun stuff to do around the holidays and incorporate things we can use for gifts as well.  So, I ordered a beeswax candle making kit at the beginning of the school year (as close to a pioneer craft as I wanted to do with the son as you roll beeswax candles versus having to juggle boiling hot wax) and we made candles yesterday.  The kit didn't make nearly as much as it promised (well, we could have made the amount they stated IF we made a bunch of birthday cake candles out of the last sheet of wax, which was kind of a rip off), but the candles we did make turned out decently cute.  My daughter, especially, is looking forward to putting the candles into Christmas gifts this year :).

2.  The husband went and got his oil changed on his car and at the same time got a recall issue on his car taken care of, so it was good that he was able to get both things done at the same time.  He used the lifetime oil changes we got on the vehicle when we bought it so we didn't need to pay anything out of pocket for the oil change.

3.  The sleep pants that I bought back in high school finally started to disintegrate on me.   I can't say that the pants haven't fulfilled their duties admirably and the 8.00 per pair I spent on them at Target back in the day...well they definitely paid for themselves many times over.  I ended up going on Amazon and found a couple of pajama sets.  I got one with shorts and one with pants and got both sets with a panda theme to them, so that the shirts will be interchangeable.  Since one shirt is a short sleeve and one is a long sleeve, this will serve me decently well I think.  I ended up having to order myself some new t-shirts as well as a bunch of t-shirts I have had forever started to fall apart as well.  I'm just praying things are decent quality and that they'll last me a while.  I'm going to pray anyway.

4.  I made out Christmas cards and got them mailed off early for a change!  I'm so proud of myself as this never happens *laugh*.  I even made Alvah sign his name on all of the cards so we got fine motor skill practice in as we filled out the cards.  He wasn't happy when he had to sign his name for the 8th time, but hey, it worked *laugh*.

5.  Our state went back on voluntary lockdown starting Monday of this week due to Covid spreading and the ICU beds (we only have 215 in the state or something close to) are quickly being taken up by patients with it.  My daughter got severely depressed by the new lockdown as she was hoping we could go and do stuff again soon, so to cheer her up a bit, we started to decorate for Christmas early.  We've just done a little bit of decorating every day (like yesterday we made the candles to put in Christmas gifts, etc) and we'll finish up by putting the tree up the day after Thanksgiving.  This doesn't take any money to do since we're just digging out decorations we already have, but it has definitely helped to raise the spirits of the kids, so I think it's worth it.

6.  When I realized that lockdown was coming I went to the store and tried to get as much as I possibly could for Thanksgiving and Christmas bought in the way of supplies.  Unfortunately, I wasn't alone in this way of thinking so fresh herbs were COMPLETELY gone already (as well as a bunch of everything else as people, once again, stocked up for the time ahead...up here I can't even say it is panic buying...it is just stocking up, but our inventory is so limited things run out FAST and stay that way for quite a while when something like this happens), so I guess I'm going to get creative with dried herbs for the turkey this year.  At least I bought vegetable stock for the turkey brine over a month ago when it was on sale, so I'm not completely up a creek.  I ended up buying so much I was able to get a free turkey.  I pulled out our free turkey from last year and put it in the fridge to defrost for Thanksgiving and put the new turkey in its spot in the freezer.  We'll have that turkey for Thanksgiving next year.  I know it seems kind of weird to do it this way, but one thing I learned when we were really, really poor was that this way I have security knowing that no matter what we have a turkey for next year.  It gives me a tremendous sense of relief to see that turkey there, so I have no problem with that turkey taking up room in the bottom of my freezer all year.

7.  Our lunch containers for the husband have slowly broken over the years and I realized that I really didn't have enough left to do things like freeze him some meals for quick grab lunches or anything or he'd have nothing to take fresh lunches to work in.  I ended up buying these Rubbermaid containers (no associate link or anything, just sharing).  So far I really like them.  They are definitely lighter weight than the easy find lid Rubbermaid I had gotten in the past, but I really like how many divided containers this set came with as it allows me to do a divided bento-like lunch set up for the husband so he doesn't have to worry about all the food blending together and I don't have to worry about packing up four containers for his lunch and can fit it all into one or two, which saves time, space in the fridge and space in the dishwasher later on :).

8.  I made our yearly recipe for aged eggnog and got it in the fridge to age for the holidays.  I'm determined to work drinking a little of it here and there into my diet.  I don't drink at all except for little glasses of eggnog this time of year, so I'm determined to at least enjoy it :).  That and non-alcoholic glogg.  I became addicted to that stuff last year, so yeah, that's on the menu for the holidays as well =D.

I used the same bottles of alcohol I used for the eggnog last year and had enough to make the recipe (barely, but I made it :).  I was able to get the dozen egg yolks by redeeming fuel rewards I wasn't using (I had a ton of bonus rewards that were going to expire as we don't go anywhere so I'm not using the rewards for gas) to get a free dozen eggs.  I froze the egg whites to use in angel food cake later (I found that Alton Brown's angel food cake took 12 egg whites, so that worked out perfect).

9.  I have become addicted to this youtube channel.  The gal makes bento boxes for her husband and films it so you can get ideas of how bento boxes are put together.  I've gotten some really good tips on ways to better pack my husband's lunches through the channel (like using rice or parchment to absorb excess oil to help keep things fresher) and it has really improved my ability to fit a good, balanced lunch into a smaller container :).

10.  My husband fixed an issue his car had by himself, thus saving us a TON of money having to take it into a garage and get it fixed.

11.  I bought a boneless pork loin on sale and then thin sliced it (I mean REALLY thin sliced it) to use for schnitzel, Japanese dishes and other things.  Thin slicing it REALLY stretched the meat and made a bunch of different freezer bags of meat.  I'm definitely thinking I need to do this more with beef and pork as it will give us meat in our meals, but also makes the meat stretch, thus saving us money, which with the current economy we desperately need to do.

And there you go folks.  Some of the things we've been up to the last couple of weeks.  How about you?  Up to anything?

Sunday, December 23, 2018

Chrismas 2018: Gifts to the Family


Welcome to the second, and final, post on the gifts I'm giving for Christmas to the kids and husband this year.  I am going to do some things late or finish up a few gifts later on, but for now I'm just going to call what I have done good and feel grateful that I was able to get done what I did.  I am happy with what I did get done, anyway :).

So, let's get to the gifts I'm giving and/or made for the family this year!

First up let's start with the gifts I'm giving to my daughter.  I aimed for two gifts per person this Christmas.  I was going to aim for four, but just ran out of time, so embroidered pillow cases for the kids, some handkerchiefs for the husband and such are on the agenda for hopefully this coming week, but here's the two gifts that are currently under the tree.

First up we have a brush/art roll I made for my daughter.  I used materials I had on hand for everything I made this year, so I used some canvas material I had, a remnant of quilt binding that I had for the ties and binding and for the smaller pockets, I was originally going to make some out of canvas and then embroider them myself, but due to the time constraints I changed my mind.  Instead, I used an old pair of embroidered jeans that my daughter loved from when she was younger and cut out the embroidered parts, zig zagged around the edges and then sewed those on as pockets for smaller brushes or other art supplies.

I thought, overall, that it turned out pretty well and I think my daughter will like it.  She's getting some brushes and other painting supplies for Christmas, so I wanted to make sure she had a really nice place to put them all.

Next up isn't a gift I made, but one that I put together anyway.  Originally I wanted to make jewelry to put into this myself, but I didn't have time, so instead I found another way.

My daughter loves necklaces now and has been asking for a jewelry box for Christmas.  I couldn't find a nice one that I liked, though, so I figured I was out of luck.  And then my eyes lit upon my old jewelry box.  I bought the jewelry box when I worked at Walt Disney World when I was in college.  It was one of the items I had found, fell in love with, and was determined to pick up before I left Disney to go home.  And so I did.  And I kept that jewelry box for years.  A while back, though, my husband got me a bigger jewelry box that I loved, so I emptied out my smaller box and had just put it up and took care of it all of this time, not knowing what I wanted to do with it, but I just didn't want to get rid of it.  So, when my eyes fell upon the box, I realized that it was a perfect opportunity to give my daughter the box that I had fallen in love with all of those years ago.

To go in it, I included a necklace I had made for my sister a lot of years ago that she had sent me a few years ago with a bunch of jewelry that she didn't want anymore that I knew Armina would like (since it's purple and all).  Then I took a few other necklaces that I was able to find at the used stores and things over the last year and voila!  Now she'll have a nice beginning jewelry box and some necklaces to start her jewelry collection.  I know she'll love that one :).

All totaled I spent 2.00 on the gift to get a few of the necklaces.

Next up are the gifts I made for the son.

First up is a panel project I found at the used store.  The panel was 1.00.  I used fusible interfacing I had around the house to use as batting for the pages and used thread I already had, so the gift cost a total of 1.00 to make.  I know that the book is a bit young for the son, but he loves to flick things, so I am hoping he'll like to flick and flip the pages on the book and hey, if he can read I'm hoping that he'll get a kick out of reading "The Night Before Christmas" and enjoy the pictures too :).

I also made the son his yearly sensory cube as he absolutely LOVES these things!  Every year he plays with the cubes until he darn near destroys them, so I couldn't let him down this year.  For the materials this year I used materials I had around the house.  Leather, cross stitch fabric, striped upholstery type of fabric, fleece,  fake fur and a shiny velvety fabric.    I think he'll really like this one.  I made this one smaller than last year  so he'll enjoy it more as he really likes the smaller cubes versus the larger ones :).


And finally is the gifts I made for my husband.  He really liked the neck pillow I made him for Christmas last year (actually we both end up stealing it from each other we both like it so well *laugh*) and so I wanted to make some more this year, but with more stuffing in them so that they'd be more supportive on the neck.  Originally I had plans to embroider them like last year, but I didn't have time, so I'll just embroider them a bit later.  I was also going to make him some tool rolls, but he couldn't remember what he wanted me to make them for, so that got put onto the back burner until he can figure out if he wants some made or not :).

So, there you are folks.  What I've been basically doing yesterday afternoon and a good portion of today.  But, yay for getting the gifts done and under the tree!  That makes me feel good anyway :).

Merry Christmas everyone!

Sunday, December 16, 2018

Christmas 2018: Gifts from Daughter


Well, I was going to start posting up one gift a day on here, but with how busy I am and how far behind on gift MAKING I am, I'm going to have to do things different this year and just kind of do a "gift dump" post as I go along to show you what we've been working on around here for gifts.  I'm in panic mode on getting gifts done on time at this point and we still have cookies to make, gingerbread houses to make and decorate, Christmas cards to fill out, Santa letters to mail off and just all the general things you should gradually be getting done in December that did NOT happen gradually this year.

So, welcome to the amended "Gift a Day" series here on "The Make Do Homemaker".  May you, hopefully, find some inspiration on what you can make for your family and friends this year in the process :).

Today, I decided we'd start off with the gifts my daughter has decided to give out, so far, for Christmas.  So, let's get to those!

 First off, up top we have some of the gifts my daughter is giving to Alvah for Christmas. 

We were at the used store right after Thanksgiving and I hear my daughter let out an excited shout.  I turn around to her trying to remove a small Snoopy from the stuffed animal rack (it had a clip on it to clip onto a backpack or something that was kind of hard to remove from the stand).  She smiled as she asked for my help and said, "Look!  It's brand new!  I want to get that for Alvah for Christmas!".  Alvah loves Snoopy and has since he was little and I was impressed with her eye for finding that one.  I helped her remove the Snoopy, which was missing a price tag, and we went up to see how much it was.  When we found out it was .50, Armina was doubly proud as she knew she was getting a gift Alvah would love super cheap.  I am so proud that I'm passing down the bargain hunting thought process to the next generation *sentimental tear*.

We were than sitting at home later that same day and Armina was brainstorming on what else to give to Alvah for Christmas (he's kind of hard to shop for, go figure) and her eyes fell upon a small bottle of water that Alvah had gotten from his teacher as part of a Halloween gift bag.  I'd drank the water and had put the bottle down on the table and Armina snatched the bottle up and asked if we could make a small sensory bottle out of it for Alvah as she knew he liked the ones I've made him in previous years. 

Armina had to sacrifice a small bottle of glitter she'd gotten with a nail polish kit from one of her Aunts as I couldn't find any glitter in the house to save my life and then I helped her with the corn syrup and distilled water solution to make the glitter float.  She chose the color of the water as she wanted the glitter to really show up well (which it does) and then I super glued the lid onto the bottle.  It came out nice looking and cost us nothing to do as we had all the materials around the house to make it.

When we were at the store the next day I pulled out a coupon for a free box of Jolly Time popcorn we'd gotten in the mail for taking a survey about popcorn consumption.  Armina had helped me take the survey (I know, weird thing to do together, but I take the time with the kids when I can get it) and her eyes lit up when she saw the coupon and asked if she could have it to buy Alvah a box of his favorite microwave popcorn for Christmas. 

At this point the child was on a roll *laugh*.

I was digging around in my closet looking for a certain bunch of Christmas decorations and stumbled across a snow globe you could personalize that I had bought at 90% off at Target years ago.  I had been using a bunch of those types of gifts for years to help pad out Christmas gifts and this was pretty much the last one in the stash.  Armina asked if we could make a snow globe for Alvah to go under the tree too as Alvah really likes snow globes.  Since it was plastic, I said sure and Armina chose a Christmasy scene from the front of some old Christmas cards we had and we put the scene into the snow globe.  So, another gift down for near free (I mean I think the snow globe ended up being about .50 after the clearance discount years ago).

We then checked the mail that same day and one of my product missions came in from "The Upside" a new product testing outfit I signed up for through Smiley360.  "The Upside" just does health and beauty products and my first mission was for "Udderly Smooth" lotion.  I tried out a small amount on Alvah's eczema (a really tiny amount since you never know how his skin is going to react) and then Armina asked if we could wrap the tubes up so she could give them to dad for Christmas for his cracked heels.  She was super excited about the idea because shopping for dad is even harder than shopping for Alvah (and she does have a good point there *laugh*).

So, yeah, so far when it comes to Christmas gifts my daughter is totally whomping me on getting those done.  I'm proud of her, though.  She put thought into each gift and still managed to do it on a shoe string budget.

So, stay tuned as (hopefully) I get to share some of the gifts I'm working on around here for Christmas as well.

Wednesday, December 23, 2015

A Christmas Light Adenture

Twas the week before Christmas and all in the Mat-Su Valley were trying to see Christmas lights at the Alaska State Fairgrounds.

Sure, I could have tried to make that rhyme, but with the exception of a couple of twisted little poems I've done in my time, poetry and me...yeah...we don't get along.

Anyway, back to my tale...

Last week we went and saw the Christmas "Bright Up the Night" light display at the Alaska State Fairgrounds.  Armed with the instructions that the website provided (enter at Green Gate, wherever that was, and exit at Red Gate, admission free, hours of operation, etc) we managed to get the kids into the car, and I only put my son's shoes on the wrong feet twice in the process!  I packed the children snacks and some drinks just to be safe from temper tantrums while we were out and we set off.

We got to the Alaska State Fairgrounds without much incident, but we had no idea where Green Gate was (we don't go to the fair primarily because of my son and crowds).  The fairgrounds are of a decent size, for those who don't live around here, and are set up with roads on all sides of the Fairgrounds.  So, the first place we checked was the main fairground "gate".  Turned out that was Purple Gate and was locked, so my husband shot down the road a bit further and turned the corner, figuring we could get into the Fairgrounds a back way and then just drive around to where we needed to be. 

Nope.  All the entries were locked and we did a couple of U-Turns to find our way.

We finally turned back onto the highway and headed toward the Fairgrounds from a different way than when we started and finally saw an open gate, so we turned to go in.  Driving down the not well lit road we quickly saw a nice big orange sign with white letters that read, "Event" (or something similar) with an arrow and we figured, "Ah ha!  We have it now!" and drove in the direction that the sign pointed.  Another sign pointed us to enter through a gate and so we did, me noticing with a sense of unease that the gate we were ENTERING through was actually Red Gate. 

And so we followed a few more signs, all pointing us toward the "Event" and we could indeed see the Christmas lights off in the near distance, so we figured that the signs were pointing us the way.  And then suddenly the signs just weren't THERE anymore.

My husband and I, confused, tried to logic out what had happened and we drove around a bit in the back lot area of the Fair.  Finally my husband saw where we needed to go about 30 feet in front of us, but we were blocked from just driving to where we needed to be due to there being a large portion of grass and other "unknowns" before we could get there.

Finally my husband just decided to back track completely and see if we'd missed a sign.  By this point we were seeing the humor in our situation and laughing a bit at the signage, my husband joking that they'd put up the signs to confuse people and make them drive right back out of the fairgrounds.

When we were almost through the entrance/exit area where we'd come in, my husband looked off to the right and saw that the Christmas light area we were trying to get to might be accessible through a side street that you could barely make out and so he decided to take a chance and drive through the side street.

And sure enough suddenly we were in the Christmas lighted area.  We suddenly saw "Please Stay in Your Vehicle" signs on the road, but we'd have to crane our necks to see behind us to see what the signs were saying.  We quickly realized we were going through the event we'd been seeking backwards.

My husband drove until we were at the very beginning (or ending?) of the event and turned around so we could drive through the right way.  I took some pictures as we drove and we were relieved we were going through the event the right way this time and wouldn't have to worry about possibly running into another car going the right way through.  Suddenly signage started making sense and directions were clearer as we drove through the actually relatively small event (although the kids loved it :).

I was really starting to feel kind of stupid that we'd gotten lost so much and mentioned to my husband that I kept wondering if we'd missed some signs or something along the way. 

It was then that we noticed the cars.

We looked off into the night and there were cars EVERYWHERE around the event, but none of them driving through the actual event.  There were lines of cars that were ringing the event anywhere there were roads in the back lot area.  It was then that we started to really laugh as we started joking that this was going to be the one event that everyone would see from the outside in first.

By the way we did finally find Green Gate.  We went looking for it once my husband was sure where the entrance was, figuring that there had to be a road where the gate was.  It was marked by one little itty bitty sign that proclaimed the display and that was it.  No where to be had was a bright orange sign proclaiming "Event".

If nothing else, this gave us an adventure that my daughter will always remember as she laughed so much that night she cried *laugh*.

Thursday, December 17, 2015

A Gift a Day Gift Thirty-Four: The "Black Watch Plaid" Quilt

Well, so I THINK we have finally come to the final gift in my "Gift a Day" series.  Not exactly the "low key" December I had planned, but at least I got it all done before the start of Christmas break, thus I won't have to worry about my son destroying the house while I'm obsessively running the sewing machine.

Course, I could be forgetting something, which has been known to happen, but I'm hoping I got everyone covered and all the gifts accomplished for the year.

This final gift is a gift to my husband and son, in that I MADE it for my husband, but I'm thinking my son will immediately claim it as anything blanket related he tends to grab as soon as he sees it.

Some people take great pride in being Irish or Swedish or Italian.  My husband takes great pride in having some Scottish blood in him. 

Years ago (like 12 or so) I tried to get a hold of enough Black Watch plaid to make a kilt for my husband, but I was never able to get a hold of very much at one time before Jo Ann's sold out of it, even when I special ordered it!  I have a few 1 yard scraps from all of those years ago and thought about maybe making my husband a quilt out of those somehow this holiday season.

And then I ran across a nice big chunk of black watch plaid in a high quality woven fabric and bought it at the used store for 1.50 a while back.  I finally pulled out all three remnants of fabric and picked the longest one to make my husband a quilt out of this year, and the woven fabric won on length and width.

I just used the plaid as a big center panel in the quilt and then added strips of dark blue I cut from a queen sized flat sheet I had in my fabric stores.  I was able to even get the bottom for the quilt out of the same sheet with just a teeny tiny bit left over, which worked great for me.  The final product ended up being somewhere between a twin and a full sized quilt, but I know it'll work well for my husband to curl up in on his recliner or in his desk chair, so I was happy enough with the final size.

I then quilted the final quilt with some green thread my step-mom sent me.  I ended up buying some quilt binding for the quilt as all I had was one container of this color or that color of quilt binding and I wanted it to look nice, so I just bought new instead.

Total Cost to Make Gift:  About 9.00 for the quilt binding and 1.50 for the original remnant of fabric.  I'm not sure what the original cost on the sheet was since I've had it for a long time, so I'm not counting that cost.  The batting I had bought at a yard sale for .50 a couple of years ago.  So all totaled about 11.00.

I used quilt basting spray vs. pins, but the basting spray was leftover from a previous project I had done, so I'm not counting it in with the cost of the final product here.

Total Time to Make Gift:  About four hours, as the quilt came together pretty quick and quilt basting spray is a wonder of wonders to make life easier.

Tuesday, December 15, 2015

A Gift a Day Gift Thirty-Three: Fur Pillow


My son, being the sensory seeking little thing he is, I really wanted to make him something with fake fur because he LOVES it (mainly loves plucking it and watching it float, really).  Originally I REALLY wanted to make one of those awesomely cuddly looking throws with the fur on one side and something cool, like flannel or cable knit, on the other, but I realized I didn't have near enough fake fur right away and I was wondering before THAT if I'd be able to dig up enough material for the other side of a throw anyway.  So, I let the little gears in my head turn and finally came up with the idea of making him a fur pillow.

I know there are some draw backs to this as it's not even a pillow sham (I didn't think fake fur would make a good pillow sham, honestly), but an actual throw pillow.  One:  I'm sure this fur isn't able to go through the dryer and washing it might mat up the fur.  Two:  If my son starts plucking it and creating bald spots, you can't just flip it over like you could a throw and hide it.

But, I also figured that the fake fur was given to me by my husband's grandfather in a sack of cloth that used to be his wife's and I think Molly would be happy with the idea of a child getting enjoyment out of something like this while it lasts.

We'll see how it holds up over time.

I just cut a basic shape of a throw pillow out of the fur, using as much of the fur as I could (thus why it's rectangular vs. square and has a few places where it's a BIT off of straight), put right sides together and sewed it up with a 1/2 inch inseam.  I left about a four inch hole to stuff it (I have small hands, which helps for things like this) and then hand stitched the last bit shut with a whip stitch when the pillow was stuffed.  

Total Cost to Make Gift:  Free.  The batting came from the bags of batting I found in storage over the summer and the fake fur was given to me.  The thread came from the stash of thread my step-mom gave me.  I did switch out the needle on my sewing machine to a heavy duty denim needle for this, but that was also given to me by my step-mom (have I mentioned my love of that woman lately?  :).

Total Time To Make Gift:  About an hour.  The batting in the bag was the nice heavy duty fill, but it did NOT want to un-clump from it's huge lump in the bag, so I spent a good portion of time getting coated in fiber fill as I had to tear one small chunk at a time off of it to stuff the pillow.  Got done right about the time I was starting to get frustrated *laugh*.

Sunday, December 13, 2015

A Gift a Day Gift Thirty-Two: Photo Cards

This is kind of a combination gift and also Christmas card to the grandparents in the family.   I normally try to send out gift cards to my extended family, but didn't have much money to spare this year so the gift cards were kind of on the pathetic end of puny.  This, sadly, has been a continuing trend the last three years or so, but I figure one thing I can do to help make up for it is to make sure my step mom and my mom get current pictures of the kiddos.

I printed off the pictures of the kids myself.  I always buy the photo CD from the school picture taking people and print off the photos myself so I can control the size and number of photos I get.  Only downside is you only get one background to choose from, but I still think it's worth it for 15.00 per disc.

I printed off enough pictures for the grandparents and put them in different cards I had.  The ones I made for my mother and father-in-law are seen above.  I bought a bunch of  "print it yourself" cards at a yard sale one year for .50 (for packs of 50 cards) and these cards were one of the various styles.  They had a spot in the front to put your child's picture and I thought they were really pretty Christmas cards.

So, I printed off a picture of each kiddo and put them in the photo holder spot on the cards.  This way if my in-laws want to frame the photos they'll have a nice Christmas themed mat that they can just cut down to the size of their photo frame.

The cards that were going across country, however, I put those photos in regular nice and thick Christmas cards so that the at-home printed photos will survive the trip without getting beat up and scratched.  I figure my mom and step mom would appreciate the extra step for protection vs. hopefully getting really cute cards in the mail.

Total Cost of Gift:  I'm not really sure as I'm still working on the starter cartridges for my printer, but I'll estimate about .15 per card or so.

Total Time to Make Gift:  About an hour to get the sizes set right, get things cut out and envelopes addressed, etc.